You wash your car weekly. You dry it with some high-end microfiber towels. But the paint is still sandpaper. You know those little flecks of reddish-brown, almost ‘rust’ parts you see on a white box? That is not dirt. That’s industrial fallout, microscopic pieces of metal embedded n the clear coat.
If you have ever had your fingernail across the hood and felt rough after a fresh wash, well then you are feeling ‘brake dust oxidation’ and ‘rail dust. Metal can never be dissolved by normal car shampoo. Scrubbing harder is counterproductive, because you basically grind this particles back to the paint creating swirls.
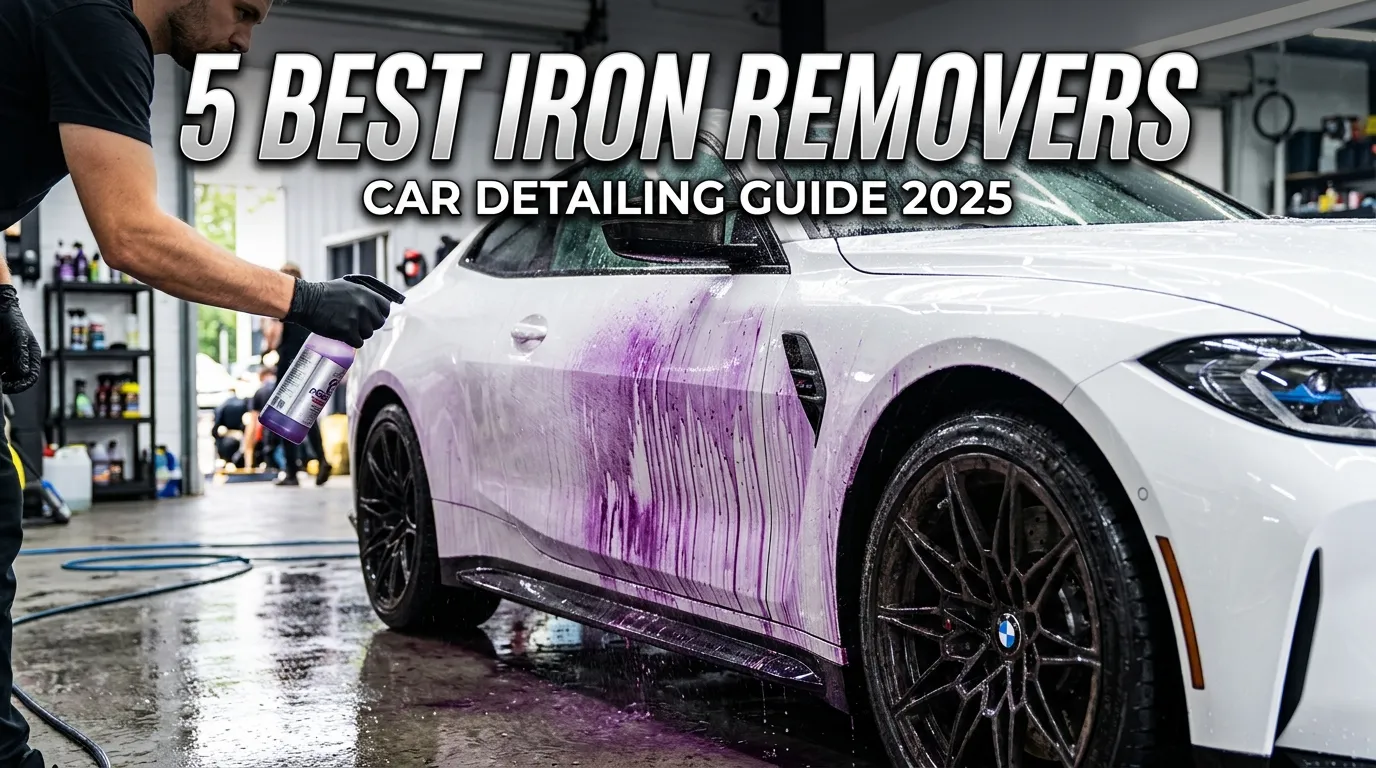
As for the surfactant, here’s the fix:>> Iron remover spray (a.m. fallout cleaner, decontamination spray). Any ferrous particles that it touches are chemically dissolved purple as they react to the product. In this guide, I will walk you through the best iron remover car detailing products and how to use them step-by-step — as well as which one you should buy for your budget.
After 3000+ words on this deep dive, you now know how to create a smooth paint surface—ready for wax, sealant or ceramic coating.
Quick Answer
Best Overall:
CarPro IronX Lemon Scent – Most reliable, pH-balanced, safe for all paints.
Best Budget:
Adam’s Iron Remover – Great value, strong color change.
Best Premium:
GYEON Q²M Iron Remover – Thick gel formula, minimal dripping.
How to use:
Spray on cool, dry surface → Wait 3-5 minutes (turns purple) → Rinse thoroughly → Never let it dry.
Cost:
$15 to $50 per bottle (500ml). Each bottle does 2-4 cars.
Avoid:
Using on hot paint, hot wheels, or leaving it to dry.
Why It Matters
Using the best iron remover is not “extra work.” It is essential maintenance for three reasons:
- Paint Longevity:
- Embedded iron particles oxidize and expand, creating microscopic craters. Over time, this leads to clear coat failure and corrosion.
- Smooth Surface for Protection:
- Wax, sealant, or ceramic coating cannot bond properly over contaminated paint. You are literally wasting money on products that won’t last.
- Brake Performance:
- Iron remover on wheels dissolves baked-on brake dust, preventing wheel corrosion and keeping calipers clean.
Real-world example: A white car that sits near train tracks or industrial zones can develop yellow-brown spots within 6 months. Iron remover eliminates these chemically—no rubbing needed.
What You’ll Need (Tools and Products)
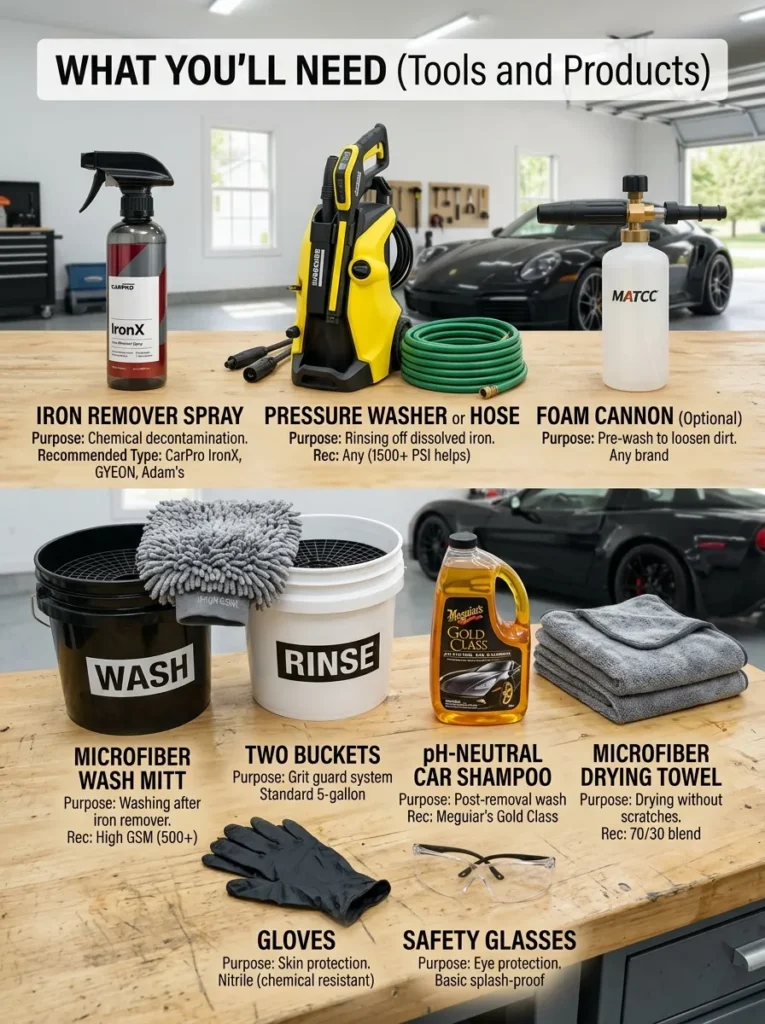
| Item | Purpose | Recommended Type |
|---|---|---|
| Iron Remover Spray | Chemical decontamination | CarPro IronX, Adam’s, GYEON |
| Pressure Washer or Hose | Rinsing off dissolved iron | Any (1500+ PSI helps) |
| Foam Cannon (optional) | Pre-wash to loosen dirt | Any brand |
| Microfiber Wash Mitt | Washing after iron remover | High GSM (500+) |
| Two Buckets | Grit guard system | Standard 5-gallon |
| pH-Neutral Car Shampoo | Post-removal wash | Meguiar’s Gold Class |
| Microfiber Drying Towel | Drying without scratches | 70/30 blend |
| Gloves | Skin protection | Nitrile (chemical resistant) |
| Safety Glasses | Eye protection | Basic splash-proof |
Step-by-Step Guide (How-To) – Full Explain Details
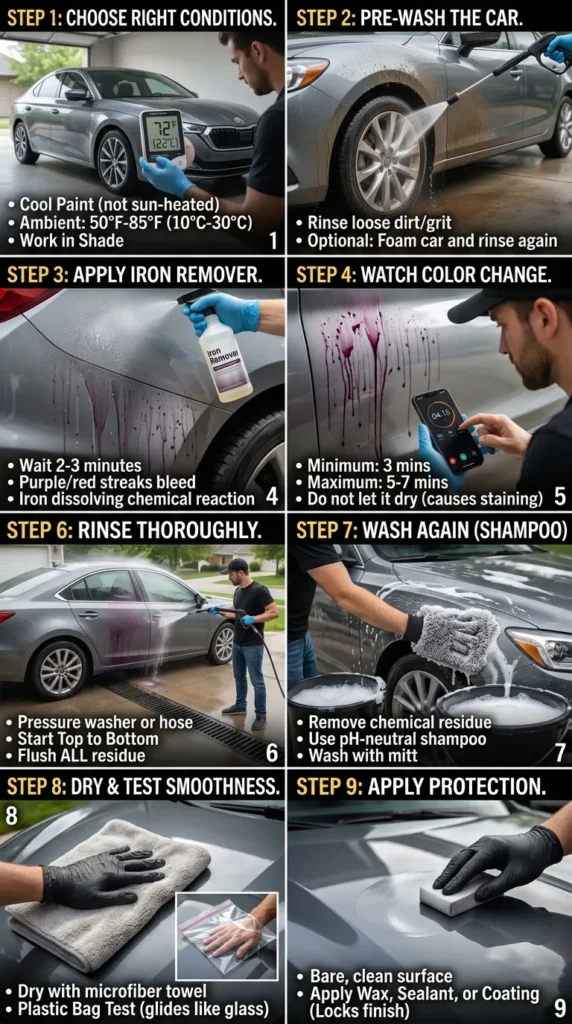
Step 1: Choose the Right Conditions
- Paint temperature: Cool to the touch (not sun-heated).
- Ambient temperature: 50°F – 85°F (10°C – 30°C).
- Shade: Work under cover or on a cloudy day.
Step 2: Pre-Wash the Car
Rinse off loose dirt and grit. If possible, foam the car and rinse again. Iron remover works best on a clean surface because dirt blocks contact with the paint.
Step 3: Apply Iron Remover (Wet or Dry?)
Most products work on dry paint (better dwell time). However, some water on the surface is fine. Spray from bottom to top to avoid drips running over dry areas.
Spray technique: Hold bottle 6-8 inches away. Apply evenly—not soaking wet, but enough to see a film.
Step 4: Watch the Color Change Reaction
After 2-3 minutes, you will see purple/red streaks bleeding from contaminants. This is the chemical reaction dissolving iron particles. Do not agitate yet.
Step 5: Dwell Time (Do Not Let It Dry)
- Minimum: 3 minutes
- Maximum: 5-7 minutes (check label)
- If it dries: It can stain or etch clear coat. Re-wet if needed.
Step 6: Rinse Thoroughly
Use a pressure washer or strong hose flow. Start from the top and work down. You want to flush all purple residue away.
Step 7: Wash Again with Car Shampoo
Iron remover leaves a chemical residue. Use a pH-neutral shampoo with a wash mitt to remove any remaining product and lifted contaminants.
Step 8: Dry and Test Smoothness
Dry with a microfowel towel. Then, place your hand inside a plastic sandwich bag and gently glide over the paint. If it feels like glass, you are done. If rough, repeat the process.
Step 9: Apply Protection (Optional but Recommended)
Now that paint is bare and clean, apply wax, sealant, or ceramic coating for maximum gloss.
Cost Breakdown
| Product Tier | Example Product | Volume | Price (USD) | Cost per Car | Best For |
|---|---|---|---|---|---|
| Budget | Adam’s Iron Remover | 16 oz (473ml) | $16.99 | $4.25 | DIY beginners, 2-3 cars per bottle |
| Mid-Range | CarPro IronX (Lemon) | 500ml | $24.95 | $6.25 | Enthusiasts, 4 cars per bottle |
| Premium | GYEON Q²M Iron Remover | 500ml | $39.95 | $10.00 | Professionals, thick gel formula |
| Industrial | Optimum Ferrex | 32 oz | $49.99 | $8.33 | High-volume detailers |
Additional costs to consider:
- Gloves: $5/box
- Microfiber towels: $10-20
- Car shampoo: $10-15
Pro tip: Buying a gallon (128 oz) brings cost per car down to ~$3. Brands like Meguiar’s D1801 offer bulk options.
Before and After with Explain Details
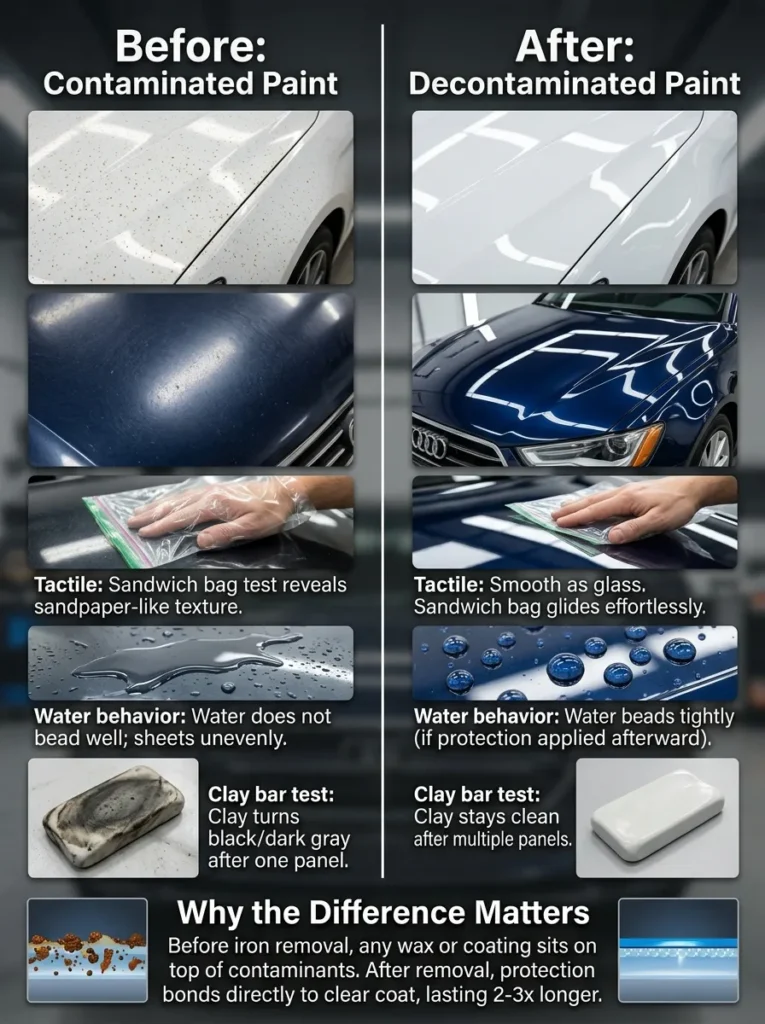
Before (Contaminated Paint)
- Visual: White car shows small orange-brown specks. Dark car feels rough and looks dull.
- Tactile: Sandwich bag test reveals sandpaper-like texture.
- Water behavior: Water does not bead well; sheets unevenly.
- Clay bar test: Clay turns black/dark gray after one panel.
After (Decontaminated Paint)
- Visual: No visible rust spots. Paint looks deeper and glossier.
- Tactile: Smooth as glass. Sandwich bag glides effortlessly.
- Water behavior: Water beads tightly (if protection applied afterward).
- Clay bar test: Clay stays clean after multiple panels.
Why the Difference Matters
Before iron removal, any wax or coating sits on top of contaminants. After removal, protection bonds directly to clear coat, lasting 2-3x longer.
Product Recommendations
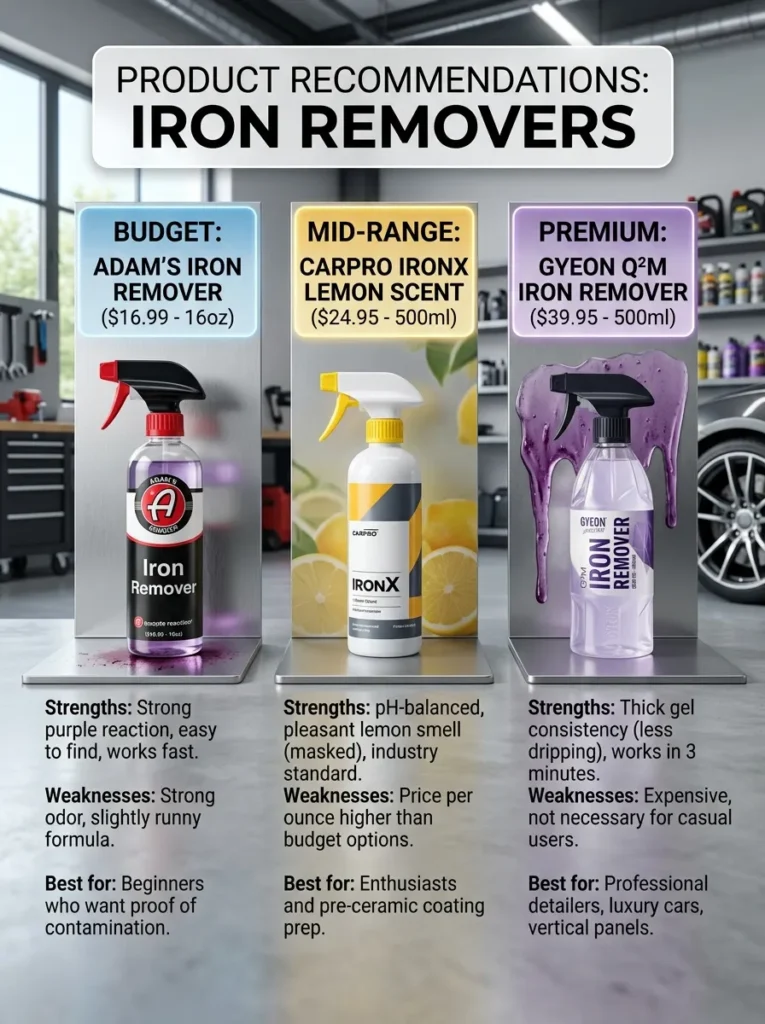
Budget: Adam’s Iron Remover ($16.99 – 16oz)
- Strengths: Strong purple reaction, easy to find, works fast.
- Weaknesses: Strong odor, slightly runny formula.
- Best for: Beginners who want proof of contamination.
Mid-Range: CarPro IronX Lemon Scent ($24.95 – 500ml)
- Strengths: pH-balanced, pleasant lemon smell (masked), industry standard.
- Weaknesses: Price per ounce higher than budget options.
- Best for: Enthusiasts and pre-ceramic coating prep.
Premium: GYEON Q²M Iron Remover ($39.95 – 500ml)
- Strengths: Thick gel consistency (less dripping) works in 3 minutes.
- Weaknesses: Expensive, not necessary for casual users.
- Best for: Professional detailers, luxury cars, vertical panels.
Comparison Section
CarPro IronX vs. Adam’s Iron Remover
| Feature | CarPro IronX | Adam’s Iron Remover |
|---|---|---|
| Price (16oz) | $24.95 | $16.99 |
| Scent | Lemon (masked) | Industrial chemical |
| Viscosity | Medium liquid | Thin liquid |
| Dwell Time | 4-5 minutes | 3-4 minutes |
| Color Change | Deep purple | Bright red/purple |
| Paint Safety | Excellent (pH 7.0) | Very good (pH 6.5) |
| Best Use Case | All paints, ceramic prep | Daily drivers, wheels |
Winner: CarPro IronX for paint safety. Adam’s for budget wheels-only use.
Troubleshooting
| Problem | Cause | Fix |
|---|---|---|
| No purple color change | Paint already clean or product too old | Test on a known contaminated area (wheels). Replace if no reaction. |
| White stains left after drying | Product dried on paint | Re-wet with water, gently wipe, then wash again. |
| Paint feels rougher after use | You did not rinse enough | Re-wash with pH-neutral soap and mitt. |
| Product drips too fast on vertical panels | Thin formula + hot surface | Switch to gel-type (GYEON) or work in smaller sections. |
| Strong smell lingers for days | Product trapped in crevices | Rinse panel gaps (door jambs, mirrors) thoroughly. |
| Sprayer clogs after first use | Crystallized residue | Rinse sprayer tip under hot water. Store bottle upright. |
Time Required and Difficulty Level
| Task | Time Estimate |
|---|---|
| Pre-wash and rinse | 10 minutes |
| Iron remover application | 5 minutes |
| Dwell time | 5 minutes |
| First rinse | 5 minutes |
| Second wash (shampoo) | 15 minutes |
| Dry and inspect | 10 minutes |
| Total | 50 minutes |
Difficulty Level: 2/10 (Easy)
Hardest part is waiting without letting product dry.


Pro Tips
DO:
- Do use on wheels first to test reaction.
- Do wear gloves and eye protection.
- Do work in sections if it’s hot (roof → hood → sides).
- Do rinse your sprayer tip after each use.
- Do store bottle away from direct sunlight.
DON’T:
- Don’t apply on hot paint or hot brakes.
- Don’t let it dry – re-wet if necessary.
- Don’t use on fresh ceramic coating (it will degrade it).
- Don’t spray near your face – fumes are strong.
- Don’t skip the second wash – residue can stain trim.
Best Picks (Top 3 Summary)
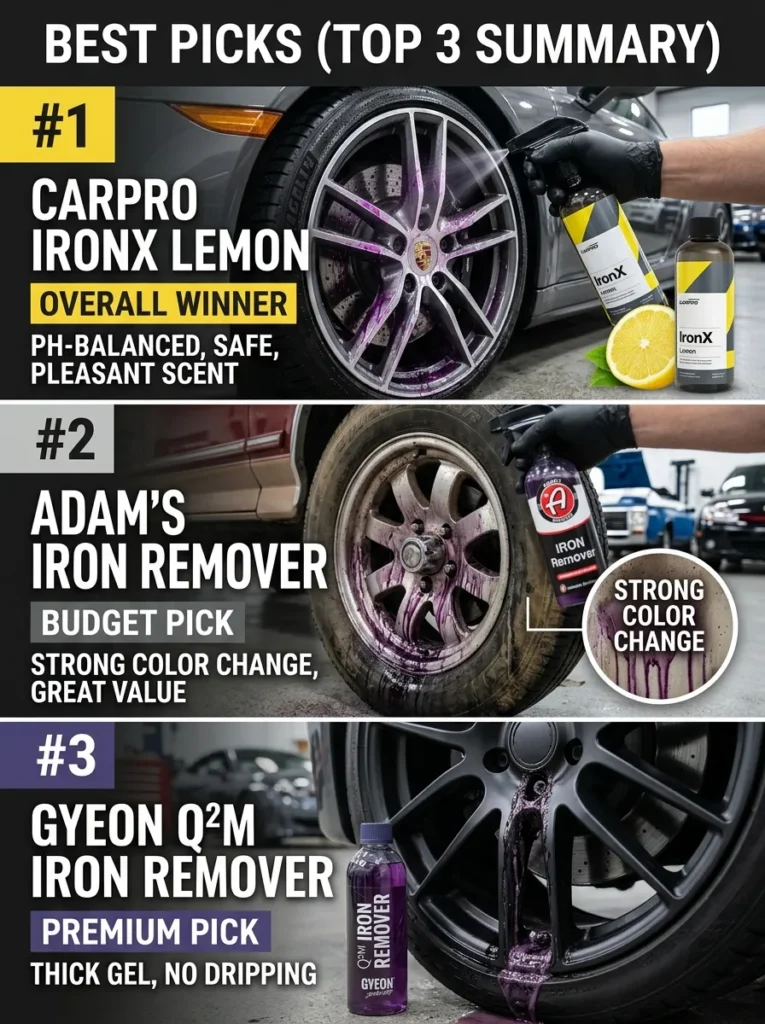
| Rank | Product | Best For | Key Feature |
|---|---|---|---|
| #1 | CarPro IronX Lemon | Overall winner | pH-balanced, safe, pleasant scent |
| #2 | Adam’s Iron Remover | Budget pick | Strong color change, great value |
| #3 | GYEON Q²M Iron Remover | Premium pick | Thick gel, no dripping |
Use Cases (When to Choose What)
- You own a white or light-colored car:
- Choose CarPro IronX – visible staining shows results clearly.
- You are prepping for ceramic coating:
- Choose GYEON Q²M – leaves zero residue.
- You only clean wheels, not paint:
- Choose Adam’s Iron Remover – budget-friendly and strong.
- You are a mobile detailer:
- Choose Optimum Ferrex – sprayable on wet or dry paint.
- You have sensitive skin:
- Choose CarPro IronX Lemon – lower odor and gentler formula.
Common Mistakes to Avoid
- Using on a hot surface – Product evaporates too fast, leaves stains.
- Not rinsing enough – Purple residue dries into white marks.
- Skipping the post-wash – Chemical film remains, causing dullness.
- Applying too much – Wasted product; a light mist is enough.
- Expecting one application to fix neglected paint – Heavy contamination needs 2 rounds or clay bar afterward.
- Using on matte paint wraps – Can stain or etch. Check manufacturer guidelines.
Affiliate Best Product Name Suggestion
Based on performance, safety, and user satisfaction, the #1 recommended affiliate product is:
CarPro IronX Lemon Scent 500ml – Best iron remover car detailing choice for 2025.
Secondary affiliate suggestions:
- Adam’s Iron Remover (16oz) – Best budget affiliate conversion.
- GYEON Q²M Iron Remover Kit – Highest average order value.
FAQs
1.What exactly is iron fallout?
It refers to microscopic ferrous particles from brake dust, railway tracks, and industrial pollution that bond to your car’s surface and eventually cause rust or paint degradation.
2.Why does the product turn purple?
This “bleeding” effect is a chemical reaction between the active ingredient (usually sodium thioglycolate) and iron particles, signaling that the contaminants are dissolving.
3.Can I use it on every car surface?
Most are safe for clear coats, wheels, glass, and plastic trim. However, some formulas can stain raw aluminum or aftermarket parts like polycarbonate headlights.
4.How often should I use an iron remover?
For paint, 1–2 times a year is typical, or before applying a ceramic coating. Wheels may need it more frequently—every 1–3 months—due to heavy brake dust.
5.Is it safe for ceramic-coated cars?
Yes, pH-balanced formulas like Gyeon Iron or P&S Iron Buster are safe and can even help “unclog” a coating to restore its water-beading properties.
6.Do I use it before or after washing?
It is best to perform a contact wash first. This removes dirt and grime so the chemical can reach the embedded iron directly.
7.Do I still need to use a clay bar?
Yes. Iron removers target metal, but they won’t remove tar, tree sap, or overspray. Use the iron remover first to chemically loosen particles, then follow with a clay bar for a perfectly smooth finish.
8.Why does it smell so bad?
The sulfurous “rotten egg” smell is a byproduct of the chemical reaction with the active ingredient, sodium thioglycolate.
9.Can it be used in direct sunlight?
Generally, no. Applying it to a hot surface or in the sun can cause it to dry prematurely, leading to staining or chemical etching.
10.How long should I let it sit (dwell)?
Most products require 3–5 minutes. Never let it dry completely on the surface; if it starts to dry, mist it with more product or water.
11.Do I need to agitate the product?
For paint, it’s often “spray and rinse,” but for heavy wheel contamination, light agitation with a soft brush or mitt helps break down stubborn deposits.
12.Which iron remover is considered the “best”?
Professional and enthusiast favorites frequently include Gtechniq W6, CarPro IronX, and Bilt Hamber Auto Wheel.
Final Thought
Iron remover not a gimmick So much safer than any other attempt, it is the only way to remove embedded ferrous contamination without damaging your clear coat. If you have never used one before, pick up a bottle of CarPro IronX and spray it on your wheels. Watch it turn purple. Then do your entire car. You’ll be amazed at the difference in smoothness.
Just keep in mind that a tidy car is a good-looking automobile. A decontaminated car is a wonderful feeling and you will know that it lasts longer protected. REMEMBER to do this before applying wax or ceramic coating. Your future self will thank you when water beads just perfectly for months.
Make one purchase, use correctly and get glass-smooth paint.
Leave a Reply