You bought a dual-action polisher. You watched the YouTube tutorials. You have the compound (AND the microfiber towels)# However, ztart buffing and the results are… disappointing. Swirl marks remain. Haze appears. It looks worse than when you came.
Problem is nobody ever tells you this: That buffing pad seems to be as important as the polisher and compound. Wrong pad density and you remove too much clear (disaster), or donothing at all (waste of time). If you use a used pad (for example), you rinse old compound history into your new paint.
Color-coded by cut level, plate, and foam densities or wool blends; also made to manage heat. The information here will let you know exactly what pads to purchase for heavy cutting, medium polishing and fine finishing. Wool vs Microfiber—You can grasp everything about foam. Youll even receive 10 personalized product recommendations by budget type.
Quick Answer
What are the best buffing pads for car detailing?
| Category | Best Pad Kit | Price | Best For |
|---|---|---|---|
| Overall Best (Foam) | SPTA 6.5″ 5-Piece Kit | $20-25 | Heavy to light cutting, all-in-one |
| Professional Grade | Rupes Foam & Wool Pads | $40-60 each | Show car finish, pros |
| Best Budget | CAR ROAD 7-Piece Kit | $15-20 | Beginners, occasional use |
| Best for Drills | Kshineni 3″ Drill Kit | $18-22 | Tight spots, headlights, mirrors |
| Best Microfiber | Mothers 5″ Microfiber 6-Pack | $15-18 | Wax/polish application |
| Best Wool (Heavy Cut) | IPELY 6″ Wool Kit | $20-25 | Heavy oxidation, deep scratches |
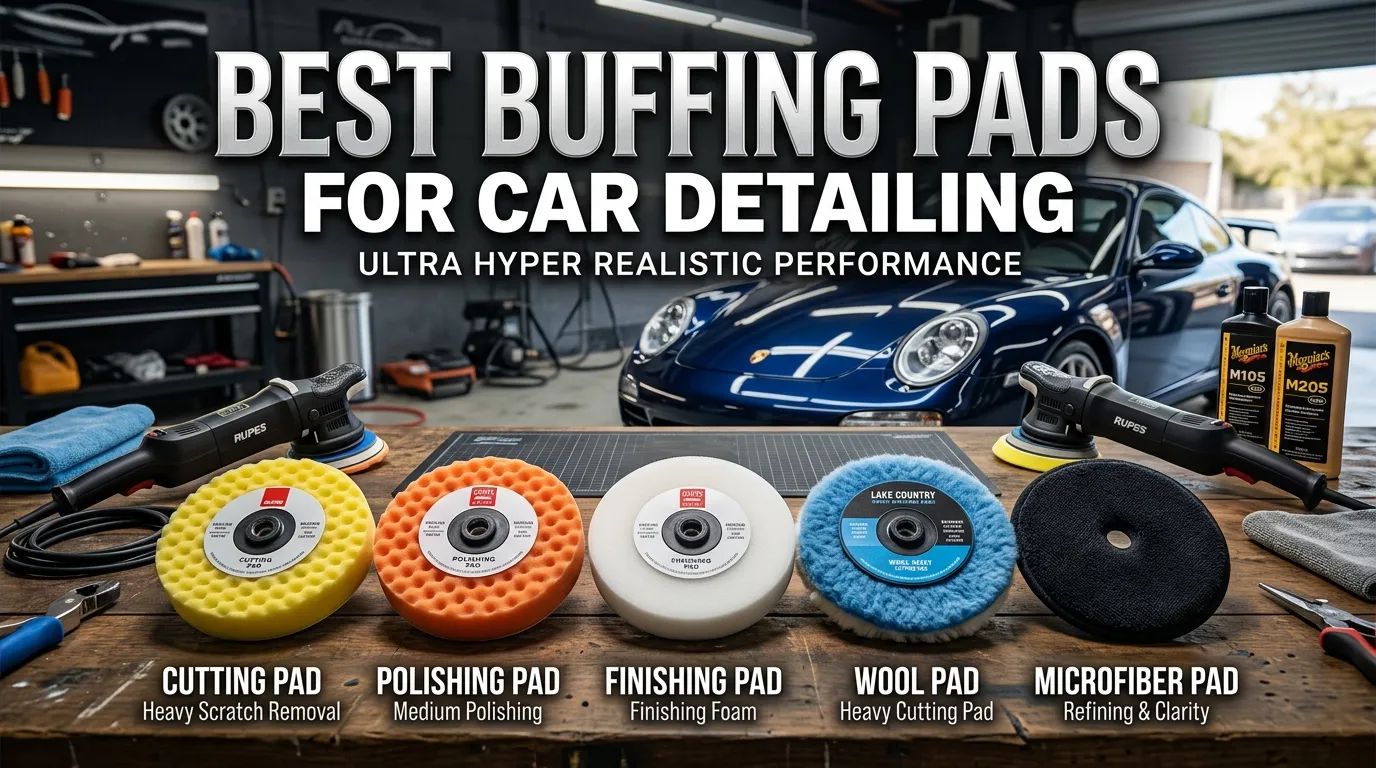
Pad Color Code Quick Reference:
- Yellow/Green = Heavy cutting (deep scratches, oxidation)
- Orange = Medium cutting (swirl marks, light scratches)
- White/Blue = Polishing (haze removal, gloss enhancement)
- Black/Red = Finishing (wax, sealant, final glaze)
Why It Matters
Why should you invest in quality buffing pads instead of using the one pad that came with your polisher?
- Prevents Clear Coat Damage: The wrong pad generates excessive heat. Too much heat burns through clear coat in seconds. A $300 paint correction becomes a $3000 respray. Quality pads manage heat dissipation .
- Consistent Results Panel to Panel: Professional detailers use 3-4 pads per stage of correction. A fresh pad performs the same on the last panel as the first. A worn pad leaves swirl marks and uneven finish .
- Faster Correction Time: The right pad with right compound combination cuts correction time by 50%. A heavy-cut wool pad removes oxidation in 2 passes that would take 6 passes with a finishing foam pad.
- Longer Pad Life: Quality pads are washable and reusable. A $20 pad that lasts 20 details costs $1 per use. A $5 cheap pad that delaminates after 2 uses costs $2.50 per use – more expensive.
- Professional Finish Quality: Foam density, pore structure, and backing plate adhesion determine whether you get a mirror finish or holograms (micro-scratches visible in sunlight). The best pads deliver showroom results .
What You’ll Need
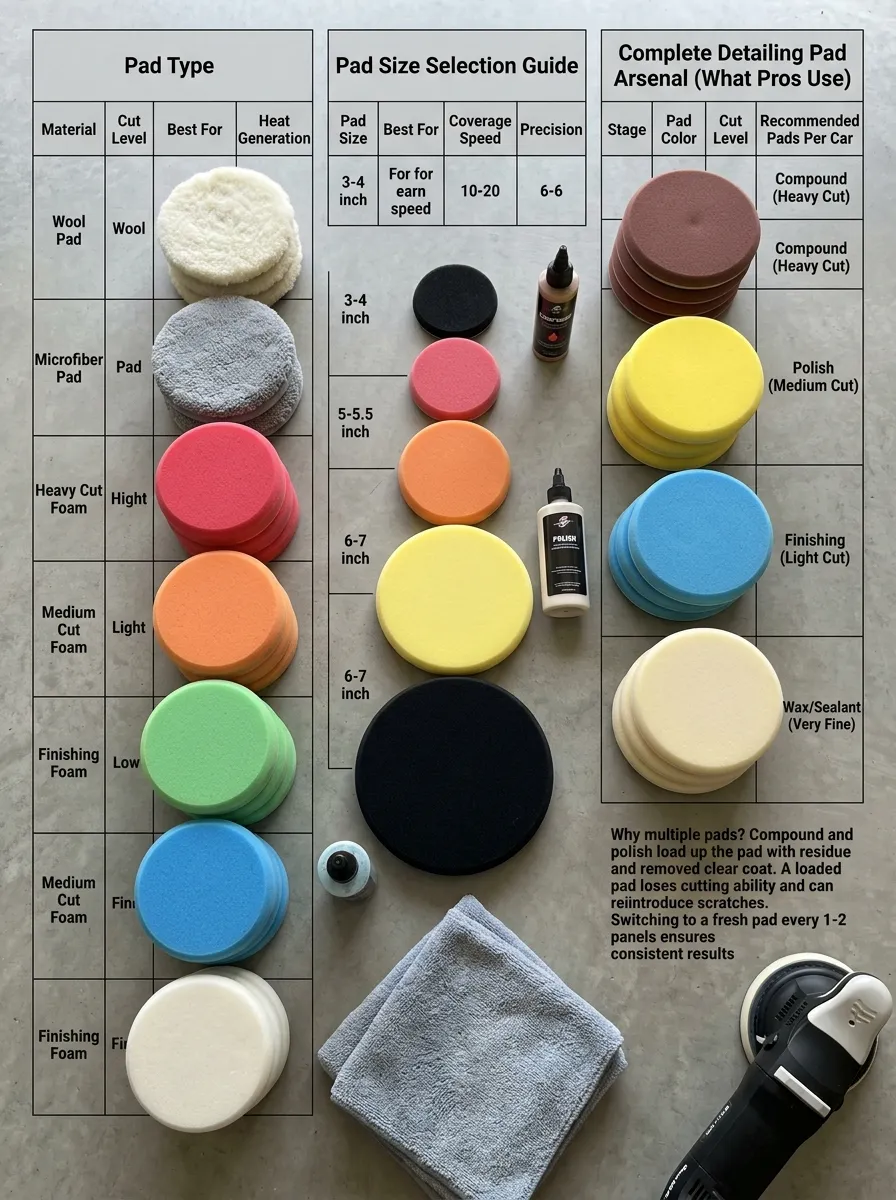
| Pad Type | Material | Cut Level | Best For | Heat Generation |
|---|---|---|---|---|
| Wool Pad | Natural or synthetic wool | Heavy | Deep scratches, oxidation, heavy compounding | High (use with caution) |
| Microfiber Pad | Microfiber fibers on foam | Medium-Heavy | Paint decontamination, compound application | Medium |
| Heavy Cut Foam | Dense, closed-cell foam | Medium-Heavy | Swirl removal, light scratch correction | Low-Medium |
| Medium Cut Foam | Medium-density foam | Medium | General polishing, haze removal | Low |
| Finishing Foam | Soft, open-cell foam | Light | Final polish, glaze, wax application | Very Low |
Pad Size Selection Guide
| Pad Size | Best For | Coverage Speed | Precision |
|---|---|---|---|
| 3-4 inch | Tight areas, A-pillars, bumpers, headlights, door handles | Slow | Very High |
| 5-5.5 inch | General purpose, most DA polishers (standard) | Medium | High |
| 6-7 inch | Large flat panels (hood, roof, doors) | Fast | Medium |
Complete Detailing Pad Arsenal (What Pros Use)
| Stage | Pad Color | Cut Level | Recommended Pads Per Car |
|---|---|---|---|
| Compound (Heavy Cut) | Yellow, Green, or Wool | Aggressive | 3-4 pads |
| Polish (Medium Cut) | Orange or White | Moderate | 2-3 pads |
| Finishing (Light Cut) | Black, Blue, or Red | Fine | 1-2 pads |
| Wax/Sealant | Red, Gold, or Microfiber | Very Fine | 1 pad |
Why multiple pads? Compound and polish load up the pad with residue and removed clear coat. A loaded pad loses cutting ability and can reintroduce scratches. Switching to a fresh pad every 1-2 panels ensures consistent results .
Step-by-Step Guide
How to Use Buffing Pads for Professional Paint Correction
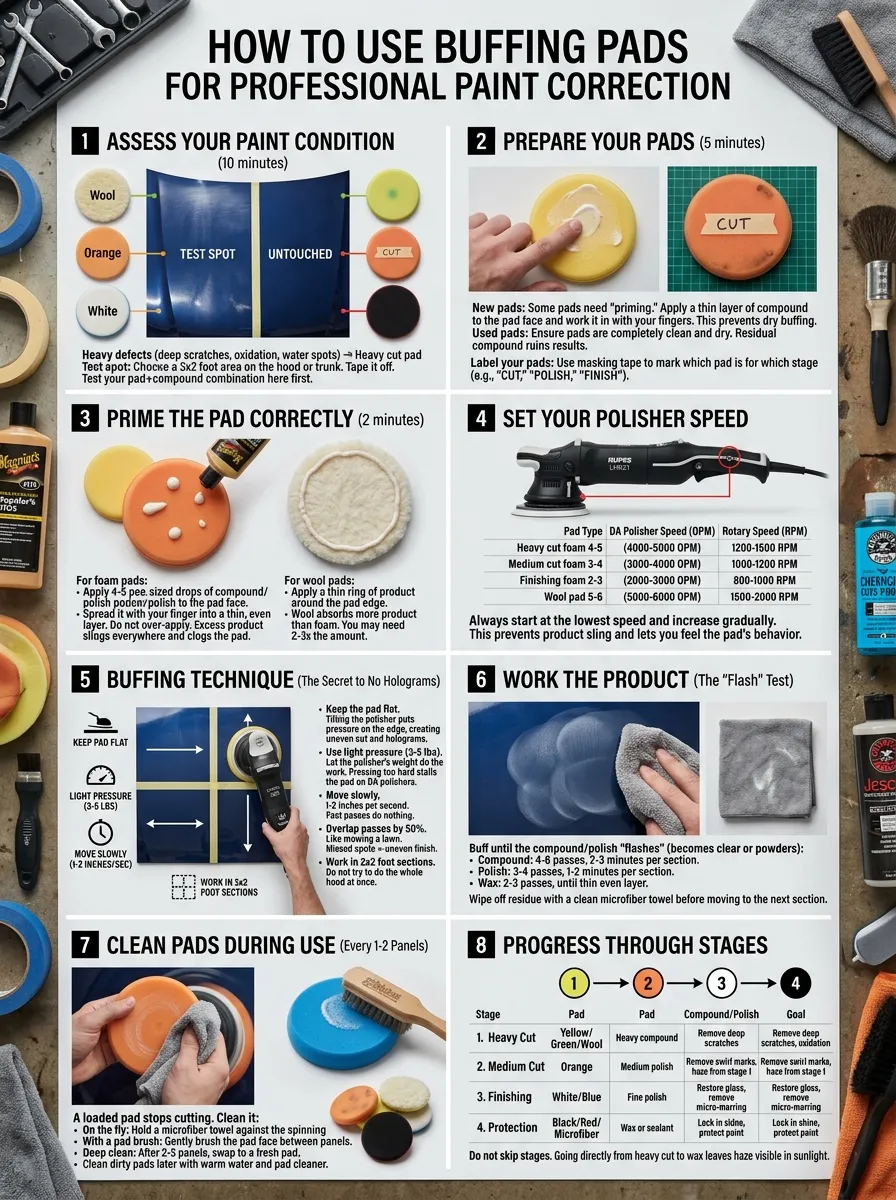
Step 1: Assess Your Paint Condition (10 minutes)
Before touching a pad to your paint, determine what you need:
- Heavy defects (deep scratches, oxidation, water spots) → Heavy cut pad (yellow/green/wool)
- Moderate defects (swirl marks, light scratches) → Medium cut pad (orange)
- Light defects (haze, micro-marring) → Polishing pad (white/blue)
- No defects (just applying wax/sealant) → Finishing pad (black/red)
Test spot: Choose a 2×2 foot area on the hood or trunk. Tape it off. Test your pad+compound combination here first.
Step 2: Prepare Your Pads (5 minutes)
- New pads: Some pads need “priming.” Apply a thin layer of compound to the pad face and work it in with your fingers. This prevents dry buffing.
- Used pads: Ensure pads are completely clean and dry. Residual compound ruins results.
- Label your pads: Use masking tape to mark which pad is for which stage (e.g., “CUT,” “POLISH,” “FINISH”).
Step 3: Prime the Pad Correctly (2 minutes)
For foam pads:
- Apply 4-5 pea-sized drops of compound/polish to the pad face.
- Spread it with your finger into a thin, even layer.
- Do not over-apply. Excess product slings everywhere and clogs the pad.
For wool pads:
- Apply a thin ring of product around the pad edge.
- Wool absorbs more product than foam. You may need 2-3x the amount.
Step 4: Set Your Polisher Speed
| Pad Type | DA Polisher Speed | Rotary Speed |
|---|---|---|
| Heavy cut foam | 4-5 (4000-5000 OPM) | 1200-1500 RPM |
| Medium cut foam | 3-4 (3000-4000 OPM) | 1000-1200 RPM |
| Finishing foam | 2-3 (2000-3000 OPM) | 800-1000 RPM |
| Wool pad | 5-6 (5000-6000 OPM) | 1500-2000 RPM |
Always start at the lowest speed and increase gradually. This prevents product sling and lets you feel the pad’s behavior.
Step 5: Buffing Technique (The Secret to No Holograms)
- Keep the pad flat. Tilting the polisher puts pressure on the edge, creating uneven cut and holograms.
- Use light pressure (3-5 lbs). Let the polisher’s weight do the work. Pressing too hard stalls the pad on DA polishers.
- Move slowly. 1-2 inches per second. Fast passes do nothing.
- Overlap passes by 50%. Like mowing a lawn. Missed spots = uneven finish.
- Work in 2×2 foot sections. Do not try to do the whole hood at once.
Step 6: Work the Product (The “Flash” Test)
Buff until the compound/polish “flashes” (becomes clear or powders):
- Compound: 4-6 passes, 2-3 minutes per section
- Polish: 3-4 passes, 1-2 minutes per section
- Wax: 2-3 passes, until thin even layer
Wipe off residue with a clean microfiber towel before moving to the next section.
Step 7: Clean Pads During Use (Every 1-2 Panels)
A loaded pad stops cutting. Clean it:
- On the fly: Hold a microfiber towel against the spinning pad at low speed. The towel pulls out residue.
- With a pad brush: Gently brush the pad face between panels.
- Deep clean: After 2-3 panels, swap to a fresh pad. Clean dirty pads later with warm water and pad cleaner.
Step 8: Progress Through Stages
| Stage | Pad | Compound/Polish | Goal |
|---|---|---|---|
| 1. Heavy Cut | Yellow/Green/Wool | Heavy compound | Remove deep scratches, oxidation |
| 2. Medium Cut | Orange | Medium polish | Remove swirl marks, haze from stage 1 |
| 3. Finishing | White/Blue | Fine polish | Restore gloss, remove micro-marring |
| 4. Protection | Black/Red/Microfiber | Wax or sealant | Lock in shine, protect paint |
Do not skip stages. Going directly from heavy cut to wax leaves haze visible in sunlight.
Cost Breakdown
Buffing Pad Kit Price Comparison
| Product | Pad Count | Sizes | Types Included | Price | Cost Per Pad |
|---|---|---|---|---|---|
| SPTA 5-Piece Kit | 5 | 6.5″ | Green, Yellow, Orange, Blue, Red | $22 | $4.40 |
| CAR ROAD 7-Piece Kit | 7 | 6″ | Foam, Wool, Microfiber | $18 | $2.57 |
| Chemical Guys Sampler Kit | 3 + cleaner | 5.5″ | Cutting, Polishing, Finishing | $25 | $8.33 |
| Kshineni Drill Kit | 9 | 3″ | 8 foam + 1 wool | $18 | $2.00 |
| IPELY Wool Kit | 4 | 6″ | Wool only | $22 | $5.50 |
| Mothers Microfiber 6-Pack | 6 | 5″ | Microfiber | $15 | $2.50 |
| Rupes Single Pad | 1 | Various | Foam or Wool | $40-60 | $40-60 |
Long-Term Value Analysis (Cost Per Use)
| Pad | Upfront Cost | Washable? | Expected Lifespan (Uses) | Cost Per Use |
|---|---|---|---|---|
| SPTA Kit (5 pads) | $22 | Yes | 15-20 uses per pad | $0.22-0.29 |
| CAR ROAD Kit (7 pads) | $18 | Yes | 8-12 uses per pad | $0.21-0.32 |
| Chemical Guys (3 pads) | $25 | Yes | 20-25 uses per pad | $0.33-0.42 |
| Rupes Single Pad | $50 | Yes | 30-50 uses | $1.00-1.67 |
| Cheap no-name pad | $8 | No | 2-3 uses | $2.67-4.00 |
Verdict: Mid-range kits (SPTA, CAR ROAD) offer the best value. Cheap pads cost more per use because they fail quickly. Premium pads (Rupes) are worth it for professionals who need perfect results every time .
Before and After
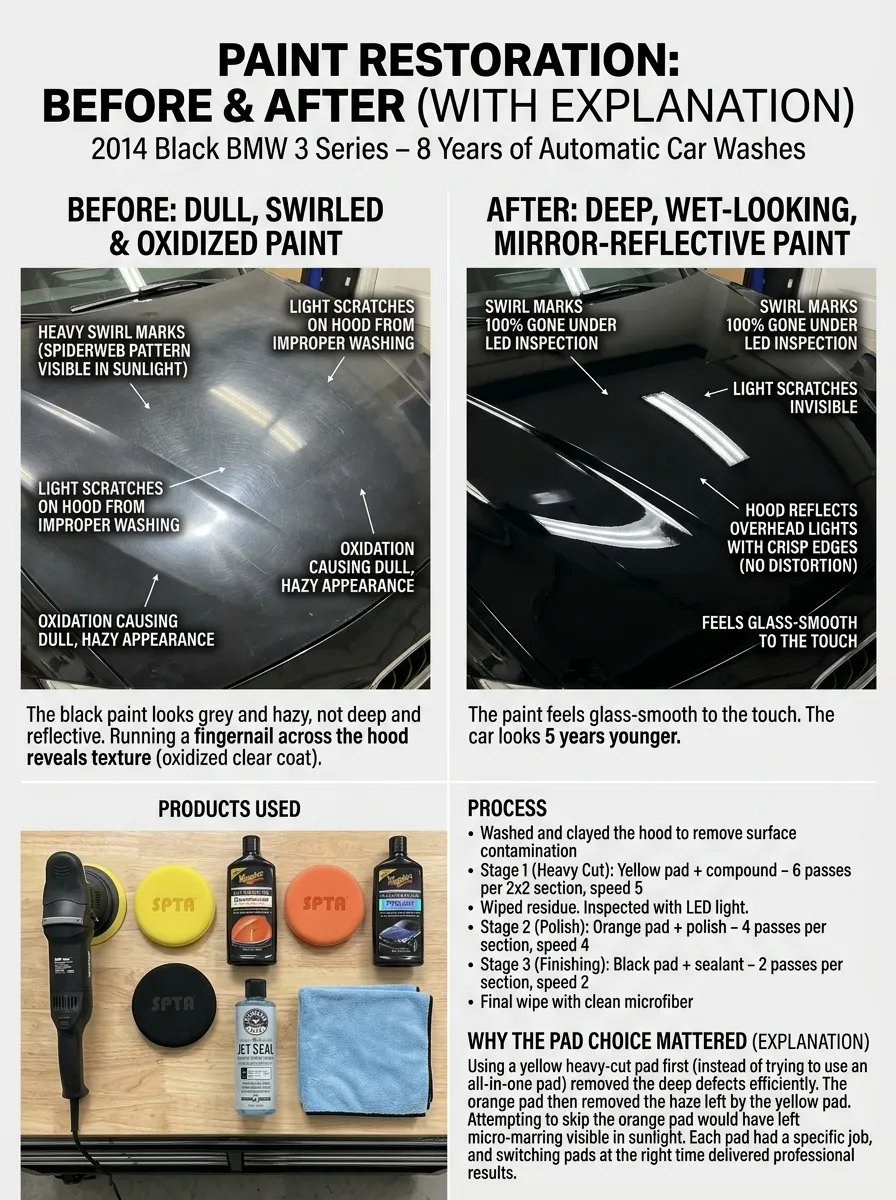
Scenario: 2014 Black BMW 3 Series – 8 years of automatic car washes. Paint is heavily swirled (spiderweb pattern visible in sunlight). Light scratches on hood from improper washing. Oxidation causing dull, hazy appearance.
Before Description: Under direct sunlight or LED work light, the paint is covered in thousands of fine circular scratches (swirl marks). The hood has deeper linear scratches. The black paint looks grey and hazy, not deep and reflective. Running a fingernail across the hood reveals texture (oxidized clear coat).
Products Used:
- Polisher: Dual-action random orbital
- Stage 1 (Heavy Cut): SPTA yellow pad + Meguiar’s Ultimate Compound
- Stage 2 (Polish): SPTA orange pad + Meguiar’s Ultimate Polish
- Stage 3 (Finishing): SPTA black pad + Chemical Guys Jet Seal
- Microfiber towels for wipe-off
Process:
- Washed and clayed the hood to remove surface contamination
- Stage 1: Yellow pad + compound – 6 passes per 2×2 section, speed 5
- Wiped residue. Inspected with LED light.
- Stage 2: Orange pad + polish – 4 passes per section, speed 4
- Stage 3: Black pad + sealant – 2 passes per section, speed 2
- Final wipe with clean microfiber
After Description: The black paint is now deep, wet-looking, and mirror-reflective. Swirl marks are 100% gone under LED inspection. Light scratches are invisible. The hood reflects overhead lights with crisp edges (no distortion). The paint feels glass-smooth to the touch. The car looks 5 years younger.
Why the pad choice mattered: Using a yellow heavy-cut pad first (instead of trying to use an all-in-one pad) removed the deep defects efficiently. The orange pad then removed the haze left by the yellow pad. Attempting to skip the orange pad would have left micro-marring visible in sunlight. Each pad had a specific job, and switching pads at the right time delivered professional results .
Product Recommendations
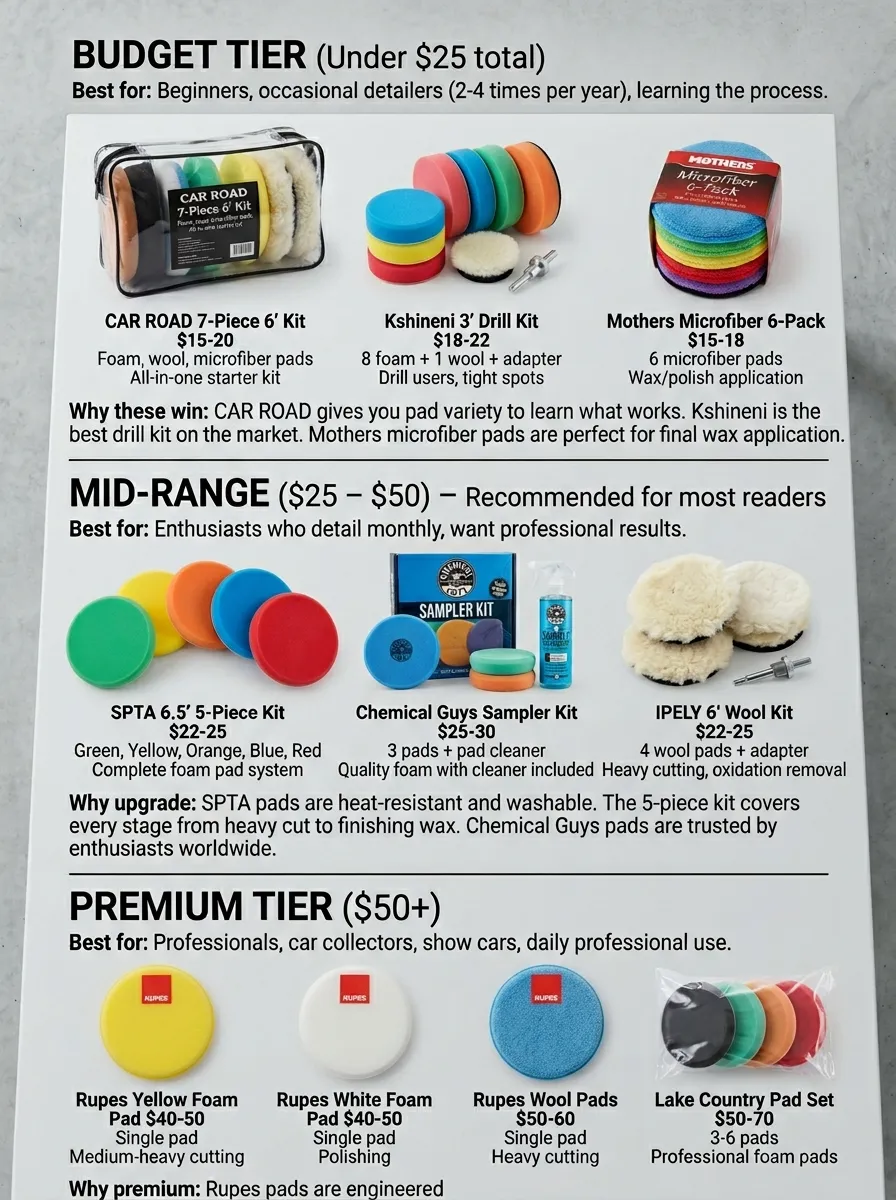
Budget Tier (Under $25 total)
Best for: Beginners, occasional detailers (2-4 times per year), learning the process.
| Product | Price | Included | Best For |
|---|---|---|---|
| CAR ROAD 7-Piece 6″ Kit | $15-20 | Foam, wool, microfiber pads | All-in-one starter kit |
| Kshineni 3″ Drill Kit | $18-22 | 8 foam + 1 wool + adapter | Drill users, tight spots |
| Mothers Microfiber 6-Pack | $15-18 | 6 microfiber pads | Wax/polish application |
Why these win: CAR ROAD gives you pad variety to learn what works. Kshineni is the best drill kit on the market. Mothers microfiber pads are perfect for final wax application .
Mid-Range ($25 – $50) – Recommended for most readers
Best for: Enthusiasts who detail monthly, want professional results.
| Product | Price | Included | Best For |
|---|---|---|---|
| SPTA 6.5″ 5-Piece Kit | $22-25 | Green, Yellow, Orange, Blue, Red | Complete foam pad system |
| Chemical Guys Sampler Kit | $25-30 | 3 pads + pad cleaner | Quality foam with cleaner included |
| IPELY 6″ Wool Kit | $22-25 | 4 wool pads + adapter | Heavy cutting, oxidation removal |
Why upgrade: SPTA pads are heat-resistant and washable. The 5-piece kit covers every stage from heavy cut to finishing wax. Chemical Guys pads are trusted by enthusiasts worldwide .
Premium Tier ($50+)
Best for: Professionals, car collectors, show cars, daily professional use.
| Product | Price | Included | Best For |
|---|---|---|---|
| Rupes Yellow Foam Pad | $40-50 | Single pad | Medium-heavy cutting |
| Rupes White Foam Pad | $40-50 | Single pad | Polishing |
| Rupes Wool Pads | $50-60 | Single pad | Heavy cutting |
| Lake Country Pad Set | $50-70 | 3-6 pads | Professional foam pads |
Why premium: Rupes pads are engineered specifically for Rupes polishers but work with any DA. The foam density, heat management, and durability are unmatched. Lake Country is another professional favorite .
Comparison Section
Foam Pads vs Wool Pads vs Microfiber Pads
| Factor | Foam Pads | Wool Pads | Microfiber Pads |
|---|---|---|---|
| Cut Level | Light to Medium | Heavy | Medium to Heavy |
| Heat Generation | Low | High | Medium |
| Best For | Polishing, finishing, waxing | Heavy compounding, oxidation | Decontamination, compounding |
| Learning Curve | Easy | Steep (can burn paint) | Medium |
| Durability | High (20-30 uses) | Medium (10-15 uses) | High (20+ uses) |
| Price | $15-50 per pad | $20-60 per pad | $15-30 for multi-pack |
| Beginner Friendly? | Yes | No (risk of damage) | Yes |
Winner for beginners: Foam pads. They are forgiving, generate less heat, and are available in color-coded cut levels .
Winner for professionals: A combination. Wool for heavy cutting, foam for polishing and finishing.
SPTA vs Chemical Guys vs Rupes (Foam Pads)
| Factor | SPTA | Chemical Guys | Rupes |
|---|---|---|---|
| Price per pad | $4-5 | $8-10 | $40-50 |
| Cut levels available | 5 (green to red) | 3 (cut, polish, finish) | 6+ (full system) |
| Heat resistance | Good | Very Good | Excellent |
| Durability | 15-20 uses | 20-25 uses | 30-50 uses |
| Best for | Budget-conscious enthusiasts | Quality mid-range | Professionals |
| Washable | Yes | Yes | Yes |
Verdict: SPTA is the best value. Chemical Guys is a quality upgrade. Rupes is for those who demand perfection .
Troubleshooting
| Problem | Likely Cause | Fix |
|---|---|---|
| Pad not spinning (DA polisher) | Too much pressure. Pad stalled. | Reduce pressure. Let the machine do the work. |
| Product sling everywhere | Too much product on pad. | Use less (4-5 pea-sized drops). Start at low speed. |
| Holograms / buffer trails | Pad not flat. Or moved too fast. Or used wrong pad for stage. | Keep pad flat. Slow down arm speed. Use correct pad for each stage. |
| Pad is disintegrating | Cheap pad. Or too much heat. Or used wrong chemical. | Buy quality pads. Reduce speed. Use pad-specific compounds. |
| Scratches after polishing | Pad was dirty (embedded debris). Or used cutting pad for finishing. | Clean pads thoroughly. Use correct pad for each stage. |
| Uneven finish (some areas glossy, some dull) | Uneven pressure. Or pad loaded unevenly. | Apply even pressure. Clean pad between panels. Use fresh pad. |
| Pad won’t stick to backing plate | Hook-and-loop worn out. Or wrong size. | Replace pad. Ensure backing plate matches pad size (e.g., 5″ pad needs 5″ backing plate). |
Time Required with Difficulty Level
| Task | Time | Pads Needed | Difficulty (1-10) |
|---|---|---|---|
| Single panel correction (hood) | 30-45 min | 2-3 (cut + polish) | 4 (medium) |
| Full car heavy correction | 4-6 hours | 6-8 (3-4 cut, 2-3 polish, 1 finish) | 7 (hard) |
| Full car light polish + wax | 2-3 hours | 3-4 (1-2 polish, 1-2 finish) | 3 (easy-medium) |
| Headlight restoration | 15-20 min | 1-2 (cut + polish) | 2 (easy) |
| Applying wax/sealant by machine | 30-45 min | 1 finishing pad | 2 (easy) |
Learning curve: Most beginners can master applying wax with a finishing pad in 10 minutes. Paint correction (cutting + polishing) takes practice. Start on an old hood or a friend’s beater car .


Pro Tips
Do
- Do use 3-4 pads per correction stage. A fresh pad every 1-2 panels ensures consistent cut. Pros use 6-8 pads per car .
- Do mark your backing plate. Draw a line across the backing plate with a Sharpie. If the line stops moving during use, you are stalling the pad (too much pressure).
- Do clean pads on the fly. Hold a microfiber towel against the spinning pad at low speed every 1-2 panels. This removes residue and restores cutting ability.
- Do store pads flat. Hanging pads or stacking them heavy can deform the foam. Store in a cool, dry place away from direct sunlight.
- Do match pad size to backing plate. A 5″ pad needs a 5″ backing plate. Mismatched sizes cause edge contact and holograms.
Don’t
- Don’t use the same pad for cutting and finishing. A pad that has seen heavy compound will have embedded abrasive particles. Those particles will scratch during finishing.
- Don’t let compound dry on the pad. Dried compound hardens and becomes abrasive. Clean pads immediately after use.
- Don’t use a pad that smells burnt. Burnt smell = melted foam = pad is ruined. Replace it immediately to avoid damaging paint.
- Don’t use fabric softener when washing pads. Fabric softener leaves residues that transfer to your paint. Wash pads with dedicated pad cleaner or mild dish soap.
- Don’t mix pad colors without knowing the cut level. Color coding is NOT universal across brands. Green might be heavy cut in one brand and finishing in another. Read the product description .
Best Picks
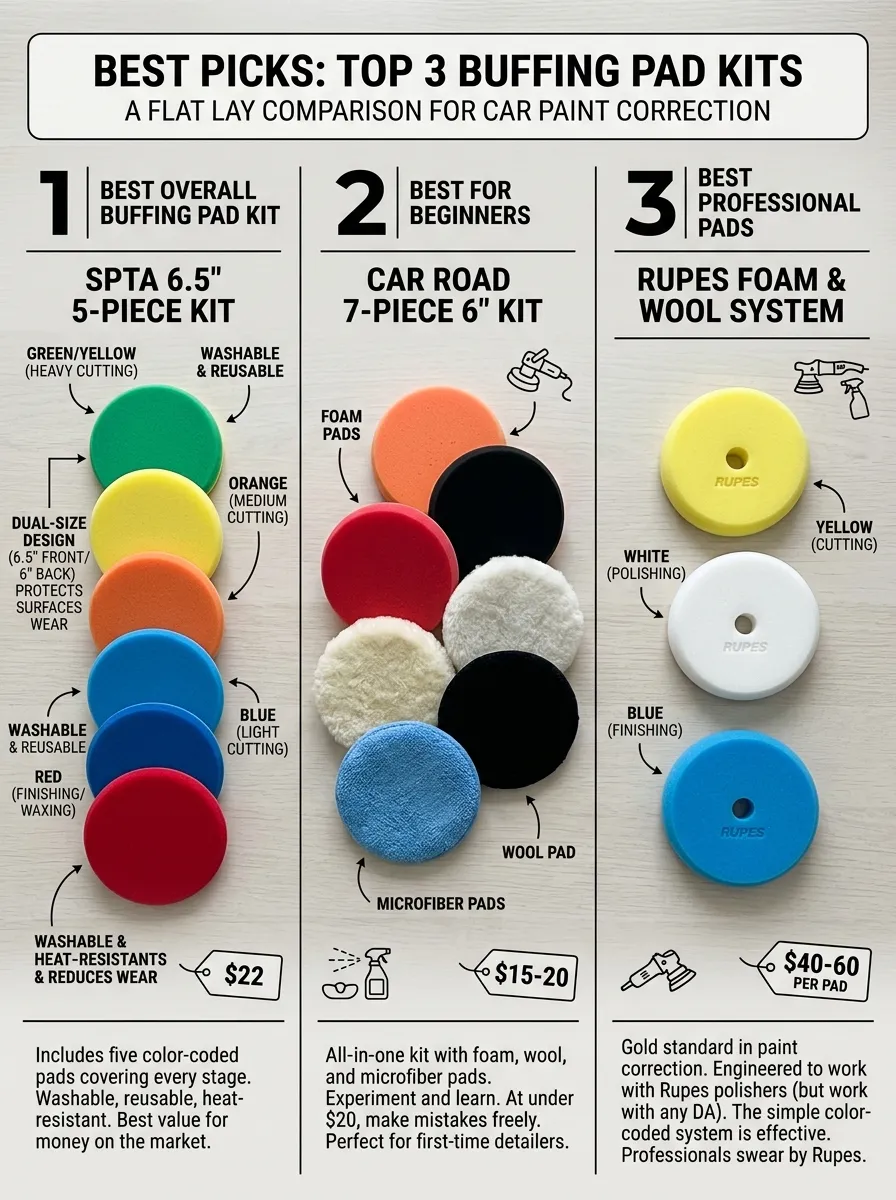
1. Best Overall Buffing Pad Kit: SPTA 6.5″ 5-Piece Kit ($22)
This kit includes five color-coded pads covering every stage: green/yellow for heavy cutting, orange for medium cutting, blue for light cutting, and red for finishing/waxing. The dual-size design (6.5″ front, 6″ back) protects surfaces and reduces wear. Pads are washable, reusable, and heat-resistant. Best value for money on the market .
2. Best for Beginners: CAR ROAD 7-Piece 6″ Kit ($15-20)
An all-in-one kit including foam, wool, and microfiber pads. The variety lets you experiment and learn what works for your paint. At under $20 for 7 pads, you can afford to make mistakes. Perfect for first-time detailers .
3. Best Professional Pads: Rupes Foam & Wool System ($40-60 per pad)
Rupes is the gold standard in paint correction. Their pads are engineered to work with their polishers (but work with any DA). The color-coded system (yellow for cutting, white for polishing, blue for finishing) is simple and effective. Professionals and serious enthusiasts swear by Rupes .
Use Cases
| Your Situation | Best Pad Choice | Why |
|---|---|---|
| First time using a polisher | CAR ROAD 7-piece kit | Cheap, variety to learn, mistakes won’t cost much |
| Black or dark-colored car | SPTA 5-piece foam kit | Foam generates less heat (critical for dark paint) |
| Heavy oxidation or single-stage paint | IPELY wool pads | Wool cuts faster, removes oxidation efficiently |
| Applying ceramic coating | Rupes white or Lake Country white foam | Fine foam ensures even, thin application |
| Headlights or tight spots | Kshineni 3″ drill kit | Small pads reach everywhere a 6″ pad cannot |
| Professional daily use | Rupes or Lake Country | Durability, consistency, professional results |
| Waxing by machine (no correction needed) | Mothers microfiber pads | Even wax distribution, no risk of cutting |
Common Mistakes to Avoid
- Using one pad for the entire car. A pad loads up with removed clear coat and compound residue. By panel 4, you are grinding that residue into the paint. Use 3-4 pads per correction stage .
- Not priming new pads. Dry foam against dry paint creates friction burns. Apply a thin layer of compound to the pad face before starting.
- Pressing too hard (stalling the pad). On a DA polisher, the pad should rotate AND orbit. Too much pressure stops the rotation. You are just vibrating the paint, not correcting it.
- Skipping pad cleaning between panels. A loaded pad cuts slower and leaves residue. Clean every 1-2 panels with a towel or brush.
- Using the wrong pad for the job. A finishing pad cannot remove swirl marks. A cutting pad will leave haze if not followed by a polishing pad. Match pad to the defect level.
- Ignoring color code differences between brands. One brand’s “orange” might be medium cut. Another brand’s “orange” might be heavy cut. Read the specifications .
- Using a pad that is too large for the panel. 6-7″ pads are for hoods and roofs. Use 3-4″ pads for bumpers, pillars, and around trim.
FAQs
1. What are the main types of buffing pads?
The first type is foam, wool and microfiber. Foam pads are dual action pads that are the most versatile, and come in different levels of density for cutting, polishing, or finishing. Wool pads are the most aggressive and as wool pads, they are used for heavy defect removals while microfiber pads offer great cutting ability with a good impact for moderate corrections.
2. Which pad should I use for heavy scratches?
Lastly, if the scratches are deep or oxidation heavy, wool pads or heavy-cut foam pads (typically red/maroon) should be used as they deliver the most cutting power and allow for defect removal to occur.
3. How do pad colors work?
Generally, pad colors represent how aggressive the pads are, and it can vary by manufacturer. Heavy cutting is done with darker colors (red or maroon), mid-range polishing is performed using orange, green, or yellow colors and for finishing and ultimate gloss the lighter colored pads like white, black, or blue are used.
4. What pad is best for a “One-Step” polish?
A medium-density foam pad (commonly orange or yellow) or a microfiber pad works best for one-step polishing because it can remove light imperfections while still leaving a good shine.
5. Can I use the same pad for cutting and finishing?
No, it’s not recommended. Cutting pads are too aggressive for finishing, while finishing pads don’t have enough power to remove defects. Each stage requires its own dedicated pad.
6. How many pads do I need to detail one car?
Ideally, you should use 4–5 pads per car. This helps maintain performance, prevents overheating, and ensures more consistent results across the vehicle.
7. How often should I clean my pads during use?
Clean your pad after every 2–3 panels using a brush or compressed air. This prevents product buildup and keeps the pad working effectively.
8. What is the best way to clean pads after the job?
Rinse pads with warm water and a dedicated cleaner or mild detergent, then let them air dry completely before storing to maintain their lifespan.
9. Which pad is best for beginners?
Yes, it does. Some pads are made for dual-action (DA) polishers and other pads can be used on rotary machines. Microfiber pads are generally best used with DA polishers, for instance.
10. Does machine type matter for pad choice?
Yes, it does. Some pads are designed specifically for dual-action (DA) polishers, while others are made for rotary machines. For example, microfiber pads are typically best used with DA polishers.
11. How do I know which pad matches my paint type?
Hard paint may need more aggressive pads such as microfiber or wool to correct defects but will police soft clear coat from micro-scratches.
12. How long should a buffing pad last?
As long as you care for a buffing pad properly, it can survive detailer after session. It will last long so if you take natural care having it clean and also use in the proper manner with rotated period of pads.
Final Thought
The most expensive buffing pads for detailing cars, those are not the best. There are the pads that fit your style, you polisher and the condition of your paint.
Start simple. Keep things simple and get a low-priced kit such as SPTA or CAR ROAD. Experiment with the feel of each pad on paint. Learn when to switch pads. Learn how to clean them. After you fall in love with paint correction, then buy Rupes or Lake Country.
However keep this in mind — An incorrectly used $50 Rupes pad is worse than a properly used $5.00 pad. Technique matters more than brand. Keep the pad flat. Use light pressure. Clean often. Match pad to the job.
A single pad and some fingers crossed is not what your car’s paint needs. Build your pad arsenal. Learn the system. And see your paint become prominent from pale.
Now go make that paint shine.
Leave a Reply