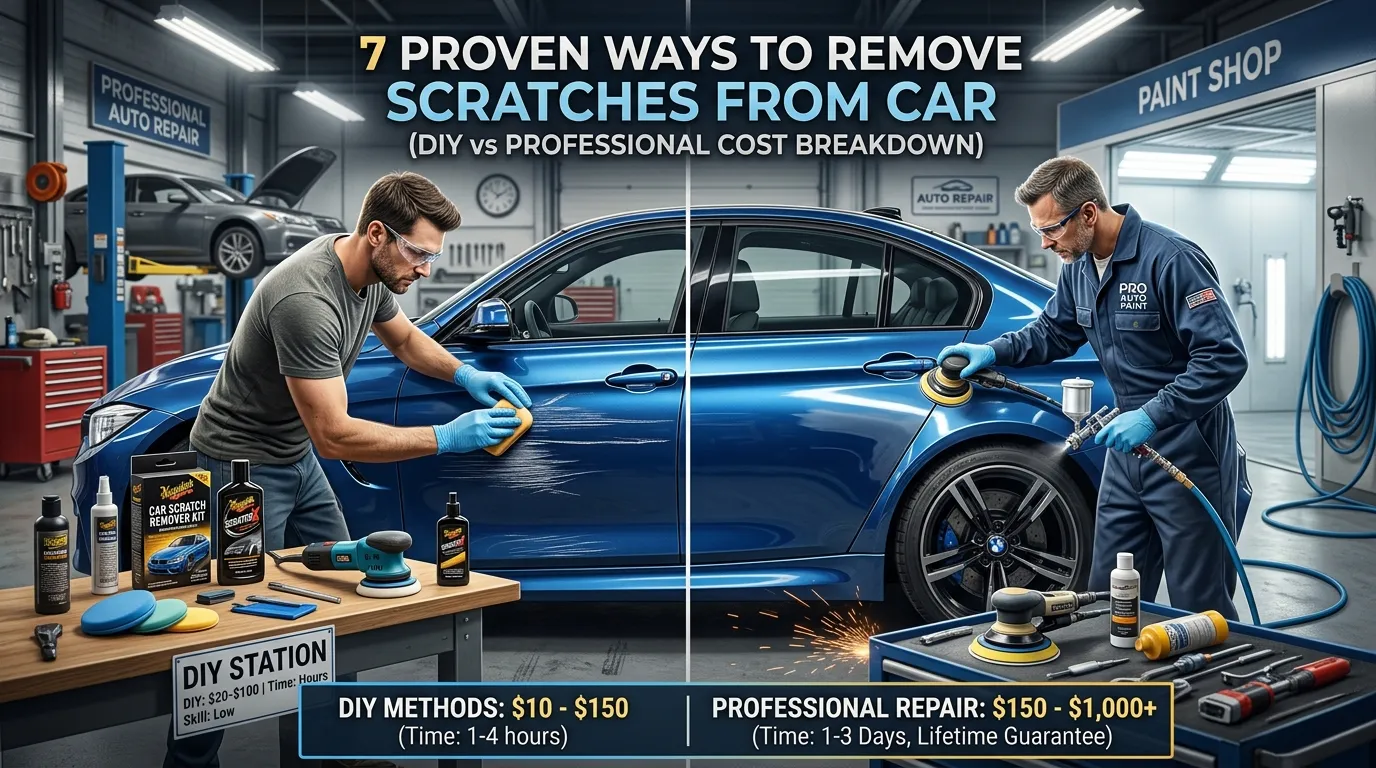
You approach your parked car and there it is: a brand new white scratch on the driver’s side door. Or, even worse s— a bunch of fine swirl marks to make your black paint appear gray outdoors? Your heart sinks. The first thought that crosses into your mind is, “Is this a $1,000 job at the body shop?”
The truth is: Remove Scratches from Car not every scratch needs a pro. Actually, about 70% of common car scratches (clear coat and light primer scratches) can be removed at home for less than $30. It is the problem that most of car owners do it wrong, rub with excessive force, use the wrong compound or even make the scratch a deeper way.
This guide will save you time, and money. DescriptionYou will learn the exact process for identifying your scratch type, which household or professional product to use, and a step by step procedure for safely removing scratches from car paint. You will know if you grab a microfiber towel [or] go for the body shop by the end of it.
Quick Answer
Can you remove scratches from a car yourself?
- Yes, if: The scratch is not deep enough to catch your fingernail. Use rubbing compound or a scratch remover kit ($10–$30).
- Maybe, if: The scratch catches your nail but no metal is showing. Use wet sanding (2000–3000 grit) + compound (risky for beginners).
- No, if: You see bare metal or plastic. Visit a body shop (repaint required).
Why It Matters (Benefits)
Removing scratches isn’t just about vanity. Here is why you should care:
- Resale value increases by up to 15% – A swirl-free, scratch-free car looks 2–3 years newer.
- Prevents rust – Deep scratches that expose metal will rust within 30–90 days. Rust spreads under the paint.
- Saves $500–$2,000 – Professional scratch repair for a single panel costs $150–$600. DIY costs $10–$80.
- Improves clear coat longevity – Scratches trap dirt and moisture, accelerating clear coat failure (peeling).
- Personal satisfaction – Fixing a scratch yourself takes 20 minutes and feels like magic.
What You’ll Need (Tools + Products)
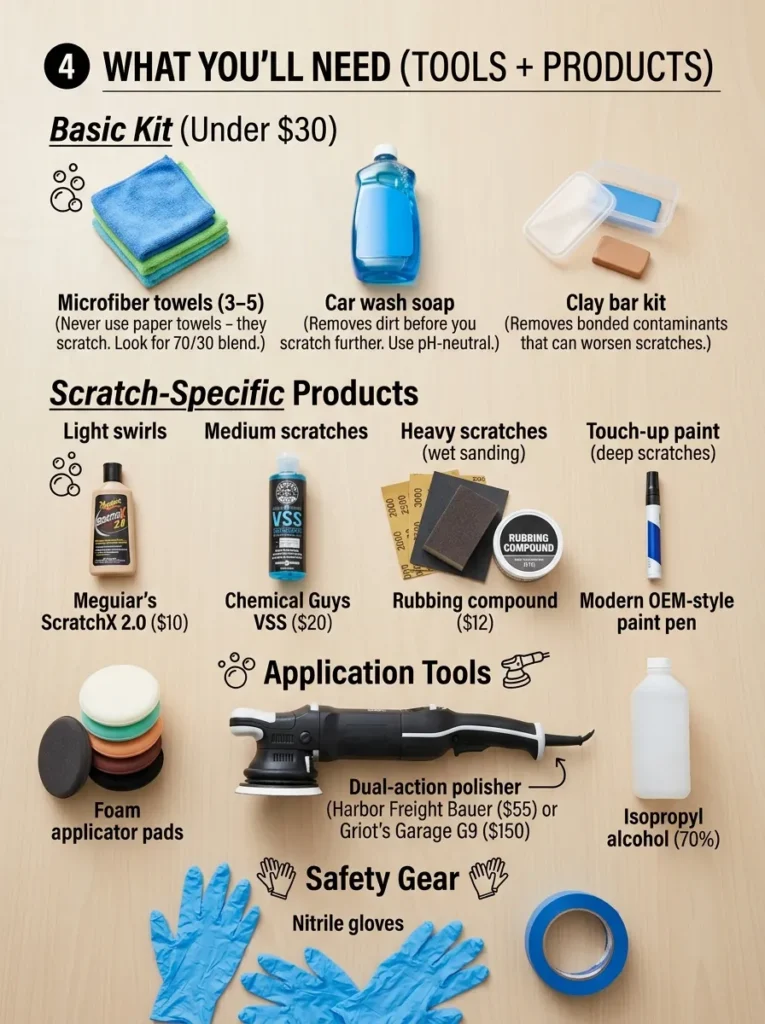
Basic Kit (Under $30)
- Microfiber towels (3–5) – Never use paper towels (they scratch). Look for 70/30 blend.
- Car wash soap – Removes dirt before you scratch further. Use pH-neutral.
- Clay bar kit – Removes bonded contaminants that can worsen scratches.
Scratch-Specific Products
- Light swirls: Meguiar’s ScratchX 2.0 ($10) or 3M Scratch Remover ($12)
- Medium scratches: Turtle Wax Scratch Repair & Renew ($15) or Chemical Guys VSS ($20)
- Heavy scratches (wet sanding): 2000, 2500, 3000 grit sandpaper ($8), sanding block, rubbing compound ($12)
- Touch-up paint (deep scratches): OEM paint pen from dealer ($25–$40)
Application Tools
- Foam applicator pads – 2–3 pads (disposable or reusable)
- Dual-action polisher (optional) – Harbor Freight Bauer ($55) or Griot’s Garage G9 ($150)
- Isopropyl alcohol (70%) – To wipe away oils before inspection
Safety Gear
- Nitrile gloves (compounds can irritate skin)
- Painter’s tape (to protect adjacent panels)
Step-by-Step Guide (How-To) with Explain Details
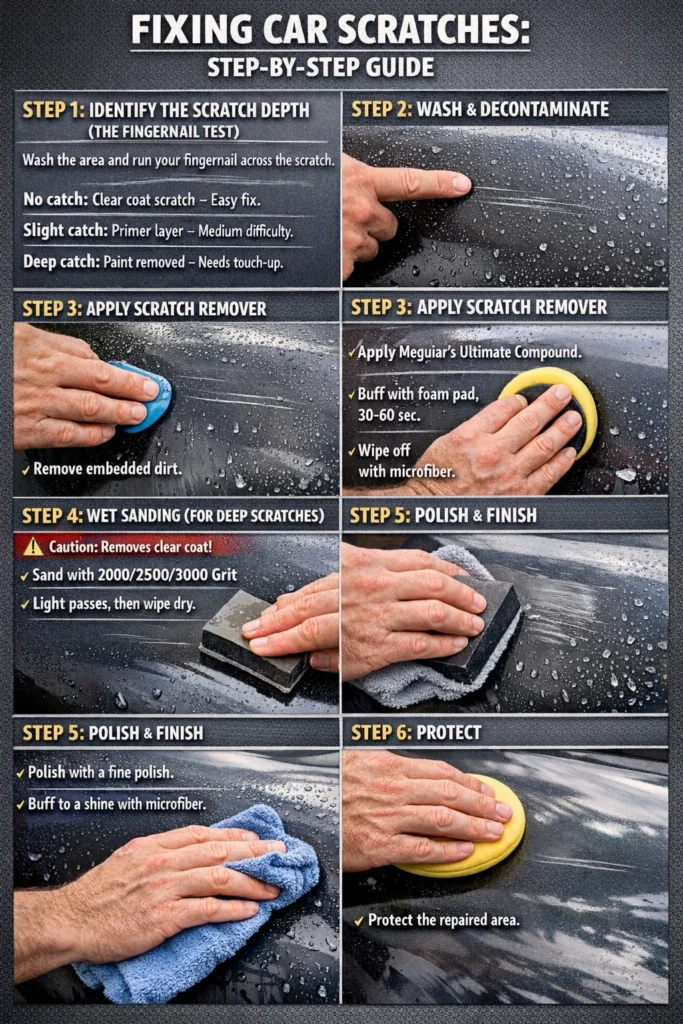
Step 1: Identify the Scratch Depth (The Fingernail Test)
Wash the area with car soap and dry it. Run your fingernail across the scratch.
- No catch: Clear coat scratch only – easy fix.
- Slight catch: Primer layer – medium difficulty.
- Deep catch or white/plastic shows: Paint removed – requires touch-up paint or pro.
Step 2: Wash & Decontaminate
Wash the entire panel, not just the scratch. Use a clay bar with lubricant (spray wax or quick detailer) to remove embedded dirt. Skipping this step will grind dirt into the scratch, making it worse.
Step 3: Apply Scratch Remover (Light to Medium)
Add a dime-sized drop of Meguiar’s Ultimate Compound to a foam pad. Work in a 12”x12” area. Apply moderate pressure in circles or back and forth for 30–60 seconds. Use a clean microfiber to remove any leftovers. Inspect. Repeat 2–3 times if needed.
Step 4: Wet Sanding (Only for Nail-Catching Scratches)
Warning: This removes clear coat. Only do this if you are confident.
Soak 2000 grit sandpaper in soap/lukewarm water for about 10 minutes. Wrap around a sanding block. Sand lightly in a single direction (and not circles) with very light pressure for 5–10 seconds. Wipe dry. The scratch should look “frosted.” When done with 2500 grit, go to the 3000. And then, rubbing compound, followed up with polish.
Step 5: Polish & Finish
After compound or sanding, apply a fine polish (e.g., Meguiar’s Ultimate Polish) to restore gloss. Buff with a clean microfiber.
Step 6: Protect
Apply wax or sealant to the area. This fills any micro-marring and protects the fresh clear coat.
Cost Breakdown
| Method | Product Example | Tool Cost | Product Cost | Total DIY | Time | Best For |
|---|---|---|---|---|---|---|
| Toothpaste | Colgate White (non-gel) | $0 (cloth) | $2 | $2 | 5 min | Very fine swirls |
| Scratch remover (hand) | Meguiar’s ScratchX | $0 (applicator) | $10 | $10 | 15 min | Light clear coat scratches |
| Scratch remover (machine) | Bauer DA polisher + compound | $55 | $15 | $70 | 30 min | Multiple scratches, swirls |
| Wet sanding kit | 3M sandpaper + compound | $8 (block) | $20 | $28 | 45 min | One deep (but not bare metal) scratch |
| Touch-up paint | OEM paint pen + clear coat pen | $0 | $35 | $35 | 1 hour | Deep scratch down to primer |
| Professional (body shop) | N/A | N/A | $150–$600 per panel | $150+ | 1–2 days | Any scratch you fear messing up |
| Mobile scratch repair | Local detailer | N/A | $80–$200 per panel | $80+ | 1–2 hours | Medium scratches, convenient |
Before and After
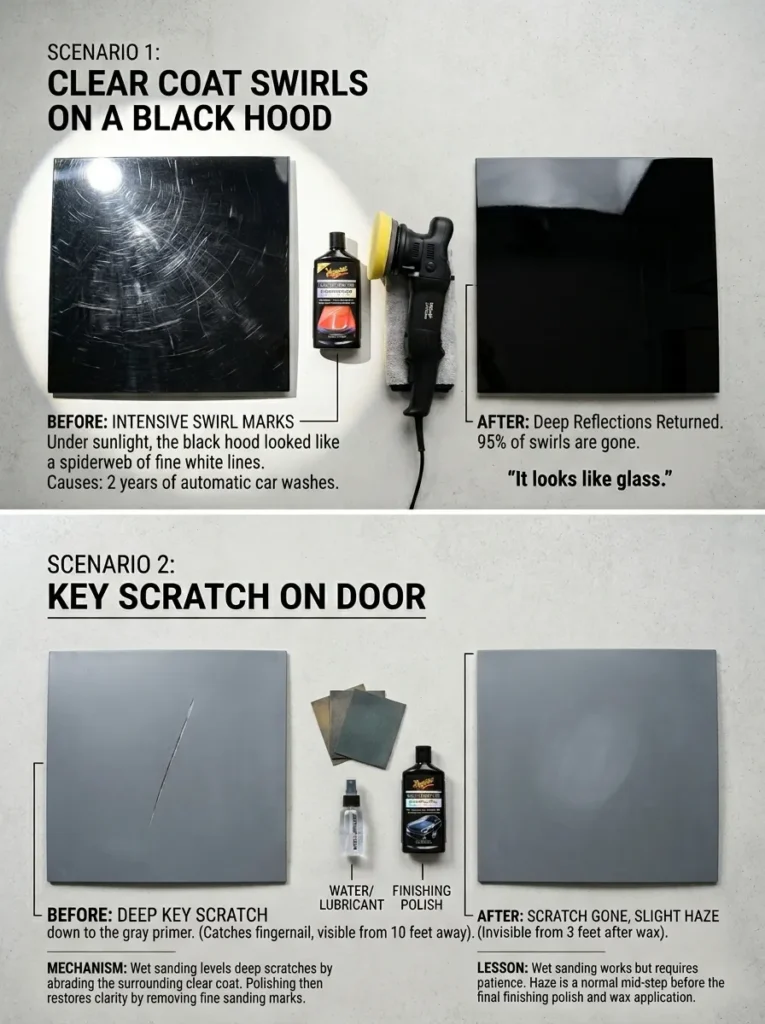
Scenario 1: Clear coat swirls on a black hood
- Before: Under sunlight, the hood looked like a spiderweb of fine white lines. The owner had used automatic car washes for 2 years.
- Method: Dual-action polisher + Meguiar’s Ultimate Compound + foam cutting pad.
- After: 20 minutes later, 95% of swirls were gone. Deep reflections returned. The owner said, “It looks like glass.”
- Why it worked: The compound abraded the clear coat evenly, leveling the scratches down to the bottom of the swirls.
Scenario 2: Key scratch on door (catches fingernail)
- Before: A 4-inch straight scratch down to the gray primer. Visible from 10 feet away.
- Method: 2500 grit wet sanding (only over scratch) → compound → polish.
- After: The scratch was gone, but the area had slight haze (which buffed out with finishing polish). After wax, invisible from 3 feet.
- Lesson: Wet sanding works but requires patience. The haze was due to not finishing with fine enough polish.
Product Recommendations
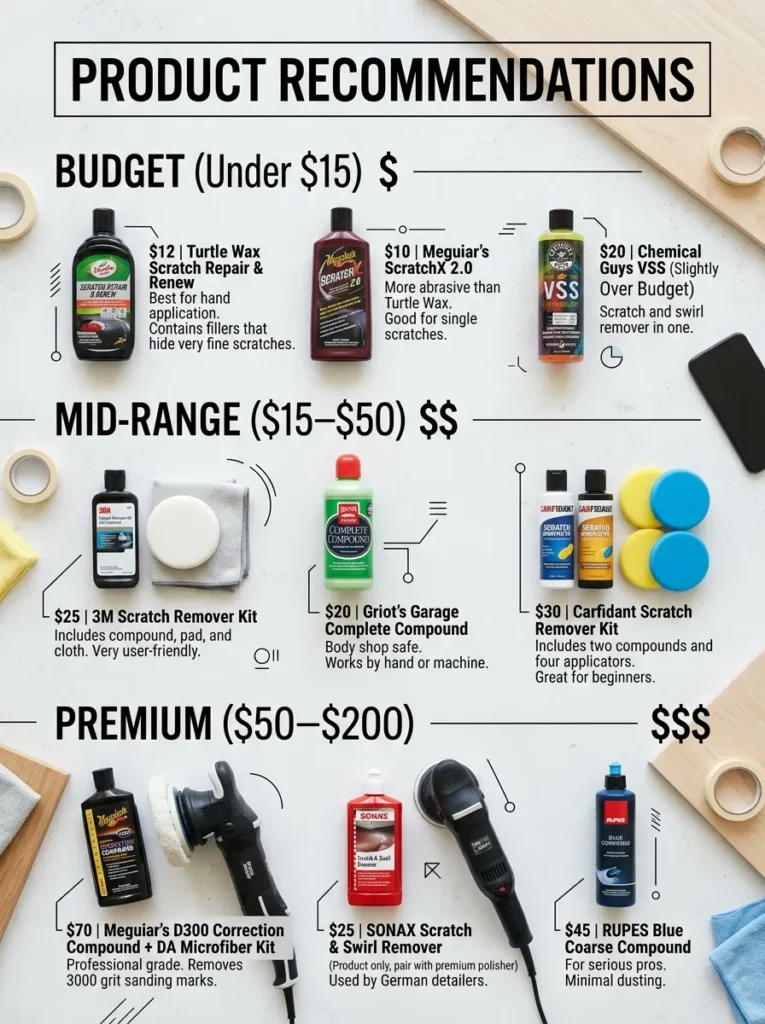
Budget (Under $15)
- Turtle Wax Scratch Repair & Renew ($12) – Best for hand application. Contains fillers that hide very fine scratches.
- Meguiar’s ScratchX 2.0 ($10) – More abrasive than Turtle Wax. Good for single scratches.
- Chemical Guys VSS ($20 – slightly over budget but worth it) – Scratch and swirl remover in one.
Mid-Range ($15–$50)
- 3M Scratch Remover Kit ($25) – Includes compound, pad, and cloth. Very user-friendly.
- Griot’s Garage Complete Compound ($20) – Body shop safe. Works by hand or machine.
- Carfidant Scratch Remover Kit ($30) – Includes two compounds and four applicators. Great for beginners.
Premium ($50–$200)
- Meguiar’s D300 Correction Compound + DA Microfiber Kit ($70) – Professional grade. Removes 3000 grit sanding marks.
- SONAX Scratch & Swirl Remover ($25 – product only, but pair with premium polisher) – Used by German detailers.
- RUPES Blue Coarse Compound ($45) – For serious pros. Minimal dusting.
Comparison Section (Option A vs Option B)
Meguiar’s Ultimate Compound vs. Turtle Wax Scratch Repair & Renew
| Feature | Meguiar’s Ultimate Compound | Turtle Wax Scratch Repair |
|---|---|---|
| Abrasive level | Medium-high (cuts quickly) | Low-medium (fills + cuts) |
| Best for | Deeper clear coat scratches | Fine swirls and haze |
| By hand or machine | Both (better by machine) | Primarily by hand |
| Fills scratches? | No (true removal) | Yes (temporary fill) |
| Wipe-off ease | Moderate (can be oily) | Very easy |
| Price | $15 | $12 |
| Durability of fix | Permanent (until next scratch) | Wash away after 2–3 washes |
| Our pick: Meguiar’s for permanent removal; Turtle Wax for quick touch-ups before selling a car. |
Troubleshooting (Problem → Fix Table)
| Problem | Likely Cause | Fix |
|---|---|---|
| Scratch looks worse after applying product | You used too much pressure or dry-sanded | Re-polish with finishing polish and less pressure |
| Haze / dull spot remains | You didn’t finish with a fine enough polish | Apply Meguiar’s Ultimate Polish by hand |
| Scratch reappears after 2 days | Product contained fillers, not abrasives | Use a true compound (e.g., 3M) not a glaze |
| Swirl marks introduced | You used circular motions with dirty towel | Use linear motions and a fresh microfiber |
| Paint feels rough after sanding | Sandpaper grit too low or not wet enough | Re-sand with 3000 grit wet, then compound |
| Touch-up paint looks like a blob | You applied too much at once | Apply with toothpick in thin layers (3–4 coats) |
Time Required & Difficulty Level
| Method | Time | Difficulty (1–10) |
|---|---|---|
| Toothpaste | 5 min | 1 (anyone) |
| Hand scratch remover (light scratch) | 15 min | 2 (requires some elbow grease) |
| Hand scratch remover (medium scratch) | 30 min (repeat applications) | 4 (need patience) |
| Dual-action polisher + compound | 30–45 min | 5 (setup + technique) |
| Wet sanding (one scratch) | 45–60 min | 7 (risk of burning through clear coat) |
| Touch-up paint + clear coat | 1–2 hours (plus drying) | 6 (needs steady hand) |
Pro Tips
Do
- Do tape off the scratch area with painter’s tape to avoid over-working good paint.
- Do work in the shade – Hot panels cause products to dry too fast.
- Do use a separate microfiber for compound, polish, and wax.
- Do test on a small hidden area first (inside door jamb).
- Do wash your microfiber towels with liquid detergent (no fabric softener).
Don’t
- Don’t use WD-40, baking soda, or vinegar – These can strip clear coat or cause clouding.
- Don’t sand a scratch you haven’t measured – Use a digital caliper if possible (clear coat is only 0.002” thick).
- Don’t apply pressure like you’re scrubbing a stain – Let the product do the work.
- Don’t use a rotary polisher as a beginner – It can burn paint in 2 seconds.
- Don’t ignore deep scratches – They will rust within 2 months.
Best Picks
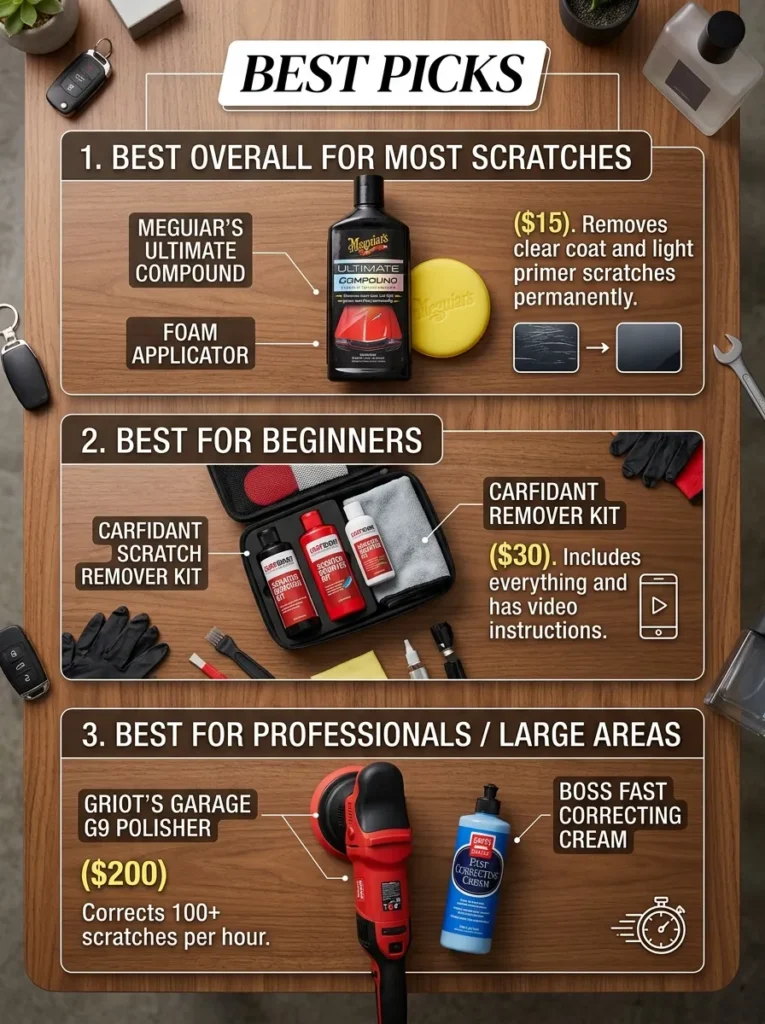
- Best overall for most scratches: Meguiar’s Ultimate Compound + foam applicator ($15). Removes clear coat and light primer scratches permanently.
- Best for beginners: Carfidant Scratch Remover Kit ($30). Includes everything and has video instructions.
- Best for professionals / large areas: Griot’s Garage G9 Polisher + Boss Fast Correcting Cream ($200). Corrects 100+ scratches per hour.
Use Cases
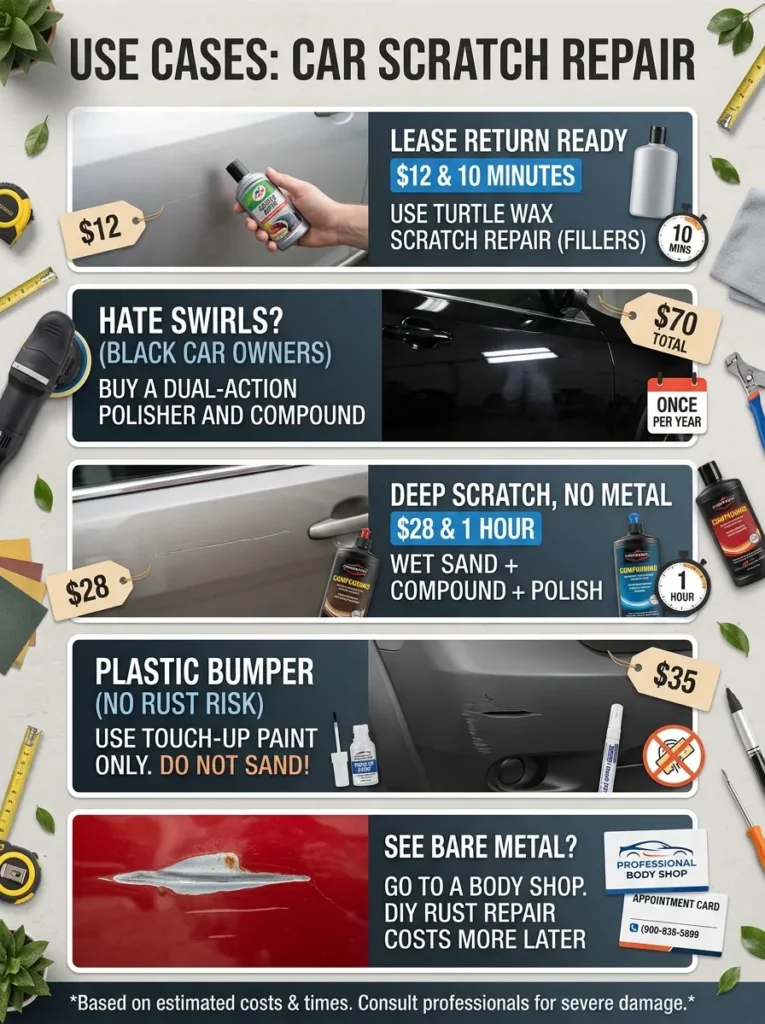
- You have a leased car returning next week: Use Turtle Wax Scratch Repair (fillers) – $12 and 10 minutes.
- You own a black car and hate swirls: Buy a dual-action polisher and compound – $70 total. Do it once per year.
- Your kid dragged a bike pedal down the door (deep scratch, no metal): Wet sand + compound + polish – $28 and 1 hour.
- Scratch is on plastic bumper (no rust risk): Use touch-up paint only – $35. Do not sand (plastic is harder to correct).
- You see bare metal: Go to a body shop. DIY rust repair costs more later.
Common Mistakes to Avoid
- Skipping the wash step – You will grind dirt into the scratch, creating deeper scratches around it.
- Using too much product – Excess compound dries into dust that scratches paint. Use a dime-sized amount.
- Not breaking down the abrasives – If you stop too early, you leave micro-scratches. Work until the product becomes clear.
- Applying touch-up paint in one thick coat – It will shrink and crack. Apply 3–4 thin coats 10 minutes apart.
- Waxing immediately after sanding – Wax seals in the haze. Always polish first.
- Using a paper towel or old t-shirt – Both contain fibers that scratch. Microfiber only.


FAQ
- How do I tell if a scratch is too deep to fix at home?
The fingernail test is the most common approach. Gently run your fingernail over the scratch; if it snags on the groove, it’s probably gone past the clear coat and into the primer or bare metal, needing professional repair or touch-up paint. - Does toothpaste really remove car scratches?
Yes, but only light cosmetic marks Whitening toothpaste (a non-gel type) works as a slight abrasive to buff over minor clear-coat scratches. You wont be able to use it for deep scratches where you see some paint or metal. - Can I use WD-40 to get rid of scratches?
WD-40 is a temporary fix for those surface scuffs. It fills in those crevices to reflect band differently and can make the scrape not look as visible for a limited amount of time, but it does absolutely nothing permanent about the scratch. - What is the difference between a clear coat scratch and a deep scratch?
- Clear coat scratches only affect the transparent top layer and are often invisible when wet.
- Deep scratches penetrate through the color (base) coat to the primer or metal, making them susceptible to rust.
- How much does it cost to repair a car scratch?
Cost can depend strongly on the depth and understanding of location. DIY repairs can be as low as $20 for a kit, and professional SMART (Small to Medium Area Repair Technique) repair jobs take only a few hours and cost less than most insurance deductibles. - Do commercial scratch remover products actually work?
Yes, products like Meguiar’s Ultimate Compound or Turtle Wax Scratch Repair are highly effective for light to moderate scratches. They use specialized polishing agents to level the clear coat around the scratch. - Is it safe to use a Magic Eraser on my car?
You can use some water with a Magic Eraser to remove paint transfer marks (scuffs from another objects paint), but it needs to be done lightly, and as always you should be careful you do not dull the cars clear coat. - Will my car insurance cover scratch repairs?
Standard policies often do not cover cosmetic scratches unless they result from a specific covered peril like vandalism, a storm (e.g., a fallen tree), or an accident. - How do professionals match the exact paint color?
Trained professionals take the unique manufacturer color code of the vehicle (found inside the door or under a hood) and use specialized tools to get an exact match, like a spectrophotometer. - How long does a professional scratch repair take?
Standard repairs – including SMART using techniques – would typically be done within 2-3 hours. But the paint can take an additional 3 to 12 hours to harden before being driven or washed. - Can I paint over a car scratch directly?
A touch-up pen is useful for deep marks, however, the area still needs to be cleaned and sanded (and often primed) before the paint can adhere properly. Painting over an unpainted scratch or a dirty one will cause the paint to peel. - How can I prevent future scratches on my car?
The best forms of defense are the sacrificial type, such as ceramic coating or Paint Protection Film (PPF). In addition, the paint will strengthen through waxing.
Final Thought
This is probably one of the most rewarding DIY car care skills because it is learning to remove scratches from car paint. It not only saves you hundreds of dollars, but also protects your clear coat and resale value. The answer is simple but the key is an honest one: you can do the fingernail test, you could actually purchase a product that works at whatever depth that thoroughly depends on and don’t rush. A $10 bottle of compound and 20 minutes to sit back and let the magic happen will make a five-year-old car look like it came fresh off the showroom floor.
If not, then use a hand-applied scratch remover in an inconspicuous area. You will likely surprise yourself. And bear in mind: anything that exposes shiny metal is not a DIY job. Recognize when a professional needs to be called. Your car will thank you.
Leave a Reply