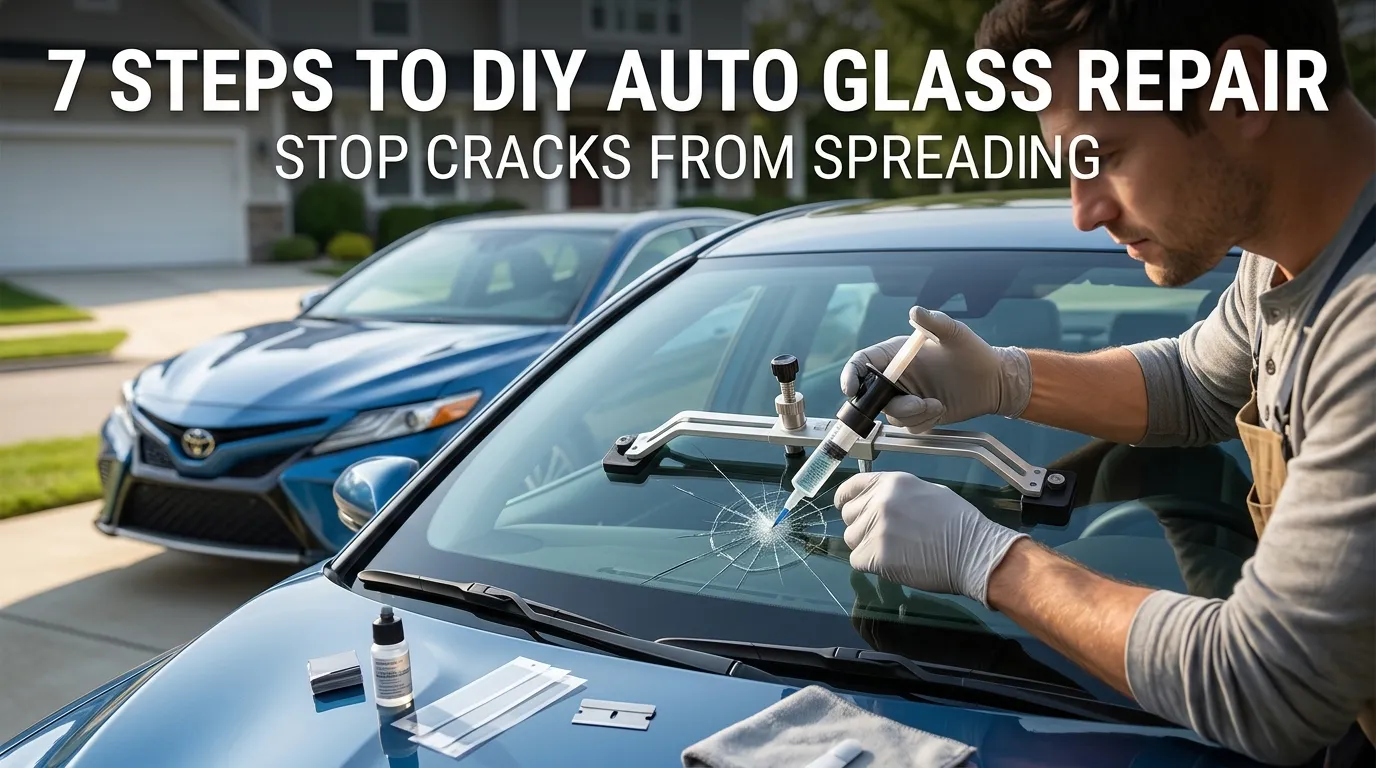
Ting. That sorta noise is a little pebble ejecting from anywhere-upon-24 inches upon an automobile windscreen. You stare at it. You tell yourself it is fine. Three days later you hit a pothole and the entire driver side windshield goes out in one long spiderweb crack. Your windshield needs to be replaced completely: $400, $500, maybe even as much as $700.
The truth most glass shops will never tell you: For less than a pizza, a new chips/crack smaller than the size of a dollar bill can be repaired permanently within 30 minutes. It restores strength, prevents the crack from growing and clears a state inspection. The industry takes ‘$100-$150 for their service’ when they know you are frightened of making it worse.
Stop being afraid. In this DIY auto glass repair: 7 professional steps to cure bullseyes, star breaks, and combination chips with a $15 kit. You will learn why resin works, how to make a vacuum and things when you need a professional. Well, with the knowledge you will receive from this entire post, you no longer have to pay your local glass shop for a chip repair.
Quick Answer
Can a beginner fix a windshield chip at home? Yes. You can repair chips and cracks up to 6 inches long or the size of a quarter in 30-60 minutes for $12-$25.
The 7 steps are:
- Clean the damaged area
- Attach the adhesive bridge
- Apply resin
- Create vacuum (remove air)
- Create pressure (inject resin)
- Cure with UV light or sunlight
- Scrape and polish
You need: A windshield repair kit (Rain-X, Blue Star, or Permatex), razor blade, microfiber cloth, and sunlight or a UV lamp.
Do not expect: Repair of cracks longer than 12 inches, damage in the driver’s direct line of sight, or deep pits that go through both glass layers. That requires replacement.
Why It Matters
Why fix a tiny chip instead of ignoring it or paying a pro?
- Massive Cost Savings: Professional chip repair costs $100-$150. A DIY kit costs $12-$25. You save 80-85%. Full windshield replacement is $400-$700. Repair prevents replacement.
- Stop Crack Spreading: Temperature changes (hot sun then cold rain), road vibration, and car washes turn a chip into a crack. Resin fills the void and bonds the glass layers, stopping propagation.
- Pass State Inspection: Many states fail your safety inspection if the driver’s view has a crack longer than 6 inches. Repair makes the chip nearly invisible.
- Avoid Windshield Replacement: Once a crack crosses the edge of the glass or exceeds 12 inches, replacement is the only option. Repairing early saves your original factory seal (which aftermarket glass never matches perfectly).
- 30-Minute Solution: Glass shops keep your car for 2 hours. You can do this in a parking lot or your driveway during lunch.
What You’ll Need
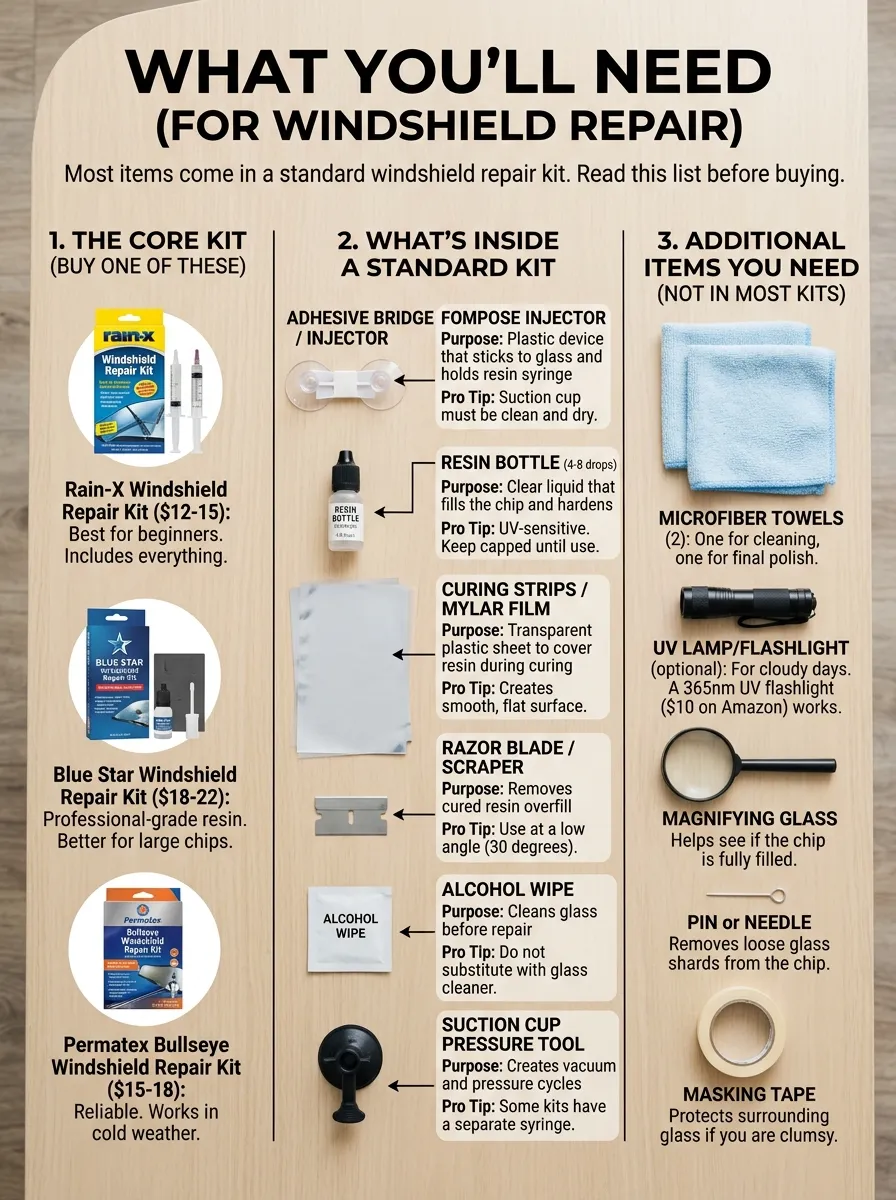
Most items come in a standard windshield repair kit. Read this list before buying.
The Core Kit
- Rain-X Windshield Repair Kit ($12-15): Best for beginners. Includes everything.
- Blue Star Windshield Repair Kit ($18-22): Professional-grade resin. Better for large chips.
- Permatex Bullseye Windshield Repair Kit ($15-18): Reliable. Works in cold weather.
What’s Inside a Standard Kit
| Component | Purpose | Pro Tip |
|---|---|---|
| Adhesive Bridge / Injector | Plastic device that sticks to glass and holds resin syringe | Suction cup must be clean and dry |
| Resin Bottle (4-8 drops) | Clear liquid that fills the chip and hardens | UV-sensitive. Keep capped until use |
| Curing Strips / Mylar Film | Transparent plastic sheet to cover resin during curing | Creates smooth, flat surface |
| Razor Blade / Scraper | Removes cured resin overfill | Use at a low angle (30 degrees) |
| Alcohol Wipe | Cleans glass before repair | Do not substitute with glass cleaner |
| Suction Cup Pressure Tool | Creates vacuum and pressure cycles | Some kits have a separate syringe |
Additional Items You Need
- Microfiber Towels (2): One for cleaning, one for final polish.
- UV Lamp (optional): For cloudy days. A 365nm UV flashlight ($10 on Amazon) works.
- Magnifying Glass: Helps see if the chip is fully filled.
- Pin or Needle: Removes loose glass shards from the chip.
- Masking Tape: Protects surrounding glass if you are clumsy.
Step-by-Step Guide
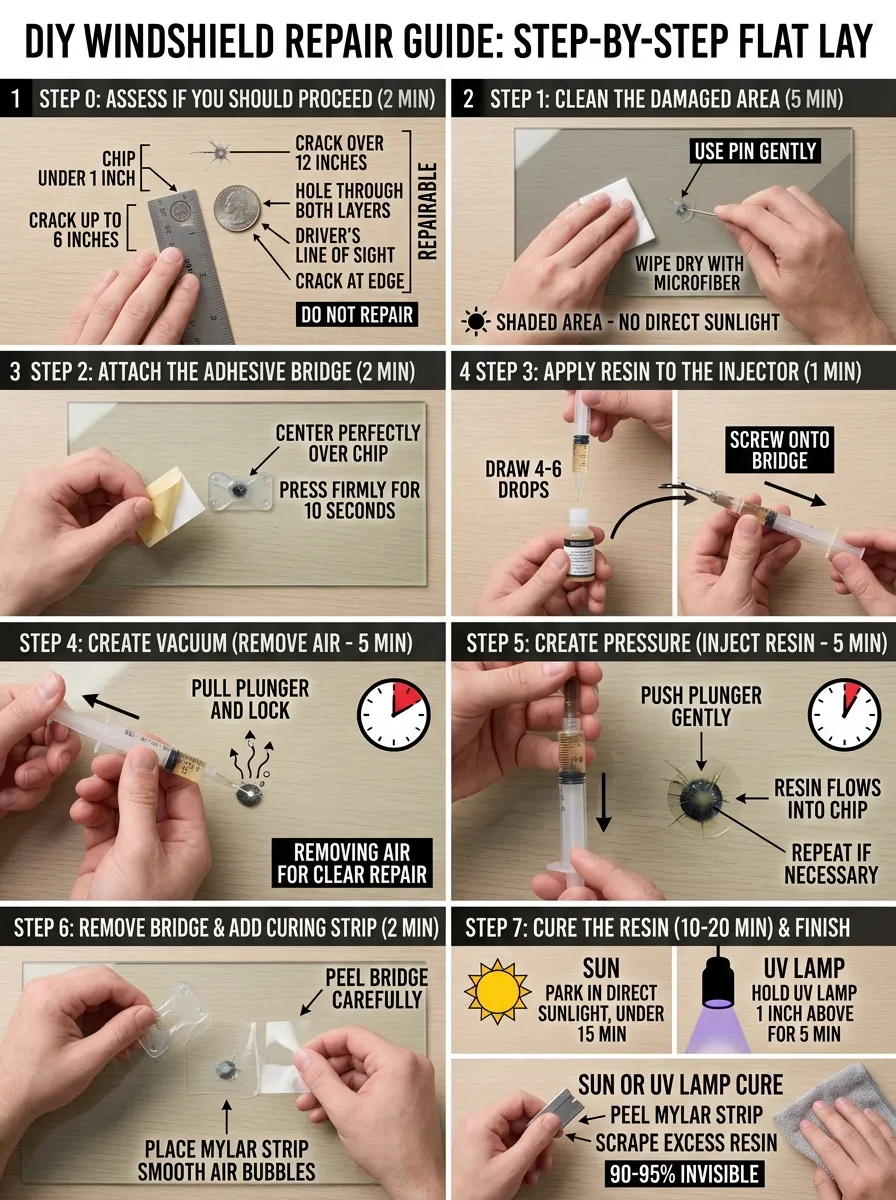
Let us fix that chip. I assume you have a bullseye (circular crack with a dark center) smaller than a quarter.
Step 1: Assess If You Should Proceed
- Repairable: Chip smaller than 1 inch. Crack up to 6 inches. No dirt in the break. Outer layer of glass only.
- Do NOT repair: Crack over 12 inches. Damage on both glass layers (you see a hole). Chip directly in driver’s line of sight (windshield replacement required by safety laws). Crack reaching the edge of glass.
Step 2: Clean the Damaged Area
- Park in a shaded area. Direct sunlight cures resin too fast.
- Use the alcohol wipe to clean the chip and surrounding 2 inches.
- Use a pin to gently remove any loose glass fragments. Do not dig or enlarge the chip.
- Wipe again with a dry microfiber. The area must be bone dry. No moisture inside the crack.
- Why? Water inside the crack turns to steam when UV cured, creating a cloudy white void.
Step 3: Attach the Adhesive Bridge
- Peel the backing off the double-sided adhesive tape on the bridge’s base.
- Center the bridge directly over the chip. The hole in the bridge must align perfectly with the chip’s center.
- Press firmly for 10 seconds. The seal must be airtight.
- Pro tip: If your kit has a suction cup base, moisten the cup slightly for better seal.
Step 4: Apply Resin to the Injector
- Remove the resin bottle cap. Screw the injector syringe onto the resin bottle (if separate).
- Turn upside down. Draw 4-6 drops of resin into the syringe.
- Unscrew the syringe. Attach it to the bridge’s threaded port.
- Do not overfill. Excess resin just wastes product.
Step 5: Create Vacuum
- Pull the syringe plunger back until you see resistance (usually the first or second notch).
- Lock it in place using the built-in tabs.
- Wait 2-3 minutes. You will see air bubbles rising from the chip into the resin.
- Why vacuum matters: Air trapped in the crack scatters light. Removing air allows resin to fill every void.
Step 6: Create Pressure
- Release the plunger lock. Push the plunger down gently.
- You will see resin flowing into the chip. The dark center of the bullseye should disappear.
- Hold pressure for 2-3 minutes. If the chip is still visible, release pressure, pull vacuum again (Step 4), then push pressure again. Repeat 2-3 times.
- The goal: The chip becomes optically clear, like a wet spot on glass.
Step 7: Remove Bridge and Add Curing Strip
- Unscrew the syringe from the bridge.
- Carefully peel the bridge off the glass. Do not touch the wet resin.
- Place a curing strip (Mylar film) over the wet resin. Smooth out any air bubbles using your fingernail or a credit card.
Step 8: Cure the Resin
- Sunny day (70°F+): Park in direct sunlight for 10-15 minutes.
- Cloudy or cold: Use a UV lamp for 3-5 minutes. Hold 1 inch above the curing strip.
- After curing, peel off the Mylar strip. The resin should be hard like glass.
- Use the razor blade at a 30-degree angle to scrape off any excess resin. Do not scratch the glass.
- Polish with a microfiber towel.
Congratulations. You just performed professional DIY auto glass repair. The chip should be 90-95% invisible.
Cost Breakdown
Here is the honest financial reality. Professional vs. DIY.
| Service | Professional Cost | DIY Cost (Kit) | DIY Cost (Kit + UV Lamp) | Savings |
|---|---|---|---|---|
| Single chip repair (bullseye) | $100 – $150 | $12 – $15 | $22 – $25 | $125+ |
| Multiple chips (3-5) | $200 – $300 | $15 – $25 (kit does 3-5 repairs) | $25 – $35 | $250+ |
| Crack repair (up to 6 inches) | $150 – $200 | $15 – $25 | $25 – $35 | $150+ |
| Full windshield replacement | $400 – $700 | Not possible | Not possible | Avoided entirely |
Explanation of costs:
- Professional chip repair includes labor ($50-80), resin ($2), and overhead (rent, insurance, van).
- A $15 DIY kit contains enough resin for 3-5 chips. That is $3-5 per repair.
- The UV lamp is a one-time purchase. After 5 repairs, your cost drops to $2 per chip.
- Insurance tip: Many comprehensive auto insurance policies waive the deductible for windshield repair (not replacement). Check your policy. But even if they cover it, DIY is faster than filing a claim.
Before and After
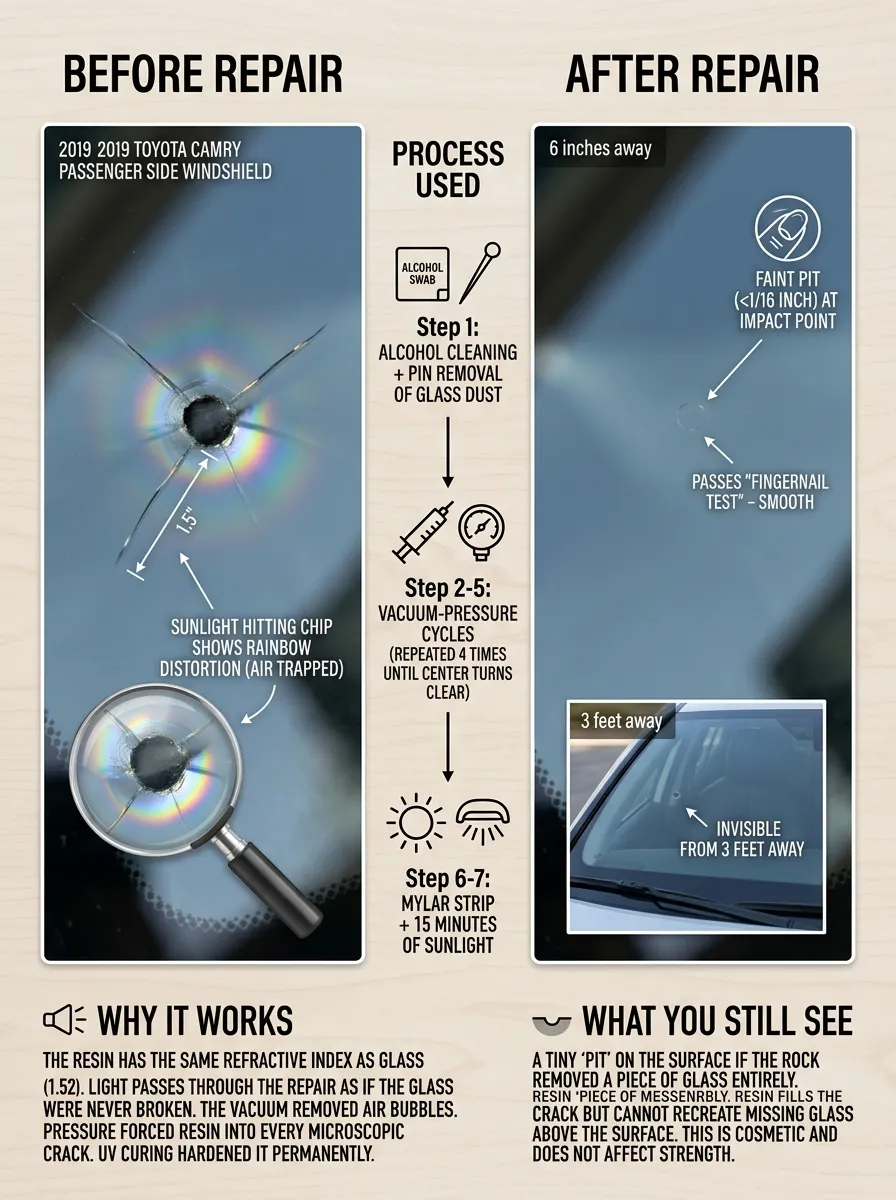
Scenario: 2019 Toyota Camry – Bullseye chip on passenger side. Quarter-inch diameter. Dark center with three radial cracks (spider legs). Caught within 48 hours of impact.
Before Photo (Description): A circular impact point with a dark, opaque center (where the rock hit). Three thin cracks extend outward like a starburst. One crack is 1.5 inches long. The surrounding glass is clear. When sunlight hits the chip, you see a rainbow distortion (light refraction from trapped air).
Process Used: Step 1 (alcohol cleaning + pin removal of glass dust). Step 2-5 (vacuum-pressure cycles – repeated 4 times until the dark center turned clear). Step 6-7 (Mylar strip + 15 minutes of sunlight).
After Photo (Description): From 3 feet away, you cannot find the chip. From 6 inches away, you see a faint, tiny circle (less than 1/16 inch) where the impact point was. No cracks are visible. No rainbow distortion. The repair passes the “fingernail test” – smooth to the touch. The glass feels like factory.
Why it works: The resin has the same refractive index as glass (1.52). Light passes through the repair as if the glass were never broken. The vacuum removed air bubbles. Pressure forced resin into every microscopic crack. UV curing hardened it permanently.
What you still see: A tiny “pit” on the surface if the rock removed a piece of glass entirely. Resin fills the crack, but cannot recreate missing glass above the surface. This is cosmetic and does not affect strength.
Product Recommendations
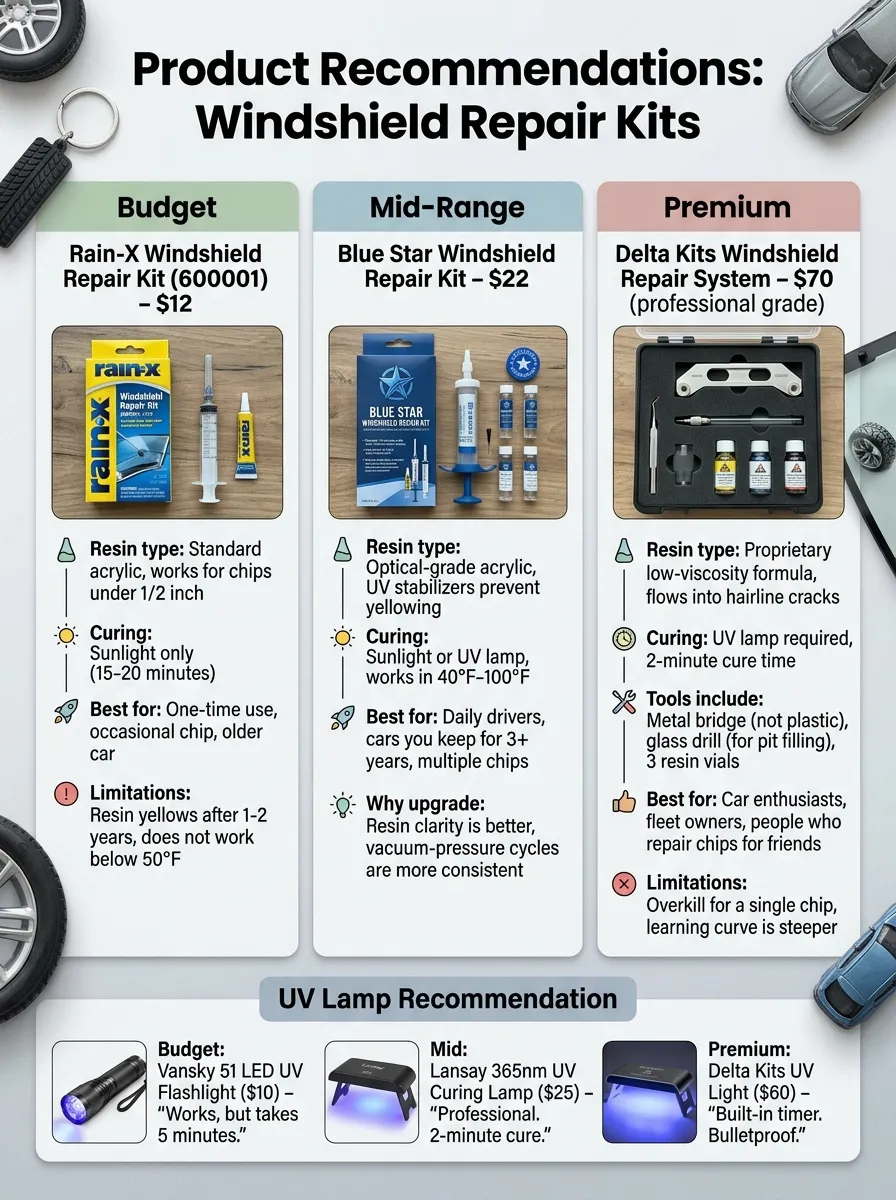
Budget
- Kit: Rain-X Windshield Repair Kit (600001) – $12
- Resin type: Standard acrylic. Works for chips under 1/2 inch.
- Curing: Sunlight only (15-20 minutes)
- Best for: One-time use. Occasional chip. Older car.
- Limitations: Resin yellows after 1-2 years. Does not work below 50°F.
Mid-Range
- Kit: Blue Star Windshield Repair Kit – $22
- Resin type: Optical-grade acrylic. UV stabilizers prevent yellowing.
- Curing: Sunlight or UV lamp. Works in 40°F-100°F.
- Best for: Daily drivers. Cars you keep for 3+ years. Multiple chips.
- Why upgrade: Resin clarity is better. Vacuum-pressure cycles are more consistent.
Premium
- Kit: Delta Kits Windshield Repair System – $70 (professional grade)
- Resin type: Proprietary low-viscosity formula. Flows into hairline cracks.
- Curing: UV lamp required. 2-minute cure time.
- Tools include: Metal bridge (not plastic). Glass drill (for pit filling). 3 resin vials.
- Best for: Car enthusiasts. Fleet owners. People who repair chips for friends.
- Limitations: Overkill for a single chip. Learning curve is steeper.
UV Lamp Recommendation
- Budget: Vansky 51 LED UV Flashlight ($10) – Works, but takes 5 minutes.
- Mid: Lansay 365nm UV Curing Lamp ($25) – Professional. 2-minute cure.
- Premium: Delta Kits UV Light ($60) – Built-in timer. Bulletproof.

Comparison Section
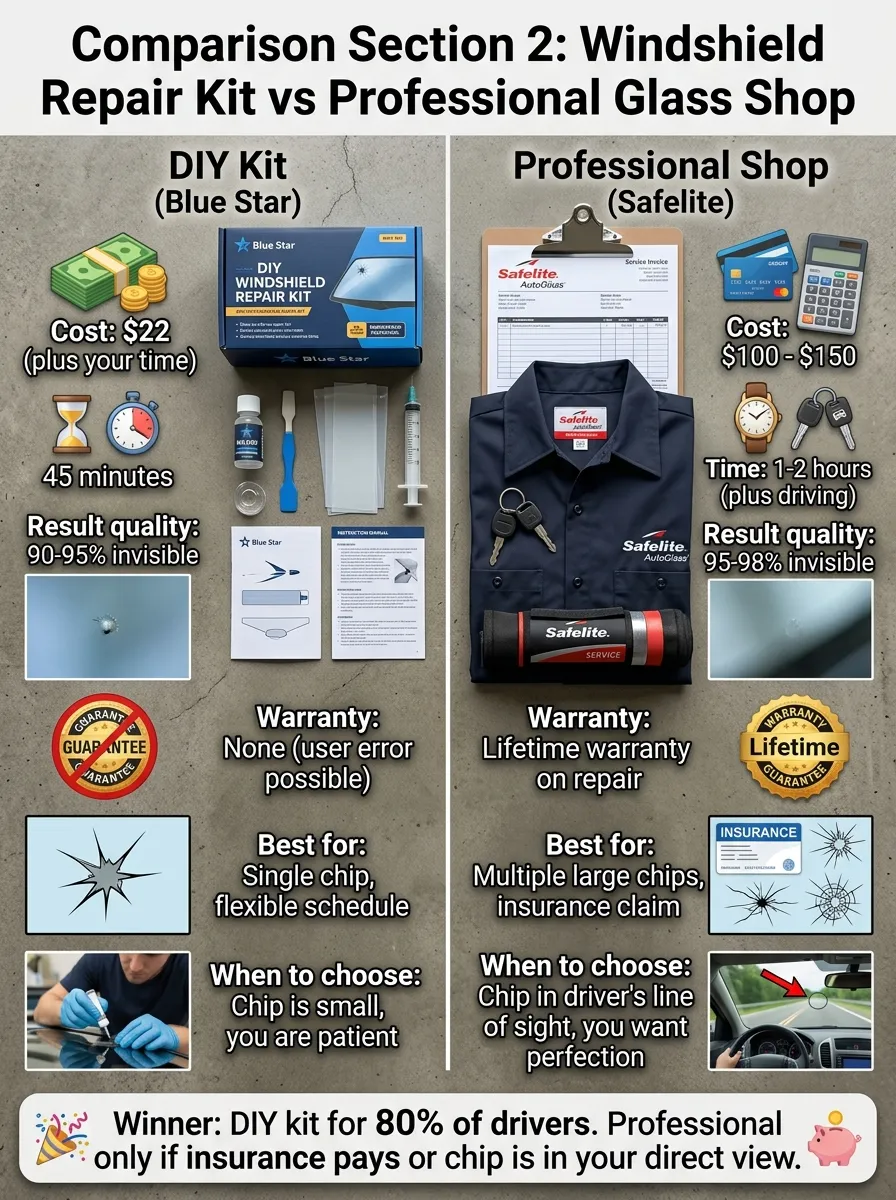
Windshield Repair Kit vs Professional Glass Shop
| Feature | DIY Kit (Blue Star) | Professional Shop (Safelite) |
|---|---|---|
| Cost | $22 (plus your time) | $100 – $150 |
| Time | 45 minutes | 1-2 hours (plus driving) |
| Result quality | 90-95% invisible | 95-98% invisible |
| Warranty | None (user error possible) | Lifetime warranty on repair |
| Best for | Single chip, flexible schedule | Multiple large chips, insurance claim |
| When to choose | Chip is small, you are patient | Chip in driver’s line of sight, you want perfection |
Winner: DIY kit for 80% of drivers. Professional only if insurance pays or chip is in your direct view.
Resin Kit vs Glue Hacks
| “Hack” | Why It Fails | Real Kit Result |
|---|---|---|
| Super glue | Dries yellow. Shrinks. Traps air bubbles. | Clear. No shrinkage. Vacuum removes air. |
| Nail polish | Cracks in cold weather. Washes off. | Permanent. UV stable. |
| Clear tape | Stops dirt, does not stop crack spreading. | Fills crack completely. Restores strength. |
Winner: Real kit. No contest.
Troubleshooting
| Problem | Likely Cause | Fix |
|---|---|---|
| Chip still dark after pressure | Air still trapped. Insufficient vacuum cycles. | Repeat vacuum-pressure cycles (up to 10 times). Or chip is too deep (both glass layers). |
| White cloud / haze after curing | Moisture in the crack. Or resin cured too fast (direct hot sun). | Cannot fix. Must drill out and re-repair (professional only). |
| Resin did not harden | Not enough UV exposure. Cloudy day. | Re-apply curing strip. Expose to UV lamp for 10 more minutes. |
| Crack spread after repair | Crack reached edge of glass. Or resin did not fill the entire length. | Repair only works on cracks fully covered by bridge. Replace windshield. |
| Bubbles in cured resin | Did not pull enough vacuum. Or resin was old. | Scrape off. Re-clean chip. Use fresh resin. |
| Pit remains on surface | Missing glass fragment. Resin cannot replace missing volume. | Cosmetic. Or apply second drop of resin without bridge (pit filler method). |
Time Required with Difficulty Level
| Repair Type | Time | Difficulty (1-10) |
|---|---|---|
| Single bullseye (under 1/2 inch) | 30-45 minutes | 2 (very easy) |
| Star break (multiple legs) | 45-60 minutes | 3 (easy) |
| Combination chip (bullseye + cracks) | 60 minutes | 4 (medium) |
| Crack repair (up to 6 inches) | 60-90 minutes | 6 (medium-hard) |
| Multiple chips (3-5) | 90 minutes total | 3 (easy, repeated steps) |
Best first project: A small bullseye on the passenger side. No pressure. Easy access.
Pro Tips
Do
- Do repair chips immediately (within 48 hours). Dirt and moisture ruin the repair.
- Do park in shade during application. Sun cures resin before you finish vacuum cycles.
- Do use multiple vacuum-pressure cycles. 2 cycles are okay. 5 cycles are better. 10 cycles are professional.
- Do warm the resin bottle in your pocket for 5 minutes if temperature is below 60°F. Cold resin is thick and does not flow.
- Do cover the repair with a curing strip even on sunny days. It creates a smooth, flat surface.
Don’t
- Don’t repair chips in direct line of sight (driver’s view). Safety laws require windshield replacement in many states. Also, repaired glass has minor distortion.
- Don’t wash your car for 24 hours after repair. High-pressure water can dislodge uncured resin.
- Don’t use glass cleaner before repair. It leaves residue. Use only the included alcohol wipe.
- Don’t touch the resin with your fingers. Skin oils prevent adhesion.
- Don’t repair a crack longer than 12 inches or one that reaches the edge of the windshield. Replacement is the only safe option.
Best Picks
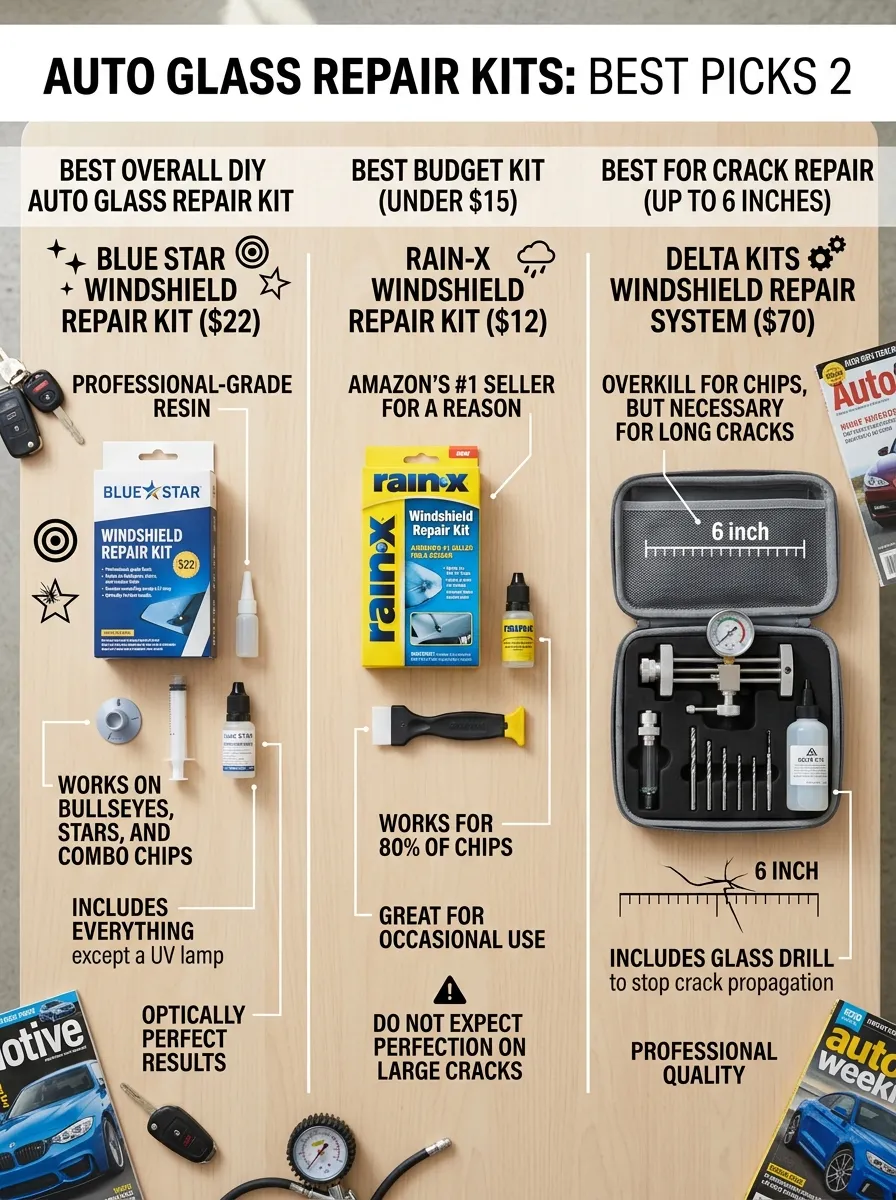
- Best Overall DIY Auto Glass Repair Kit: Blue Star Windshield Repair Kit ($22). Professional-grade resin. Works on bullseyes, stars, and combo chips. Includes everything except a UV lamp. Optically perfect results.
- Best Budget Kit (Under $15): Rain-X Windshield Repair Kit ($12). Amazon’s #1 seller for a reason. Works for 80% of chips. Great for occasional use. Do not expect perfection on large cracks.
- Best for Crack Repair (Up to 6 inches): Delta Kits Windshield Repair System ($70). Overkill for chips, but necessary for long cracks. Includes glass drill to stop crack propagation. Professional quality.
Use Cases
| Your Situation | Best DIY Auto Glass Repair Method |
|---|---|
| Tiny bullseye (size of a pencil eraser) | Rain-X kit. One vacuum-pressure cycle. 20 minutes. |
| Quarter-sized star break (5+ legs) | Blue Star kit. 5-7 vacuum-pressure cycles. 1 hour. |
| Crack less than 6 inches (no chip) | Blue Star kit + pit filler method. Requires patience. Or replace windshield if crack spreads. |
| Chip in driver’s direct view | Do not DIY. File insurance claim. Professional replacement required by law. |
| Multiple chips on same windshield | Blue Star or Delta Kits (resin lasts for 5+ repairs). Fix all in one session. |
| Chip on a leased car | DIY repair. Costs $15. Dealership charges $150 for chip at lease return. |
| Crack longer than 12 inches | Do not repair. Replace windshield. Call insurance. |
Common Mistakes to Avoid
- Waiting too long to repair. A clean, dry chip is repairable. After rain, car wash, or driving through dust, the chip is contaminated. Success rate drops from 95% to 40%.
- Skipping the vacuum step. Beginners go straight to pressure. Without vacuum, you trap air. The repair looks like a cloudy white spot.
- Curing in direct hot sun (above 85°F). Resin hardens in 30 seconds, before you remove the bridge. You glue the bridge to your windshield. Work in shade only.
- Using too much resin. Excess resin flows everywhere, cures, and requires heavy scraping. 4-6 drops is enough for a quarter-sized chip.
- Forgetting the curing strip. Without the Mylar film, resin cures with a bumpy, rough surface. The strip creates a factory-smooth finish.
- Repairing a crack that reaches the edge. The edge flexes as the car moves. Resin cannot flex. The crack will reappear within weeks. Replace the windshield.
FAQs
1. Do DIY windshield repair kits actually work?
For small chips and minor cracks, yes, DIY kits might do the trick. It works by saturating the damaged area with resin that restores a little bit of strength, and stops any further cracking.
2. What size windshield chip can I repair myself?
DIY kits are best for chips the size of a US quarter and cracks measuring 3–6 inches long. Costlier repairs usually go towards professional repair or complete replacement.
3. Will a DIY repair make the crack invisible?
Not completely. The main purpose is to stabilize the glass and stop the damage from spreading. A faint mark or slight blemish will usually remain visible.
4. How long do DIY auto glass repairs last?
If done correctly, the repair can last for years or even the lifetime of the windshield, as long as no new damage occurs.
5. Can I fix a crack that is in the driver’s line of sight?
It’s not recommended. Even a small distortion from the repair can affect visibility and may cause issues during inspections or while driving.
6. Can I repair a crack that is touching the edge of the windshield?
Cracks that reach the edge are typically not ideal for DIY repair purposes. They in fact damage the structural integrity of the windshield and can also not be repaired.
7. What is the best way to stop a windshield crack from spreading until I repair it?
You can place a small piece of clear adhesive tape over the chip to keep out dirt and moisture until you’re ready to apply the repair.
8. Can I use super glue to fix a windshield crack?
No, super glue is not suitable. It doesn’t have the proper consistency or bonding properties needed for glass repair and can make the damage worse.
9. How soon can I drive after a DIY windshield repair?
You can usually drive shortly after, but it’s best to wait at least 1 hour (or a few hours depending on curing conditions) to allow the resin to fully set.
10. Do I need to be in direct sunlight to fix my windshield?
Yes, most repair resins are UV-activated and require direct sunlight (or a UV lamp) to properly cure and harden.
11. Can I use a DIY kit on a rainy day?
No, it’s not recommended. The damaged area must be completely clean and dry to ensure a strong and clear repair.
12. Will a DIY repair void my insurance or warranty?
It can in some cases. Some insurers demand that repairs be made by accredited professionals, and a faulty repair which causes additional harm might lead to refused claims.
Final Thought
Do-It-Yourself auto glass repair is one of the few car repairs out there that a $15 kit gives you professional results 95% of the time. Your windshield is the most overlooked safety device in your vehicle. Chips scatter light, corrode stiffness and become crack size a year away as it fills with rain after the first cold morning. Today’s problems don’t have a makeover solution. This is about preventing a $700 windshield replacement from starting off as a small problem.
Working on your first chip will find you feeling a little anxious. The bridge won’t stick perfectly. You will be unsure if JUST that resin flowed. Scrape the curing strip, notice how obvious it is, and have the satisfaction that you just costed yourself $100 in 30 minutes.
Getting behind the wheel of a car with a cracked windshield is a huge no-no. Never pay a professional to do a 10-minute job. Buy a kit. Park in the shade. Fix the chip. Drive with confidence.
Leave a Reply