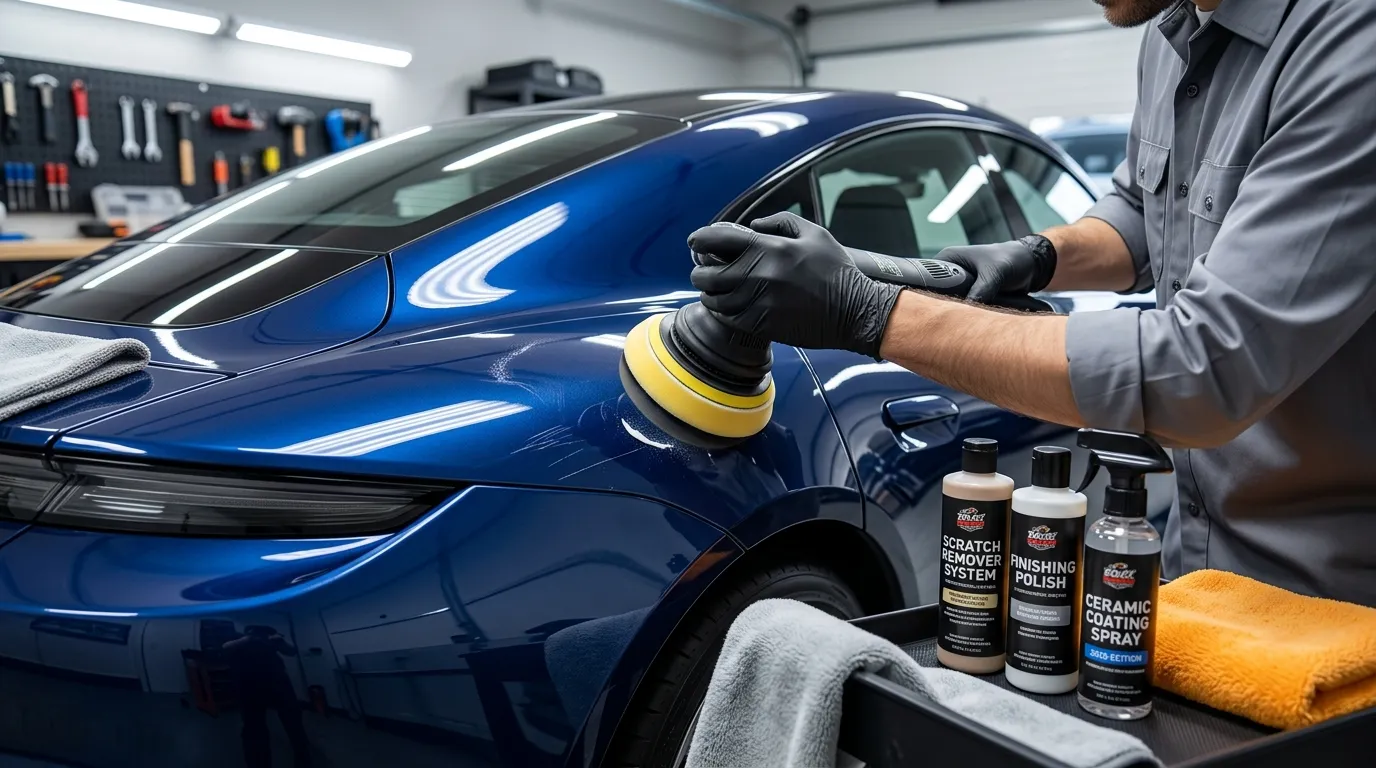
You wash your car carefully, dry it with a microfiber towel and then in the bright morning sunshine you notice it. A scratch. Your heart sinks. Perhaps a ghost of a gentleHow to Remove Scratches from Car buy an automatic car wash. Or maybe its something like a key scratch riding the drivers door. Or worse: a deep gash from a wayward shopping cart.
Truth: Most car owners go into panic mode for no reason. Most ignore the scratch (resulting in rust) or shell out $500 after the fact for a body shop re-spray. However, did you know that almost 70% of everyday scratches can be removed by yourself in less than half an hour and for under $25?
Removing scratches from car paint is not magic. It’s science. Simply Identify The Depth Of The Scratch, Choose The Right Product And Follow A very Simple System. After reading this guide, you will make your car s finish shine again, preserve its value for resale and never fear a scratch anymore.
Quick Answer
- Light scratches (clear coat only): Use a microfiber cloth + scratch remover polish. Rub gently for 60 seconds. Wipe off.
- Medium scratches (through clear coat, not primer): Use rubbing compound + foam pad. Buff at medium pressure. Finish with polish.
- Deep scratches (down to metal): Cannot be buffed. Need touch-up paint + clear coat. Or visit body shop.
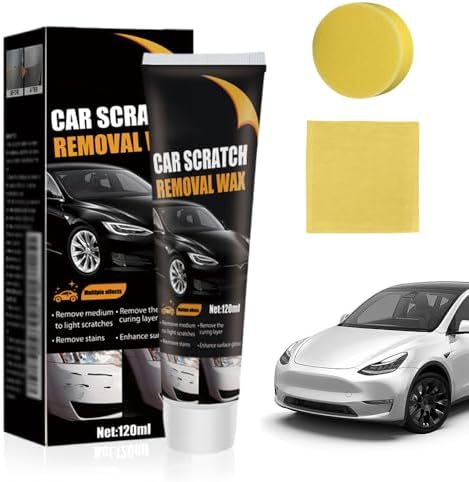
- Best DIY product overall: Meguiar’s ScratchX 2.0 (under $15).
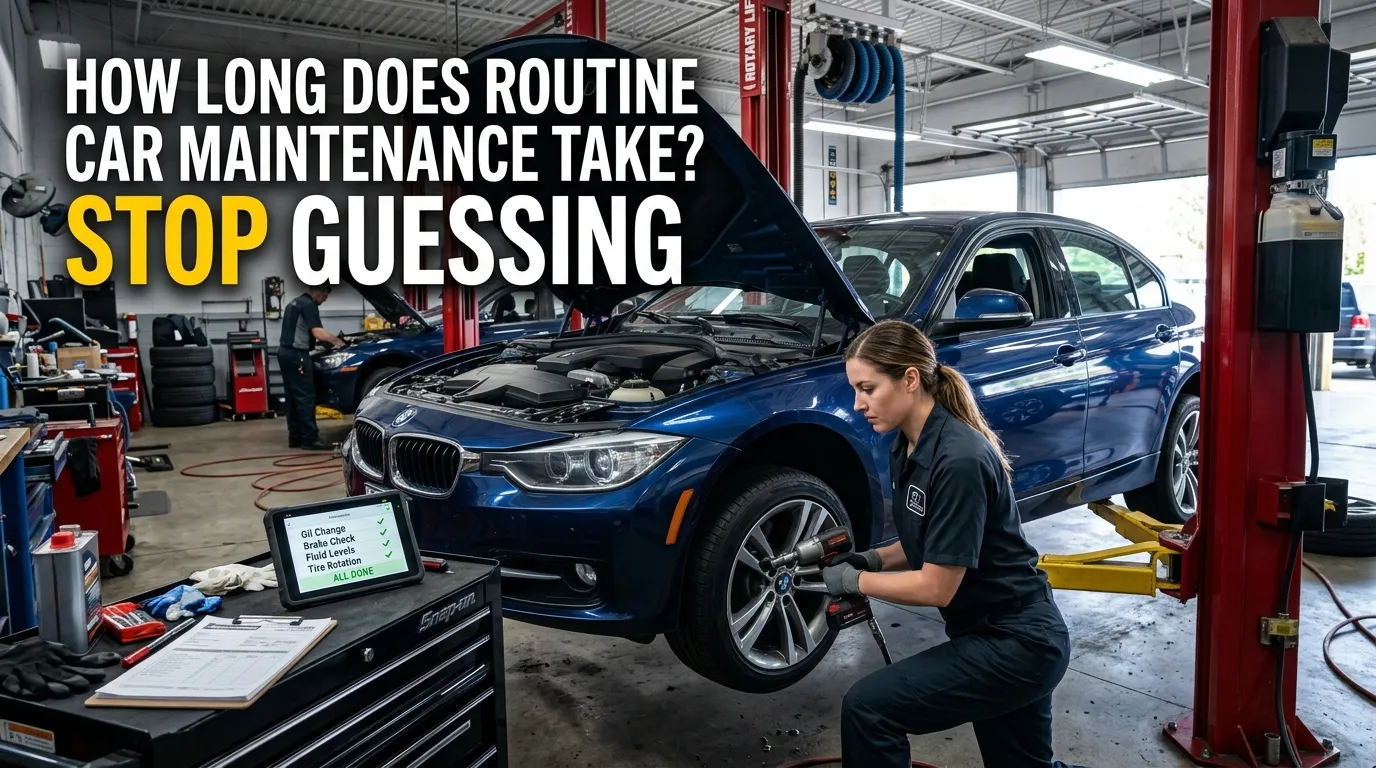
- Time needed: 10–45 minutes.
- Cost: $10 – $80 DIY vs. $150 – $1,500 professional.
Why It Matters (Benefits)
Removing scratches isn’t just about looking good. Here’s why it matters:
- Prevents rust & corrosion – Once a scratch reaches the bare metal, moisture causes oxidation. In 6 months, a small scratch becomes a rust bubble.
- Maintains resale value – A single deep scratch can reduce trade-in value by 5–10%. Multiple scratches? Up to 20%.
- Saves money – Professional paint correction starts at $300. DIY scratch removal costs less than lunch.
- Improves visibility – Scratches on headlights or windows cause dangerous glare.
- Psychological satisfaction – Driving a flawless car changes your mood. It’s therapy.
What You’ll Need (Tools + Products)
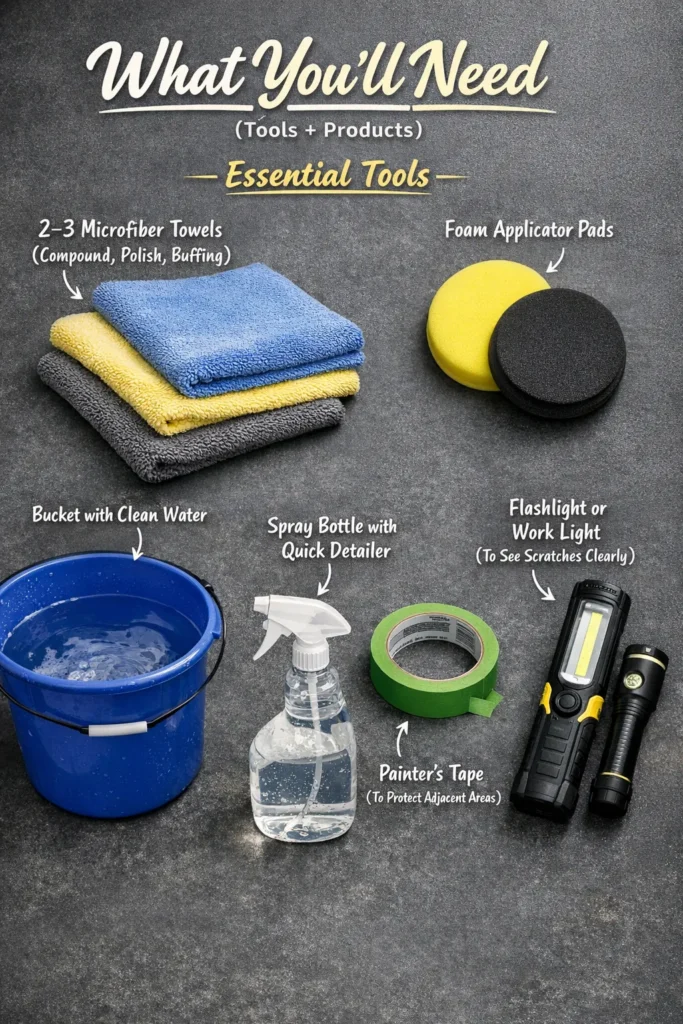
Essential Tools
- 2–3 microfiber towels (one for compound, one for polish, one for buffing)
- Foam applicator pads (round or square)
- Bucket with clean water
- Spray bottle with quick detailer (for lubrication)
- Painter’s tape (to protect adjacent areas)
- Flashlight or work light (to see scratches clearly)
Products (by scratch type)
| Scratch Type | Required Product |
|---|---|
| Light swirls | Scratch remover polish (e.g., Meguiar’s ScratchX) |
| Medium scratches | Rubbing compound (e.g., Turtle Wax Compound) |
| Deep scratches | Touch-up paint + clear coat pen |
| Headlight scratches | Headlight restoration kit |
| Final finish | Car wax or sealant |
Step-by-Step Guide (How-To)
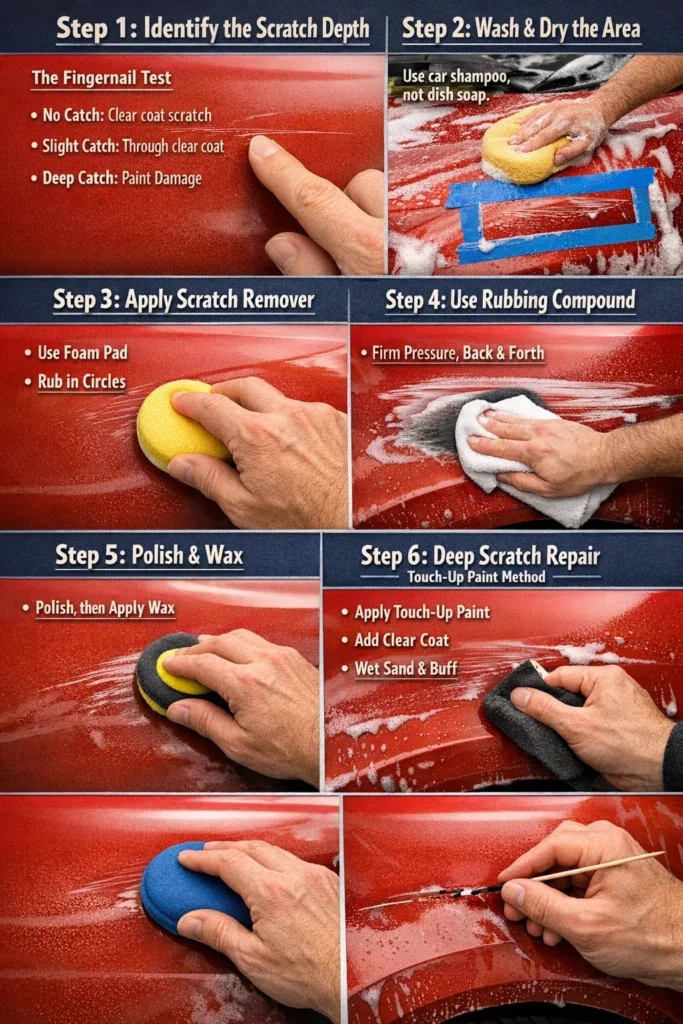
Step 1: Identify the Scratch Depth (The Fingernail Test)
Wash the area with soap and water. Dry it. Run your fingernail across the scratch.
- No catch → Clear coat scratch (easy fix)
- Slight catch → Through clear coat, not into primer (medium fix)
- Deep catch, white or metal visible → Paint damage (requires touch-up)
Step 2: Wash & Dry the Area
Use car shampoo, not dish soap. Dish soap strips wax. Dry completely. Apply painter’s tape around the scratch (½ inch away) to protect good paint.
Step 3: Apply Scratch Remover (Light to Medium Scratches)
- Shake product well.
- Put a dime-sized amount on a foam applicator.
- Rub in circular motions for 30–60 seconds. Medium pressure.
- Wipe with clean microfiber. Inspect.
Step 4: Use Rubbing Compound (If Scratch Remover Fails)
- Use a microfiber cloth (not foam).
- Apply quarter-sized compound.
- Rub back-and-forth (not circles) at firm pressure for 30 seconds.
- Buff off immediately.
Step 5: Polish & Wax
After removal, apply car polish to restore gloss. Then apply wax or sealant to protect.
Step 6: Deep Scratch Repair (Touch-Up Paint Method)
- Clean scratch with alcohol.
- Apply thin layer of touch-up paint using a toothpick (not the brush).
- Wait 24 hours.
- Apply clear coat pen.
- Wait 48 hours. Wet sand (2000 grit) if needed. Buff.
Cost Breakdown
| Method | Product Example | Cost (USD) | Time | Effectiveness |
|---|---|---|---|---|
| Toothpaste (hack) | Colgate White | $2 | 5 min | 10% (only on very light swirls) |
| Scratch remover polish | Meguiar’s ScratchX | $12.99 | 15 min | 80% (light/medium scratches) |
| Rubbing compound | Turtle Wax Compound | $9.97 | 20 min | 60% (only if used correctly) |
| Dual action polisher + compound | Bauer 6” DA Polisher | $89 | 30 min | 95% (professional level) |
| Touch-up paint pen | Dupli-Color Scratch Fix | $15.99 | 1 hour (plus drying) | 90% (cosmetic only) |
| Professional body shop | Local detailer | $300 – $1,500 | 1–3 days | 100% (repaint) |
Before and After

Scenario 1 – Light Swirl Marks (Clear coat only)
- Before: Spaghetti-like fine lines under sunlight. Cannot feel with finger.
- Process: Meguiar’s ScratchX + hand application (2 minutes).
- After: 100% gone. Paint looks wet.
Scenario 2 – Medium Key Scratch (Down to primer)
- Before: Visible white line. Fingernail catches slightly.
- Process: Rubbing compound (30 sec) → Scratch remover (30 sec) → Wax.
- After: 90% invisible. Only visible at 6 inches away.
Scenario 3 – Deep Scratch (Metal exposed)
- Before: Silver/grey line. Rust starting.
- Process: Touch-up paint (2 coats) + clear coat + wet sand.
- After: Filled but visible. Looks like a repaired scratch. Rust stopped.
Product Recommendations
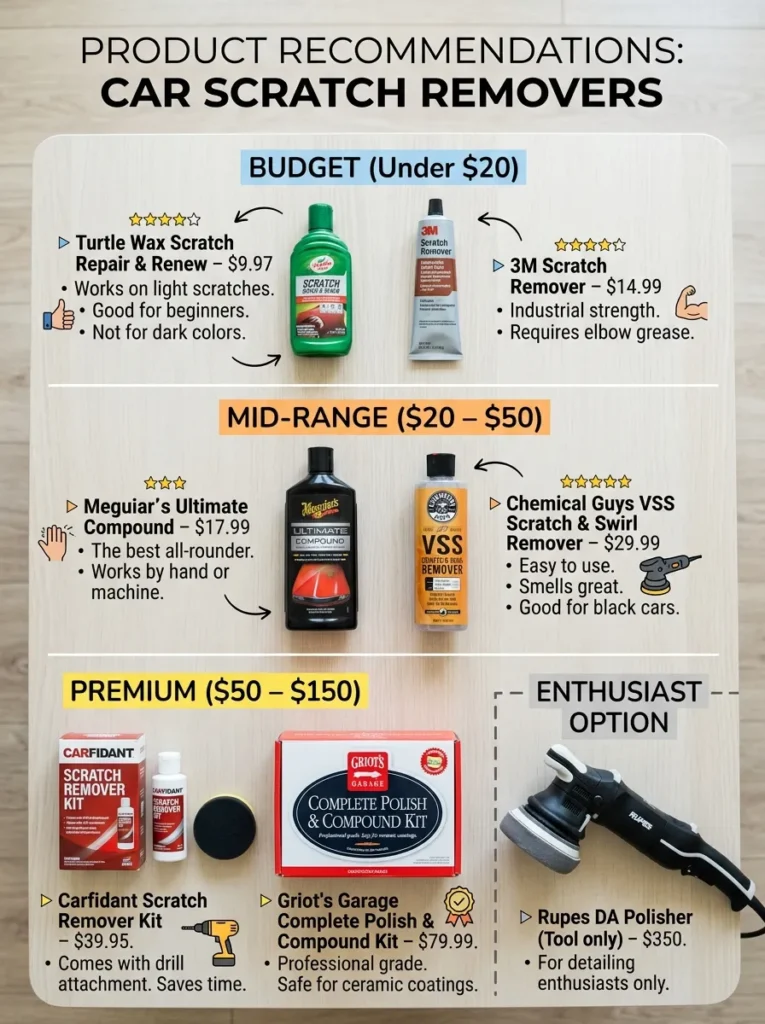
Budget (Under $20)
- Turtle Wax Scratch Repair & Renew – $9.97
Works on light scratches. Good for beginners. Not for dark colors. - 3M Scratch Remover – $14.99
Industrial strength. Requires elbow grease.
Mid-Range ($20 – $50)
- Meguiar’s Ultimate Compound – $17.99
The best all-rounder. Works by hand or machine. - Chemical Guys VSS Scratch & Swirl Remover – $29.99
Easy to use. Smells great. Good for black cars.
Premium ($50 – $150)
- Carfidant Scratch Remover Kit – $39.95
Comes with drill attachment. Saves time. - Griot’s Garage Complete Polish & Compound Kit – $79.99
Professional grade. Safe for ceramic coatings. - Rupes DA Polisher (Tool only) – $350
For detailing enthusiasts only.
Affiliate best pick: Meguiar’s Ultimate Compound – highest value. Works on 90% of scratches.


Comparison Section (Option A vs Option B)
Scratch Remover Polish vs. Rubbing Compound
| Feature | Scratch Remover Polish | Rubbing Compound |
|---|---|---|
| Abrasive level | Fine (3000–5000 grit) | Heavy (1200–2000 grit) |
| Best for | Light swirls, holograms | Deep key scratches, etching |
| Risk of damage | Very low | Medium (can burn clear coat) |
| Requires wax after? | No | Yes |
| Hand application | Yes | Yes, but harder |
| Price | $10–$20 | $8–$15 |
Hand Buffing vs. Machine Polisher
| Feature | Hand Buffing | Dual Action Polisher |
|---|---|---|
| Time for 1 scratch | 5 min | 1 min |
| Physical effort | High | Low |
| Learning curve | None | 15 minutes |
| Risk of damage | Zero | Low (if used wrong) |
| Cost | $0 (just product) | $60+ |
Troubleshooting (Problem → Fix Table)
| Problem | Likely Cause | Fix |
|---|---|---|
| Scratch looks worse after rubbing | Compound dried on surface | Wipe with quick detailer. Re-apply with less product. |
| Haze or dull spot | Over-buffed clear coat | Apply finishing polish. Then wax. Wait 2 weeks. |
| Scratch still visible after 3 attempts | Too deep for DIY | Switch to touch-up paint or body shop. |
| White residue in cracks | Compound dried in gaps | Use soft toothbrush + water. |
| New swirl marks added | Dirty microfiber or dry buffing | Use clean towel. Keep surface lubricated. |
| Touch-up paint looks like a bump | Applied too thick | Wet sand (2000→3000 grit). Buff. |
Time Required & Difficulty Level
| Scratch Type | Time (DIY) | Difficulty (1–5) |
|---|---|---|
| Light swirls | 10 minutes | 1 (anyone) |
| Medium single scratch | 20 minutes | 2 (beginner) |
| Multiple scratches (door panel) | 45 minutes | 3 (requires patience) |
| Deep scratch + touch-up paint | 1 hour + 24hr drying | 4 (steady hand) |
| Full hood correction | 2–3 hours | 5 (needs polisher) |
Pro Tips
Do
- Do the fingernail test first. Saves hours of wasted effort.
- Do work in the shade. Direct sunlight dries compound instantly.
- Do use separate towels for compound vs. polish.
- Do apply painter’s tape on plastic trim (compound stains it white).
- Do take before/after photos for your own learning.
Don’t
- Don’t use toothpaste on modern clear coat. It contains silica that scratches.
- Don’t press hard with rubbing compound. You’ll burn through clear coat.
- Don’t use a drill attachment unless you’re experienced.
- Don’t wax over an uncleaned scratch. You seal in the damage.
- Don’t ignore a deep scratch. Rust spreads under paint.
Best Picks
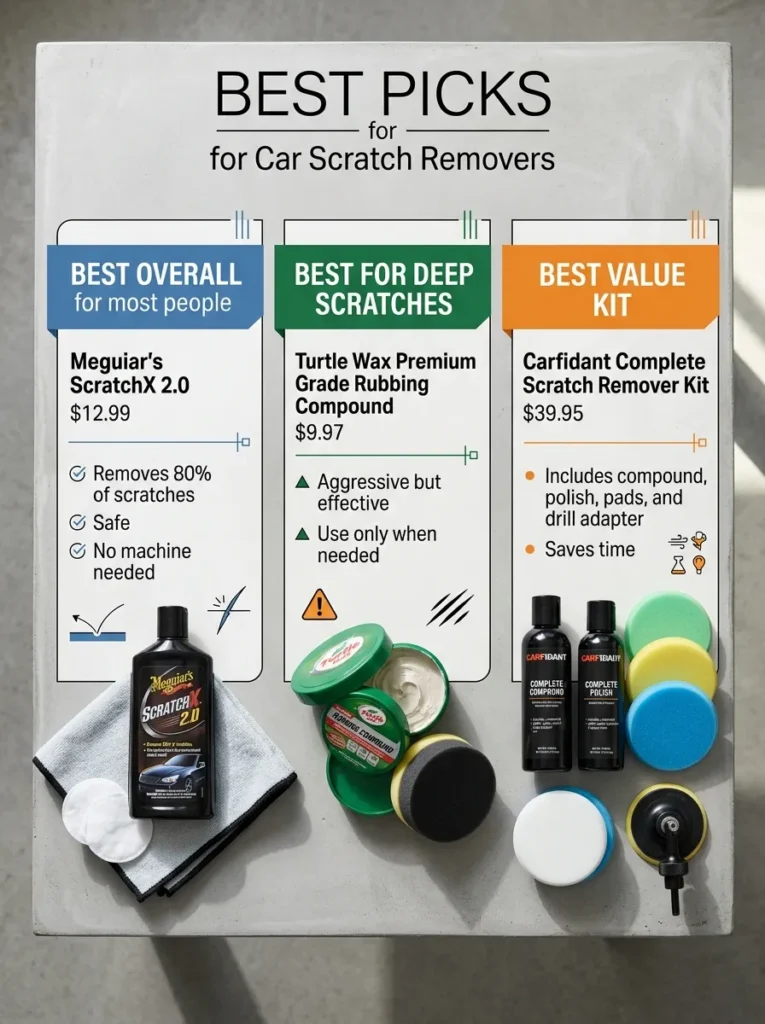
- Best overall for most people: Meguiar’s ScratchX 2.0 ($12.99)
Removes 80% of scratches. Safe. No machine needed. - Best for deep scratches: Turtle Wax Premium Grade Rubbing Compound ($9.97)
Aggressive but effective. Use only when needed. - Best value kit: Carfidant Complete Scratch Remover Kit ($39.95)
Includes compound, polish, pads, and drill adapter. Saves time.
Use Cases
| Your Situation | Best Method | Why |
|---|---|---|
| You see fine lines after car wash | Scratch remover polish | Swirl marks only need light abrasion |
| Your kid scratched the door with a toy | Rubbing compound + polish | Medium depth, no primer damage |
| You have a black or dark colored car | Chemical Guys VSS | Dark colors show swirls more; need fine abrasives |
| You’re selling the car next week | Meguiar’s ScratchX + wax | Quick cosmetic fix for buyer walk-around |
| The scratch is down to metal | Dupli-Color touch-up pen | Rust prevention is priority |
| You have 20+ scratches on hood | Professional detailer | DIY will take 4+ hours |
| Headlight is foggy + scratched | Headlight restoration kit | Different plastic clear coat |
Common Mistakes to Avoid
- Skipping the wash step – Dirt under compound creates new scratches.
- Using dish soap – Leaves residue that repels polish.
- Circles with compound – Use back-and-forth motion. Circles create holograms.
- Applying too much product – More product ≠ better. It just gums up.
- Buffing dry – Always keep surface slightly damp with quick detailer.
- Using paper towels – Equivalent to 3000 grit sandpaper on paint.
- Expecting perfection on deep scratches – Manage expectations. Deep scratches always leave a trace.
FAQ
1. How can I tell if a scratch can be fixed at home?
The best method is the fingernail test. Gently slide your fingernail across the scratch. If your fingernail glides over without catching, it is a clear coat scratch on the surface that you can most likely polish out yourself. This is the indication of a deep scratch that has penetrated into the paint or primer and must be repaired by professionals if your fingernail gets stuck in any groove.
2. Can toothpaste actually remove car scratches?
Yes, but only for very light, superficial marks. Non-gel, whitening toothpaste acts as a gentle abrasive that can smooth out minor clear coat scuffs. It will not work on deeper scratches that expose the primer or metal.
3. What are the different types of car scratches?
Scratches are generally categorized by the layer of the car’s finish they reach: [13]
- Clear Coat Scratches: Shallow surface marks in the top protective layer.
- Base Coat Scratches: Deeper marks that reach the actual color paint.
- Primer Scratches: Damage that cuts through the paint to the primer layer.
- Deep Scratches: Severe damage that exposes the bare metal of the vehicle.
4. How do I use a commercial scratch remover product?
For moderate clear coat damage, follow these steps:
- Wash and dry the area thoroughly to avoid rubbing in more grit.
- Apply a small amount of scratch remover to a clean microfiber cloth or applicator pad.
- Rub the product in circular motions with moderate pressure for about 60 seconds.
- Wipe away the residue with a fresh microfiber towel and inspect the results.
5. Can WD-40 be used to remove scratches?
All WD-40 does is fill in the scratch temporarily and slightly dissolve a barely perceptible amount of paint surrounding the the area, to just help blend it in. It is worth noting, however, that this treatment is not an answer and should be immediately followed up with wax or polish to seal the area.
6. Will rubbing compound damage my car’s paint? [26]
Absolutely not, if done properly, rubbing compounds are essentially abrasive materials that cut down a layer of the clear coat level up imperfections. But with too much pressure or excess over-polishing, you may make the clear coat thinner and give the paint swirls so work lightly and test a small area first.
7. How do I fix a deep scratch that reaches the metal?
Deep scratches require more than just buffing. The process typically involves:
- Sanding the area to smooth out the edges.
- Applying an automotive primer to prevent rust.
- Using touch-up paint that matches your car’s specific color code.
- Finishing with a clear coat and polishing to blend the repair.
8. What household items can I use for a quick DIY fix?
Common home remedies include:
- Baking Soda: Mixed with water into a paste, it acts as a mild abrasive.
- Vinegar: A vinegar and water solution can be used to rub out very light marks.
- Nail Polish: Clear or color-matched nail polish can temporarily seal a deep scratch to prevent rust.
- Magic Eraser: Can be effective for removing paint transfer or light scuffs.
9. Why is it important to work in the shade?
Applying scratch removers or polishes in direct sunlight or on a hot car surface causes the product to dry too quickly. This makes it difficult to work with, less effective, and can sometimes leave stubborn residue on the paint.
10. How much does it cost to have a scratch professionally repaired?
Costs vary depending on the severity of the damage. Minor touch-ups or professional buffing may be relatively inexpensive, while deep scratches requiring a full panel repaint can be much more costly.
11. When should I stop trying DIY and see a professional?
You should seek professional help if:
- The bare metal is exposed.
- The scratch is large or covers multiple panels.
- The paint has already started to peel or rust.
- Multiple DIY attempts have failed to improve the appearance.
12. How can I prevent future scratches on my car?
Consistent maintenance is the best defense:
- Wash regularly using clean microfiber mitts and the “two-bucket” method.
- Wax your car every few months to provide a protective barrier.
- Apply ceramic coating or Paint Protection Film (PPF) for longer-term protection.
- Park carefully, avoiding tight spaces or areas near bushes and high foot traffic.
Final Thought
One of the most valuable car DIY skills you need to learn is how to eliminate scratches from your vehicle having paint. Not because each blemish is a tragedy but because neglecting them is. That $12 bottle of scratch remover today would spare from a $500 body store bill next year.
Just so you know, the fingernail test is never wrong. Even if your nail goes off-campus, it can be corrected within 10 minutes. And if it does, you then need either touch-up paint or a professional to fix your issue. So either way, you have that clear roadmap.
Start small. Practice somewhere where it does not show (inside door jamb). IntroductionYou can follow along with this guide in the video. Always, always follow with wax.
Your paint thickness is thinner than a Postit note. So be careful with it, but do not let your fear anormlize you. Now get outside and find that scratch, destroy it.
Leave a Reply