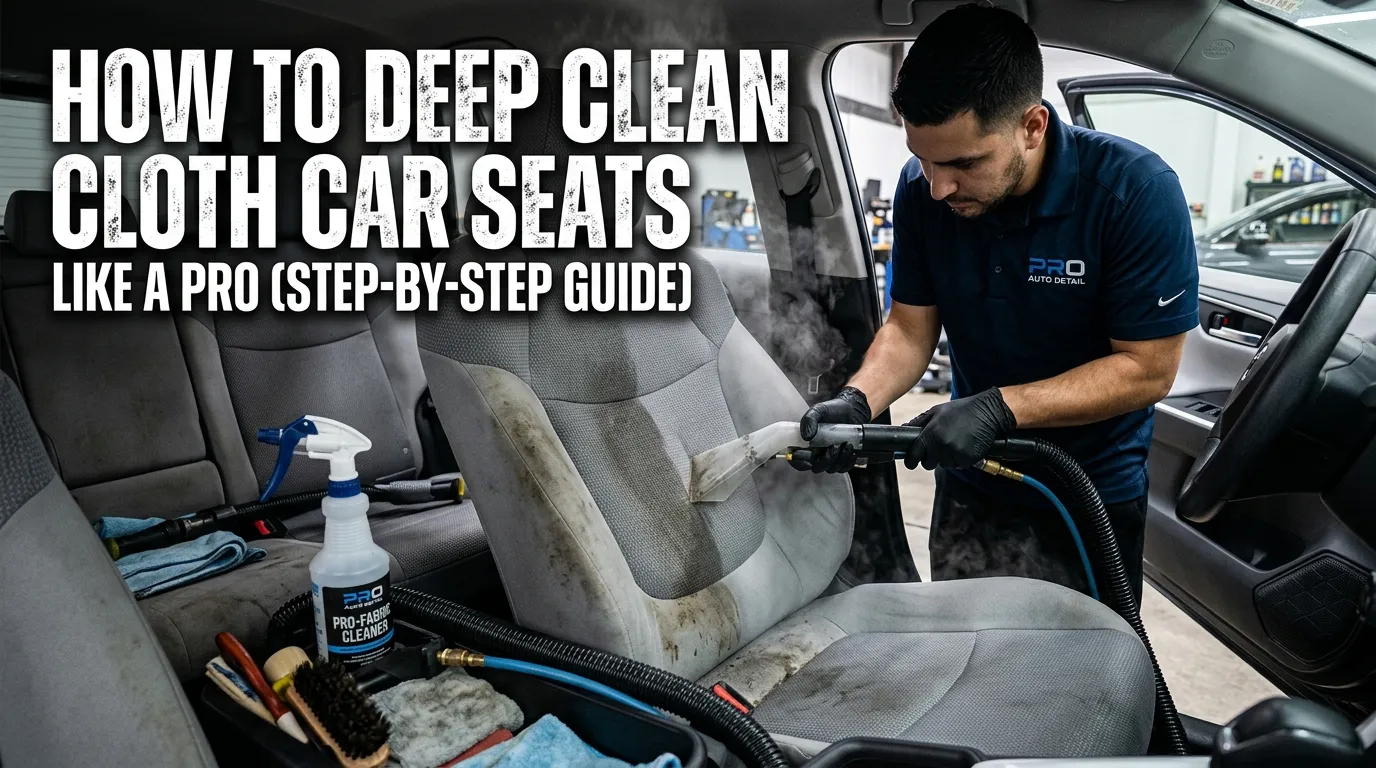
Let’s be real your car seats have been through some stuff. From the morning coffee that didn’t survive a turn signal to the French fries your child “accidentally” dropped last week, fabric car seats are magnets for chaos. Cloth upholstery is like a sponge unlike leather, all you can do with that is wipe down. It clings to dirt, captures odors and gradually becomes less textile than tie-dye. Yet the good news is that you don’t have to be a pro detailer to revive them. In fact, with the proper tools and some time on your hands, How to Deep Clean Cloth Car Seats you can have those seat look 90% new without ever leaving your driveway. In this guide, I’ll walk you through precisely how to clean cloth car seats from the quick daily maintenance of them to deep extraction methods that get rid of junk you didn’t know was there.
Quick Answer
For Clean Cloth Car Seats: (1) Vacuum the car seats to remove any loose dirt. 2) Treat stains beforehand with a specialized fabric cleaner, or try an at-home vinegar mixture. 3) Brush the fabric with a soft brush. 4) Use a wet/dry vacuum or upholstery cleaner to extract the dirt. 5) Wait until the seats are completely dry before using the car. For stain prevention, finish with a fabric protectant spray.
Why It Matters (How to Deep Clean Cloth Car SEATS)
Taking care of your fabric seats isn’t purely for vanity’s sake. First, it’s hygiene. Dirt, allergens, bacteria, and food particles get captured by fabric, which can hurt air quality inside your cabin. Second, it preserves resale value. A potential buyer may not mind high mileage, but they’ll notice a nasty stain right away. Third, it prevents permanent damage. Dirt particles are like sandpaper, and every time you sit down, you grind that grit into the fibers themselves and wear those out prematurely.” In fact, regular cleaning helps the upholstery last longer.
What You’ll Need (Tools & Products)
Before you start, gather your arsenal. Using the right tools makes the difference between spreading a stain and removing it.

- Vacuum Cleaner: A wet/dry vac (like a Shop-Vac) is ideal, but a strong household vacuum with an upholstery attachment works for dry steps .
- Cleaning Solution: You have options here.
- DIY: Combine warm water and a few drops of mild dish soap with white vinegar.
- Commercial: Try a specialized fabric cleaner. Technik I2 Tri-Clean is great for killing bacteria, and Armor All Stain Remover includes a built-in brush to scrub.
- Brushes: An interior detailing brush with soft to medium bristles (the GYEON Q²M Leather Brush is perfect — it works well on fabric, just as much). A soft toothbrush, in the old way, for tight seams.
- Microfiber Towels: You’ll need a stack of clean, lint-free towels. These are non-abrasive and highly absorbent .
- Water: Distilled water is best to avoid mineral stains, but tap works in a pinch .
- Stain Remover: For stubborn spots like grease or ink .
- Fabric Protectant (Optional): Products like Gtechniq Smart Fabric I1 V3 create a barrier against future spills .
Step-by-Step Guide (How-To) with explain Details
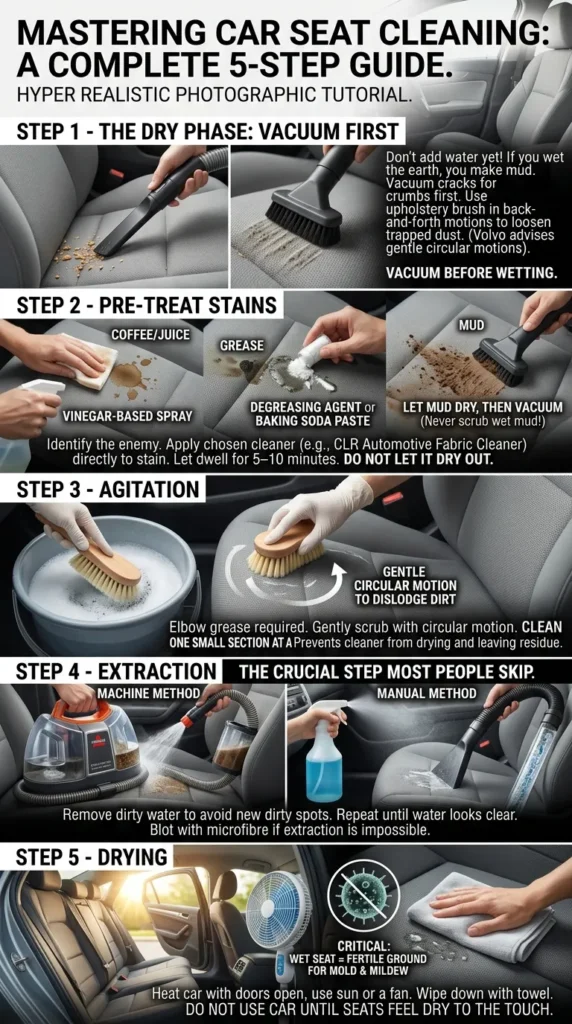
Step 1: The Dry Phase – Vacuuming
And don’t you dare add water yet. If you wet the earth, which makes mud before vacuuming. First, vacuum with a crevice tool to access the cracks where crumbs hide. Next, with the upholstery brush, make back-and-forth passes across the seat. This raises the fibers and loosens trapped dust. Volvo advises using gentle, circular motions to keep the fabric from being damaged.
Step 2: Pre-Treat Stains
Identify the enemies. Is it coffee? Grease? Mud?
- Coffee/Juice: Blot with a vinegar-based spray.
- Grease: Apply a degreasing agent or a paste of baking soda and water.
- Mud: Let it dry completely, then vacuum—never scrub wet mud, or you’ll drive it deeper .
Spray your chosen cleaner (like CLR Automotive Fabric Cleaner) directly onto the stain and let it dwell for 5–10 minutes. Do not let it dry out .
Step 3: Agitation
This is where the elbow grease comes in. Dip your soft brush into warm water (or the cleaner) and gently scrub the area. Use circular motion to dislodge the dirt molecules. If you are cleaning the seat in its entirety, proceed one small section at a time. If you try to scrub the entire front seat at once, that cleaner may dry before you have a chance to extract it out leaving a residue.
Step 4: Extraction
This is the step most people skip, and it’s why their seats get “clean spots” that later attract more dirt. You have to remove the dirty water.
- Machine Method: If you have a portable upholstery cleaner (like a Bissell), use it to spray hot water and immediately vacuum it back up .
- Manual method: If you don’t have a machine, fill a spray bottle with clean water and mist the area, then suck it out using a wet/dry vacuum. Repeat until the water you’re vacuuming up looks clear. If not, blot with a damp microfibre cloth (but extraction is always better).
Step 5: Drying
This is critical. A wet seat is fertile ground for mold and mildew. Heat up with your car doors open, in the sun, or on a fan. Wipe down the seats with a towel to absorb excess moisture. Do not use the car until the seats feel dry to the touch.
Cost Breakdown (HOW to Deep Clean Cloth Car Seats)
| Method | Tools Needed | Cost Estimate | Best For |
|---|---|---|---|
| DIY Household | Vinegar, Baking Soda, Dish Soap, Towels | $5 – $10 | Light maintenance & spot cleaning |
| Spray & Wipe | Commercial Aerosol (e.g., Armor All), Microfiber | $15 – $25 | Quick interior refresh |
| Budget Machine | Wet/Dry Vac, Brush, Cleaner | $50 – $100 | Deeper clean without breaking the bank |
| Prosumer Machine | Portable Extractor (e.g., Bissell SpotClean) | $120 – $250 | Heavy stains, pets, and regular deep cleaning |
| Professional Detail | Full service by a shop | $150 – $400 | Neglected seats, severe odors, time-saving |
Before and After with explain details
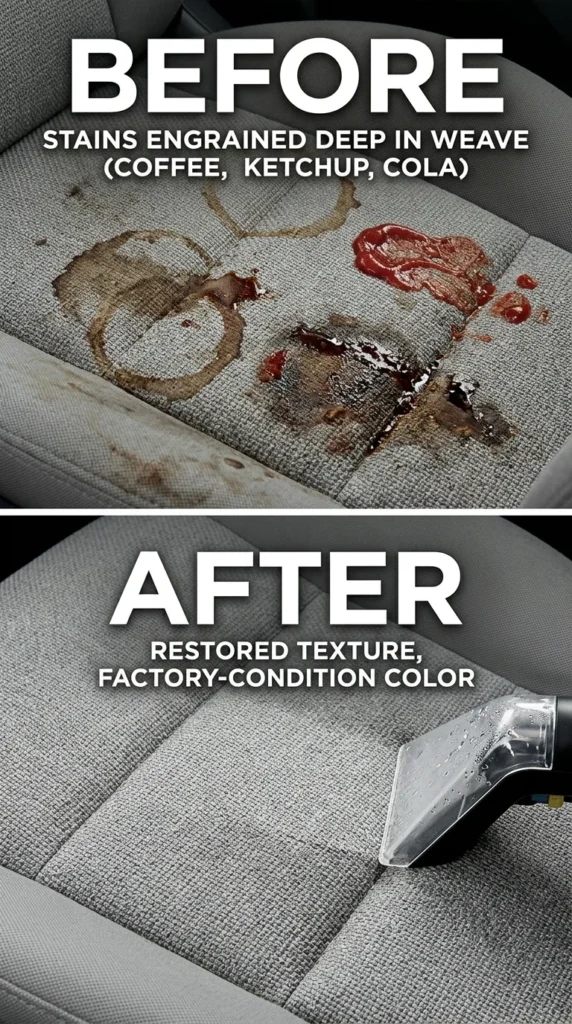
In fact, the results are shocking visually if you go out and search for product tests (like ones done by Car and Driver). In their trials, stains from coffee, ketchup and cola lifted dark brown and red blotches so they were returned to a grey factory-condition colour after three passes with a portable cleaner. The “before” tends to reveal dirt ingrained deep in the weave. The “after” is the restored texture of the fabric. The most important lesson here is that stains—even set-in ones—are not permanent; they just need suction to remove them, instead of surface wiping.


Product Recommendations (Budget)
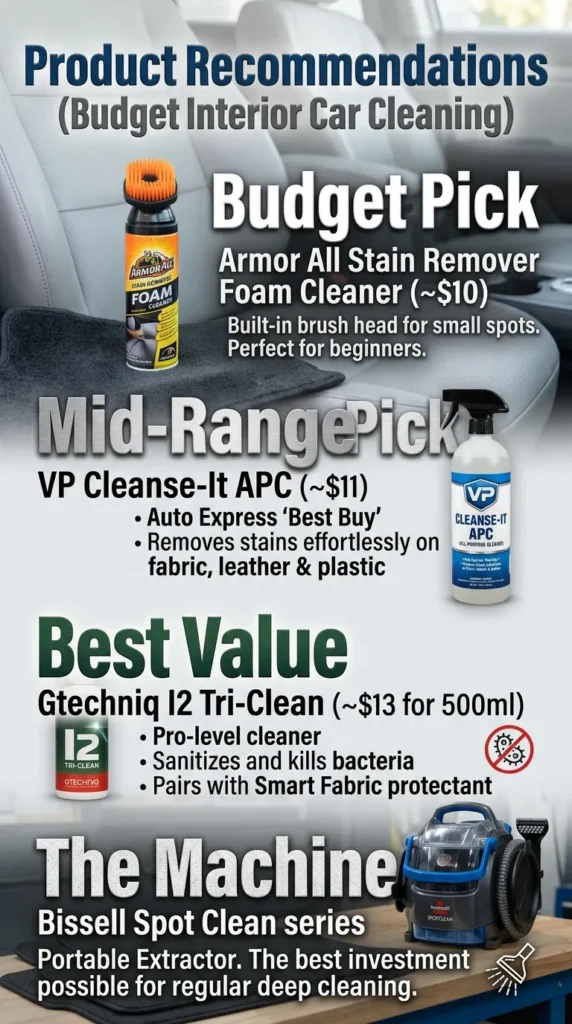
- Budget Pick: Armor All Stain Remover Foam Cleaner (approx. It comes with a built-in brush head, so it’s perfect for beginners looking to address small spots without needing additional tools.
- Mid-Range Pick:VP Cleanse-It APC (~$11). Named a “Best Buy” by Auto Express, this all-purpose cleaner removed stains on fabric, leather and plastic without an ounce of effort.
- Best Value: Gtechniq I2 Tri-Clean (~$13 for 500ml) This is a pro-level, all-in-one cleaner that not only cleans but sanitizes to kill bacteria. It pairs nicely with their Smart Fabric protectant for long term care.
- The Machine: Bissell Spot Clean series. If you intend to do this regularly, a portable extractor is the best investment possible.
Comparison Section: Extractor Machine vs. Spray Cleaner
Option A: Portable Extractor Machine (e.g., Bissell/Shark)
- Method: Uses hot water and solution injected into the fabric, then immediately vacuumed out.
- Pros: Deep cleans; removes dirt rather than just dissolving it; best for large areas.
- Cons: Expensive upfront; heavy; requires drying time; bulky to store.
- Best For: Families with kids/pets; annual deep cleans.
Option B: Aerosol Foam Cleaner (e.g., Armor All/Turtle Wax)
- Method: Spray foam, scrub, wipe away.
- Pros: Cheap; easy to store; great for spot cleaning; no electricity needed.
- Cons: Only cleans the surface; residue can attract more dirt if not rinsed properly; bad for deep set stains.
- Best For: Quick touch-ups; cleaning between professional details.
Troubleshooting (Problem)
| Problem | Why It Happened | The Fix |
|---|---|---|
| Water Rings / Clean Spots | Only cleaned the dirty spot, leaving the surrounding dirt as a “ring.” | Clean the entire seat panel, not just the stain. Blend the edges into the surrounding area. |
| Stain Came Back (Wicking) | Stain soaked through to the foam padding; moisture brought it back to the surface. | Treat the spot, blot heavily, and apply weight (like a book) on a towel overnight to absorb the oil/fill from the padding. |
| Musty Smell After Cleaning | Seat took too long to dry, causing mildew. | Vacuum with a wet/dry vac to remove excess water. Use fans and baking soda to dry ASAP. |
| White Residue | Used too much soap; didn’t rinse fully. | Re-wet the area with plain water and extract/blot until the suds are gone. |
| Fabric Fading | Sun damage or harsh chemicals. | Unfortunately, this is permanent. Prevention via window tint or protectant is key . |
Time Required & Difficulty Level
- Time Required: 1 – 3 hours, depending on the severity.
- Difficulty Level: Easy to Moderate. The work is more physical than technical. The hardest part is waiting for the seats to dry.
Pro Tips (Don’t)
- DO test any cleaner on a hidden spot (like under the seat) to check for colorfastness .
- DON’T scrape or rub dirty surfaces with sharp objects .
- DO use a lint-free microfiber cloth. Paper towels can leave lint and scratches on plastic trim.
- DON’T oversaturate the seat. The foam underneath acts like a sponge and will hold water forever, leading to mold .
- DO keep the seat belt extended until it’s fully dry if you clean it, to prevent retractor issues .
Best Picks (Top 3 Summary)
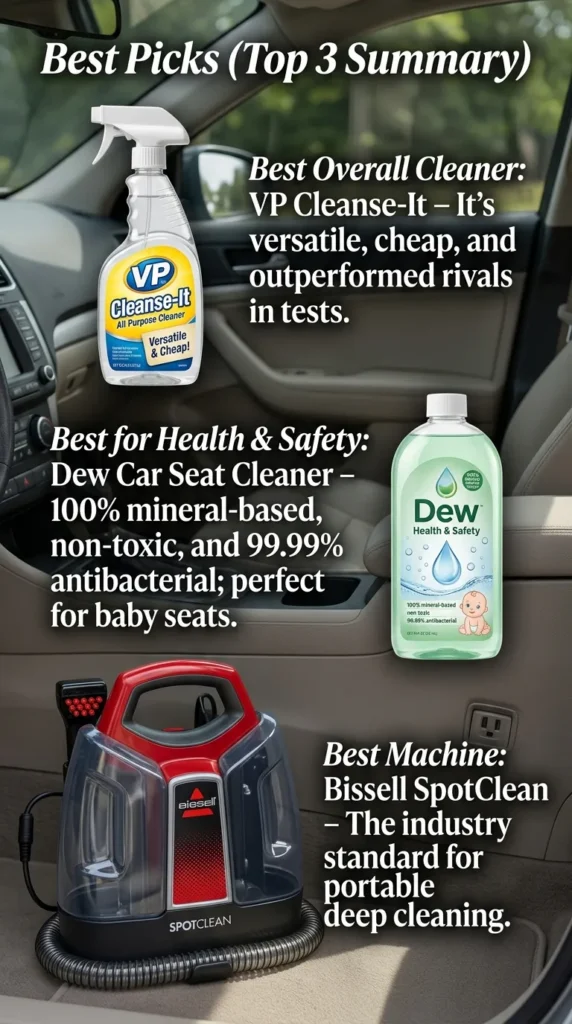
- Best Overall Cleaner: VP Cleanse-It – It’s versatile, cheap, and outperformed rivals in tests .
- Best for Health & Safety: Dew Car Seat Cleaner – 100% mineral-based, non-toxic, and 99.99% antibacterial; perfect for baby seats .
- Best Machine: Bissell SpotClean – The industry standard for portable deep cleaning .
Use Cases (When to Choose What)
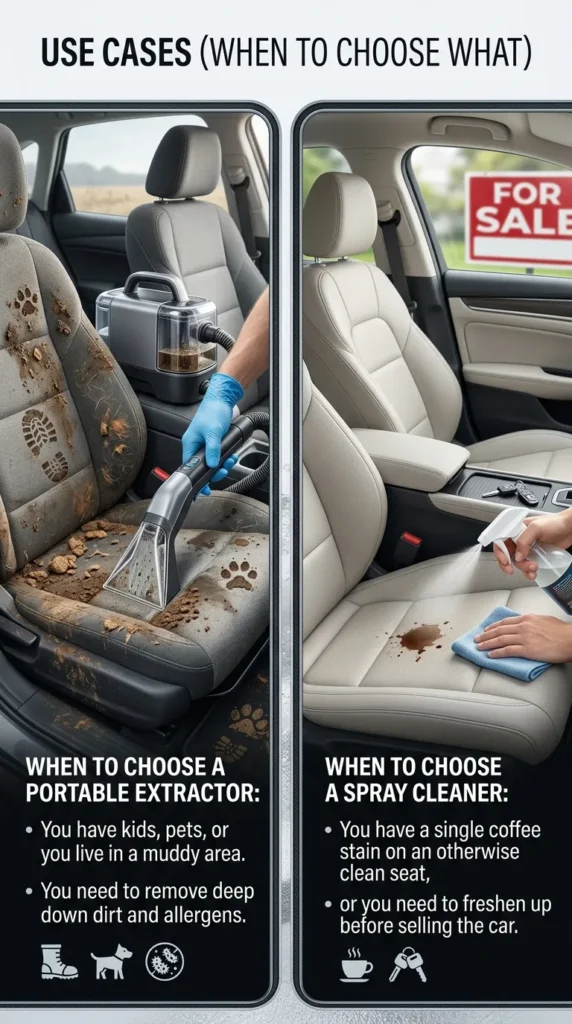
- When to choose a portable extractor: You have kids, pets, or you live in a muddy area. You need to remove deep down dirt and allergens.
- When to choose a spray cleaner: You have a single coffee stain on an otherwise clean seat, or you need to freshen up before selling the car.


Common Mistakes to Avoid
- Rubbing a Spill: Rubbing spreads the stain and forces it deeper. Always blot.
- Using Dish Soap: While a few drops are okay, too much creates suds that are hard to rinse out, leaving sticky residue.
- Forgetting the Headliner: The ceiling gets dusty too, but it’s delicate. Don’t scrub it hard, or the glue might fail .
Safety Notes
- Airbags: Seat-mounted side airbags are standard on just about every new car. Don’t spray cleaner inside the seat where the airbag inflates. Instead, spray your cloth and then gently wipe that area. Moisture in the air bag module may lead to failure.
- Ventilation: If cleaning chemical cleaners, ventilate the car. Concentrated fumes can be harmful if inhaled.
- Electrical Components: Watch out for sensors beneath the seats (occupancy sensors). Do not put water everywhere in the area.
FAQs
- How often should I clean my cloth car seats?
For general maintenance, vacuum weekly and do a deep clean (extraction) every 6 to 12 months. If you have kids or pets, bump that up to every 3-4 months . - Can I use a carpet cleaner on my car seats?
Yes, you can use a home carpet cleaner, but only if it’s portable and you use the right automotive upholstery solution. Home carpet soap might be too harsh. - Will cleaning remove the “new car smell”?
It might remove the synthetic “new car” scent, but it will replace it with a clean, neutral smell. Odor removal is usually a benefit of cleaning . - Is baking soda safe for fabric seats?
Yes. Baking soda is a great natural deodorizer. Sprinkle it on, let it sit for a few hours, and vacuum it up. - How do I get rid of vomit smell from cloth seats?
Clean immediately. Use an enzyme cleaner (like Nature’s Miracle) designed to break down organic matter. These are available at pet stores. - Can I use a steam cleaner?
Yes, steam cleaners are great for sanitizing and loosening dirt. However, they leave moisture, so you still need to extract the dirty water with a vacuum afterward to prevent mold . - What is the best homemade cleaner?
A mix of 2 cups warm water, 1 tablespoon white vinegar, and a few drops of mild dish soap. Shake well. - Why does my seat smell sour after cleaning?
The foam padding underneath didn’t dry fully. You need to extract more water and speed up drying. - Are all-purpose cleaners safe for seats?
Yes, if they are pH-neutral and designed for interiors. Auto Express recommends VP Cleanse-It as a safe and effective APC . - How do I clean sunscreen stains?
Sunscreen is oily. Use a degreaser or rubbing alcohol on a cloth to break down the oil, then clean normally.
Final Thought
Cleaning cloth car seats is not rocketing science, but it is science—the science of suspension and extraction. Whether you’re looking at a $5 bottle of foam or a $200 extractor, the principles are pretty much the same: break lose the dirt, dissolve the gunk and extract it. There is nothing more satisfying than seeing gunky water transform to clear as you clean. Your car is the place you spend hundreds of hours a year, keeping it fresh means not only protecting your investment but making every drive more enjoyable. So, pick up a paint brush, turn up the music and pamper your interior with some tender love and care.


Leave a Reply