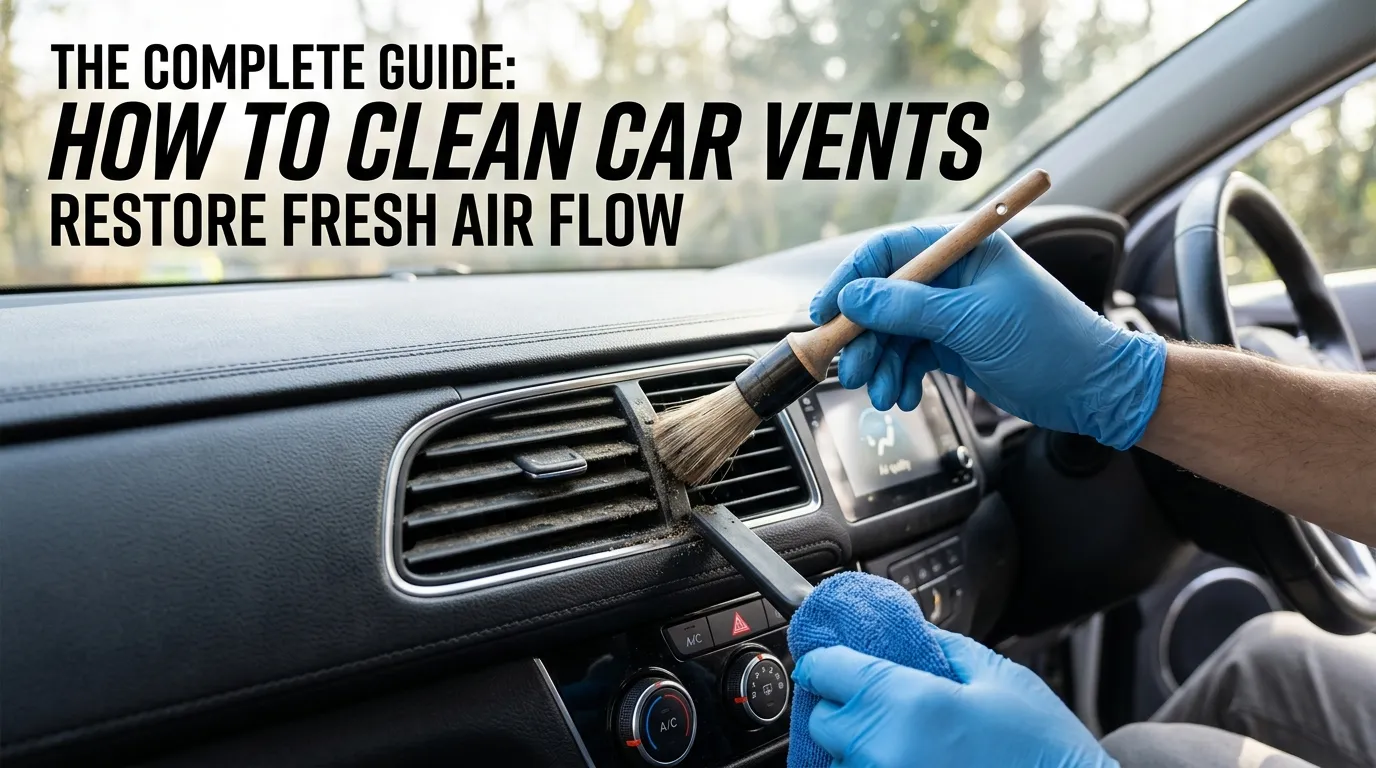
Imagine this: You hop into your car on a hot summer day, turn the air conditioning up high and instead of a cool refreshing stream of air, you’re met with a cloud of dusty particles and rotten smell. It is a frustrating experience that renders every drive uncomfortable. For most car owners, air vents are the most neglected aspect while cleaning the vehicle interiors. They are the dark horses of the dashboard, silently building up dust, pollen and even mold over time. This buildup isn’t just unsightly; it directly compromises your cabin air quality and can even make your vehicle a sneeze-inducing environment for hay-fever sufferers.
The good news is you don’t need to be a professional detailer to address this question. In this ultimate guide, we show you exactly how to clean car vents like a pro. how to clean car vents We will cover everything from basic weekly wipe-downs to deep cleaning the ductwork, and all the techniques, tools and tips you’ll ever need to help kick dust out of your car for good so that every breath you draw in is as clean and crisp found.
Quick Answer
Here’s how to clean your car vents in a hurry: Turn off the HVAC system. By pressing a soft-bristled brush that’s attached to the extension of a vacuum crevice tool into the vent slats, you can loosen dust and suck it away. For gunky residue, use a microfiber cloth with an all-purpose-cleaner solution on it. Use compressed air or a foaming HVAC cleaner to deep clean inside the ducts.
Why It Matters (Benefits)
Cleaning your car vents is about more than just aesthetics. It has direct impacts on your health, comfort, and your vehicle’s longevity .
- Healthier Cabin Air: The air you breathe is circulated by vents. Dust, pollen, mold spores and bacteria build up in the vents and are blown right back into your face. Regular cleaning eliminates these allergens, minimizing the chances of respiratory irritation and allergy flare-ups while on the road.
- Odor Elimination: Musty odors — the types often referred to as “socks” or “wet dog” — generally result from bacteria and mildew sporing within a damp HVAC system. Cleaning the vents and ducts tackles the cause of the odor instead of covering it up with an air freshener.
- Better HVAC Efficiency — A buildup of dust and debris can clog airflow pathways, making your blower motor work overtime to move air through. Clean vents provide proper airflow and allow your AC to work as it should.
- Keeps Interior Looking Great: Dust blowing out of your vents settles on your dashboard, seats, and windows causing your interior to look dirty more quickly. Dirty vents mean a dirtier cabin for longer.
What You’ll Need (Tools & Products)
Gathering the right tools before you start makes the job easier and prevents damage to your dashboard. Here’s a detailed list of what you’ll need :
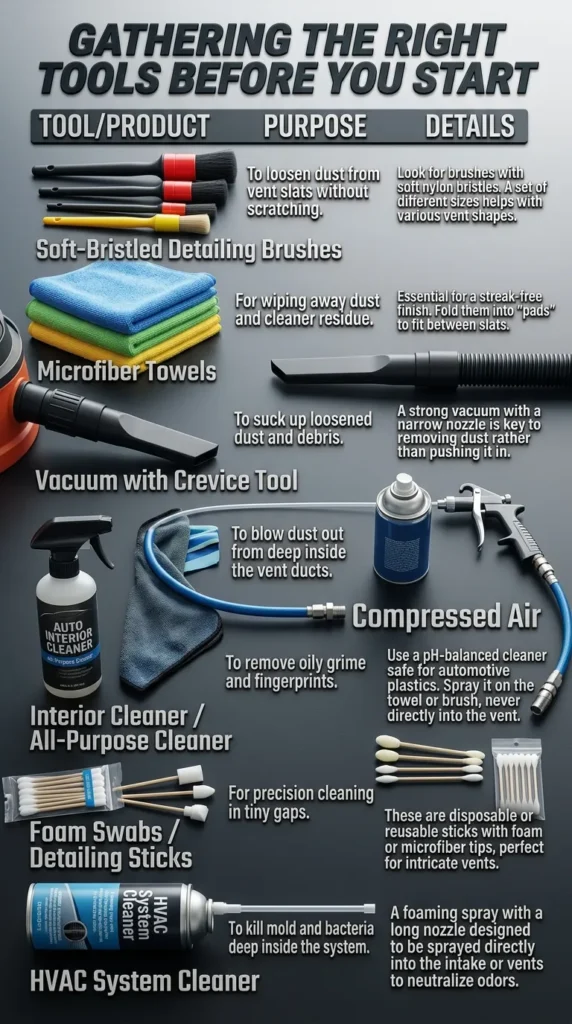
| Tool/Product | Purpose | Details |
|---|---|---|
| Soft-Bristled Detailing Brushes | To loosen dust from vent slats without scratching. | Look for brushes with soft nylon bristles. A set of different sizes helps with various vent shapes . |
| Microfiber Towels | For wiping away dust and cleaner residue. | Essential for a streak-free finish. Fold them into “pads” to fit between slats. |
| Vacuum with Crevice Tool | To suck up loosened dust and debris. | A strong vacuum with a narrow nozzle is key to removing dust rather than pushing it in. |
| Compressed Air | To blow dust out from deep inside the vent ducts. | Either a can of compressed air or an air compressor with a blow gun attachment works well . |
| Interior Cleaner / All-Purpose Cleaner | To remove oily grime and fingerprints. | Use a pH-balanced cleaner safe for automotive plastics. Spray it on the towel or brush, never directly into the vent . |
| Foam Swabs / Detailing Sticks | For precision cleaning in tiny gaps. | These are disposable or reusable sticks with foam or microfiber tips, perfect for intricate vents . |
| HVAC System Cleaner | To kill mold and bacteria deep inside the system. | A foaming spray with a long nozzle designed to be sprayed directly into the intake or vents to neutralize odors . |
Step-by-Step Guide (How-To)
Follow these steps for a thorough vent cleaning. We’ll start from the outside and work our way in .
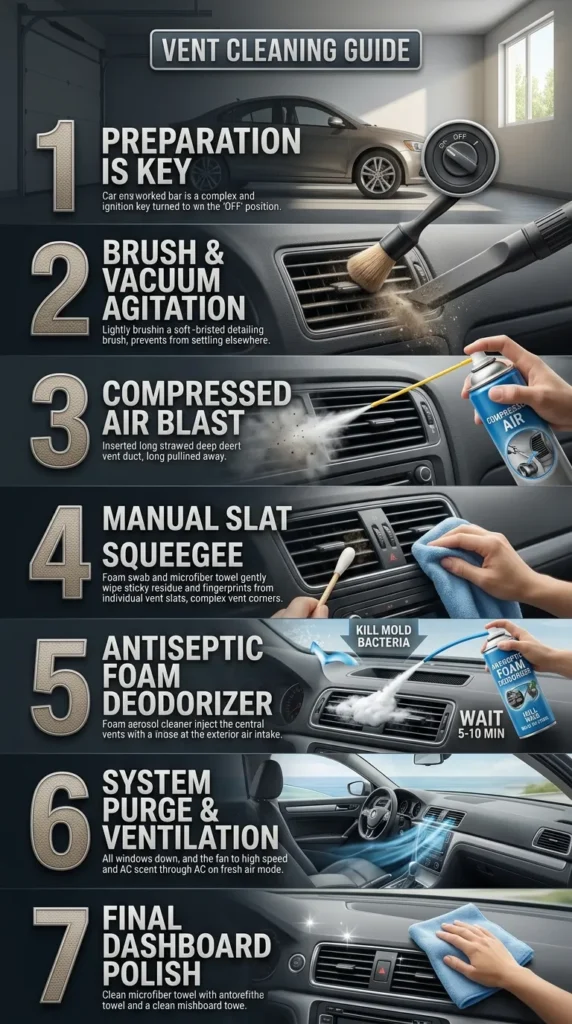
- Preparation Is Key: Dock your vehicle in a shaded area to stop cleaners from drying too fast on scorching plastic Turn the ignition completely off. And that’s important to avoid blindly spraying cleaner into a powered fan and back-blowing it all over your interior.
- Loosen and Vacuum (The “Duo” Method): Use your soft-bristled brush to lightly agitate the dust stuck to the vent slats. Make sure to brush in all directions to hit the edges. While you brush, hold the vacuum crevice tool directly at the vent opening to collect the dust as it flies out. This means it can’t, as it does at the moment, just settle out elsewhere in the cabin.
- Blow It Out: For dust that’s settled farther down the ductwork, use compressed air. Stick the straw into the vent and pump short, controlled bursts. You might see a cloud of dust go up. Remember to grab it with the vacuum right away.
- Deep Clean the Slats: If they have sticky residue (from glossy protectants or fingerprints), spray your microfiber towel or a foam swab lightly with an interior cleaner. Gently wipe each slat individually. Foam swabs are a godsend for complex vents, as they can reach into the corners without leaving lint.
- Deodorize the System: You need to sanitize the system if your smell like a moldy BATHROOM. Get a specialized A/C vent and duct cleaner. Look through the product directions and use it with the AC turned off. Often, this means sticking the hose into the vents (usually the center vents or exterior air intake at the base of the windshield) and spraying foam. Leave it for the recommended period of time (generally 5-10 minutes) to kill bacteria.
- Final Flush: Once the cleaner has had time (5-10 minutes) to work its magic, fire up your ride, turn the fan on high speed and set your AC system to “fresh air,” leaving the windows down. This flushes the cleaning agents through the system and out (with a clean smell left behind.
- Wipe: Finally, use the microfiber towel to wipe down the dashboard one last time and pick up any dust that landed while you were doing all of this.
Cost Breakdown
Cleaning your vents can be as cheap or as expensive as you want it to be. Here’s a breakdown of the costs associated with DIY versus professional cleaning .
| Method | Cost Range | Description |
|---|---|---|
| DIY (Basic) | $0 – $15 | Using household items like an old paintbrush, a toothbrush, and a vacuum you already own. You may only need to buy microfiber towels. |
| DIY (Pro-Level) | $25 – $60 | Investing in a kit with detailing brushes ($10-20), foam swabs ($10-15), and a can of compressed air ($8-12) or HVAC cleaner ($10-15). |
| Professional Interior Detail | $50 – $150+ | As part of a full interior detail, a pro will clean vents thoroughly. Some shops offer “odor bomb” or HVAC sanitizing services for an extra fee ($20-50) . |
Explanation:For routine maintenance, the DIY route provides the most bang for your buck. You could get 90% of the results for a fraction of the cost. Unless you have a serious mess (like smoke or mold) to deal with or want showroom-perfect results without breaking a sweat, professional detailing is not worth it
Before and After
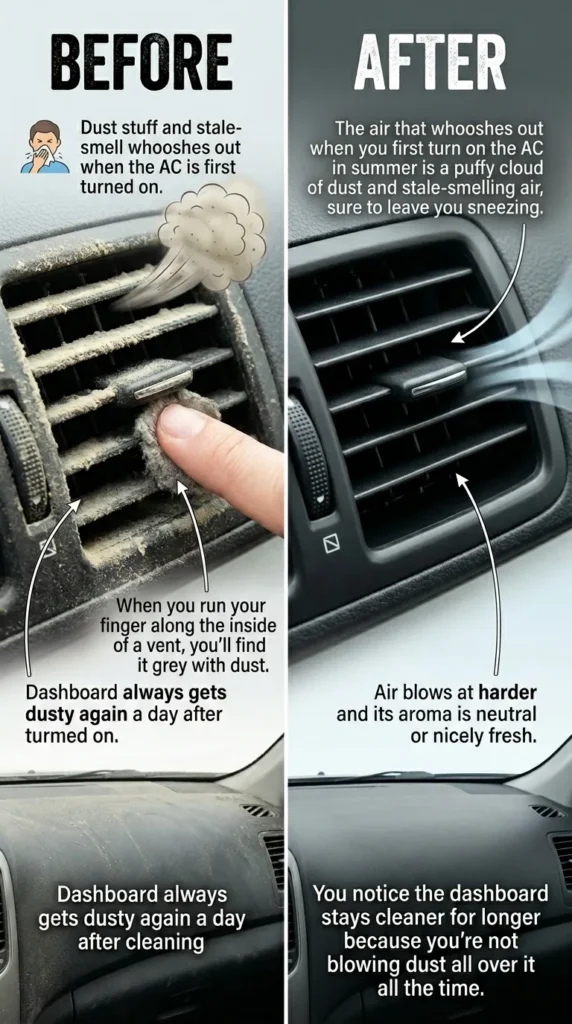
- Before: When you look at your vents, there’s a cream-colored line of dust caked on the edges. When you run your finger along the inside of a vent, you’ll find it grey with dust. The air that whooshes out when you first turn on the AC in summer is a puffy cloud of dust and stale-smelling air, sure to leave you sneezing. The dashboard always seems to get dusty again a day after cleaning.
- After: The vent slats are clean, with no dust visible even in the corners. The plastic should be clean and may have a natural, matte sheen. When you switch on the air, it blows harder and its aroma is neutral or nicely fresh. You notice the dashboard stays cleaner for longer because you’re not blowing dust all over it all the time.
Product Recommendations (Budget Premium)
Here are some top-tier product suggestions to help you get the job done, categorized by price and type .
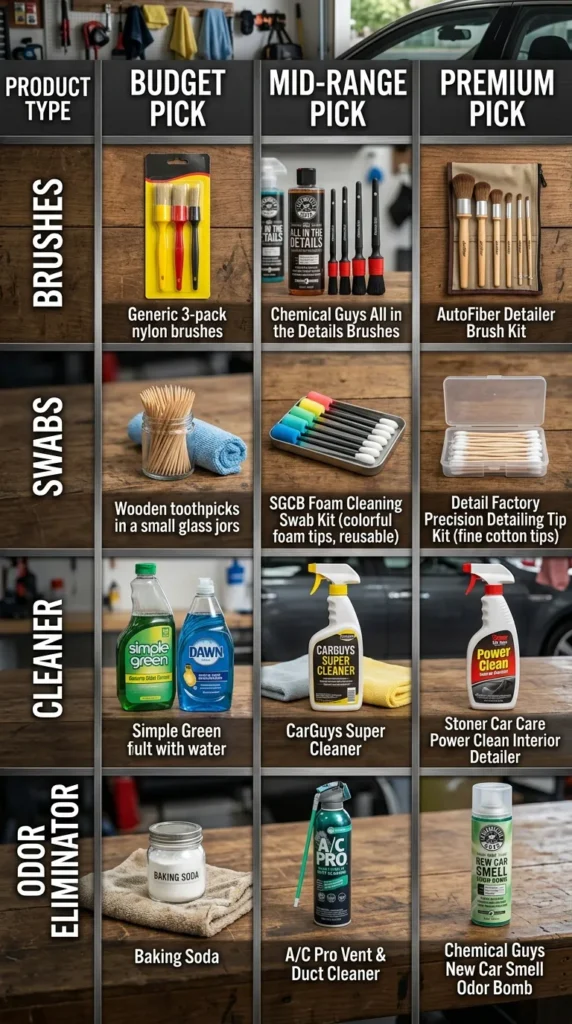
| Product Type | Budget Pick | Mid-Range Pick | Premium Pick |
|---|---|---|---|
| Brushes | Generic 3-pack nylon brush set from an auto parts store. | Chemical Guys All in the Details Interior Detailing Brushes | AutoFiber Detailer Brush Kit |
| Swabs | Box of wooden toothpicks with a microfiber cloth wrapped around them (DIY). | SGCB Foam Cleaning Swab Kit (Reusable) | Detail Factory Precision Detailing Tip Kit |
| Cleaner | Simple Green (diluted) or dish soap and water. | CarGuys Super Cleaner – works on all surfaces. | Stoner Car Care Power Clean Interior Detailer |
| Odor Eliminator | Baking soda left in the car overnight. | A/C Pro Vent & Duct Cleaner | Chemical Guys New Car Smell Odor Bomb |
Comparison Section: Brush & Vacuum vs. Compressed Air
When it comes to the physical act of removing dust, two methods reign supreme. Here’s how they compare .
- Option A: Brush + Vacuum (The Dynamic Duo)
- Process: Physically knocking dust loose with a soft brush while a vacuum sucks it away.
- Pros: This is the most secure method. It physically sucks the dirt out of your car. It’s inexpensive, needs no special equipment (other than a vacuum) and provides immediate visual feedback.
- Cons: It is labor-intensive and you may miss dust that lies deeper in the ductwork.
- Option B: Compressed Air
- Process: Forcefully blasting dust out of the vents with high-pressure air (from a can or compressor).
- Pros: Super-fast and cleans deep in the ducts removing hidden debris. Watching a “dust storm” erupt can be very satisfying.
- Pros: It just moves the dust around. Without a vacuum running at the same time, you’re just blowing dirt all around your seat and on your floor. If not done carefully, it can also slam debris farther into the system.
Winner: For a thorough clean, the best approach is to use them together. Use the compressed air to blast dust from deep inside and have your vacuum ready at the vent opening to catch it all. Follow up with a brush for the slats .
Troubleshooting (Problem)
Even with the best intentions, things can go wrong. Here’s how to fix common vent-cleaning problems .
| Problem | Possible Fix |
|---|---|
| Musty smell returns after a few days. | You likely have mold deep in the evaporator core. You need a professional “A/C system bomb” or foam cleaner that enters via the cowl intake, not just the vents. Also, check and replace your cabin air filter . |
| Cleaner residue/streaks on the dashboard. | You used too much product. Wipe the area with a damp (not wet) microfiber towel to remove excess, then buff dry with a clean towel. |
| Vents are greasy/sticky after cleaning. | You used a protectant or cleaner with too much shine. Wipe the slats down with a 50/50 mix of water and isopropyl alcohol on a microfiber towel to strip the residue. |
| I hear a rattling noise in the vent now. | A piece of debris or a foam swab tip may have broken off inside the duct. Try using a vacuum with a long, thin attachment to see if you can suck it out. |
| Water/cleaner came out of the vents when I used AC. | This is usually normal condensation if you used a lot of liquid, but it could indicate a clogged AC drain tube. If it persists, consult a mechanic. |


Time Required & Difficulty Level
- Duration: 15 to 30 minutes for a light cleaning. For deep sanitizing with a foaming cleaner, allow up to 45 minutes so the product can work and your system dry.
- Difficulty Level: Easy (1/5). This is a beginner-friendly task. It takes patience and attention to detail but no mechanical prowess. The most significant hazard is scratching your dashboard, which can be avoided with the use of soft instruments.
Pro Tips (Don’t)
- DO remove your cabin air filter and check it. If it’s dirty, replace it. A clean filter is essential for clean air .
- DON’T spray any liquid directly into the vents. This can pool in the ducts and damage electronic motors and sensors in the HVAC system .
- DO use a headlamp. It helps you see exactly how much dust is lurking in the dark crevices.
- DON’T use all-purpose cleaner on your screens or displays. Use a dedicated electronics screen cleaner .
- DO use a “fresh air” mode occasionally instead of recirculation to help dry out the system and prevent mold .
Best Picks (Top 3 Summary)

- Best Overall Kit: Chemical Guys All in the Details Interior Kit. This provides the brushes, towels, and cleaner you need to get started right away .
- Best for Precision: SGCB Foam Cleaning Swab Kit. For intricate vents and tight spaces, these reusable swabs are a game-changer .
- Best for Odor Removal: A/C Pro Vent & Duct Cleaner. An easy-to-use aerosol that genuinely kills the bacteria causing bad smells deep in the system .
Use Cases (When to Choose What)
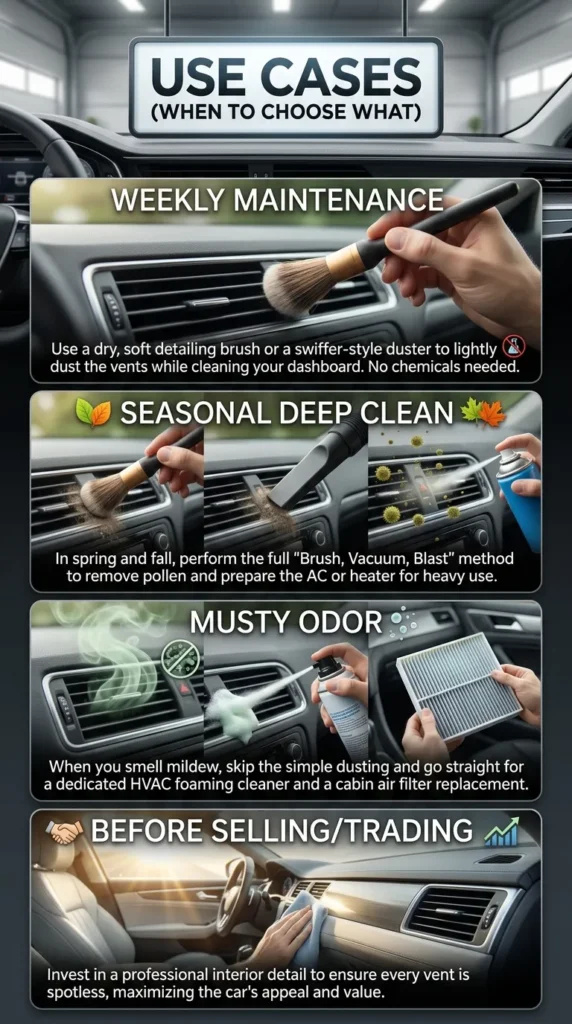
- Weekly Maintenance: Use a dry, soft detailing brush or a swiffer-style duster to lightly dust the vents while cleaning your dashboard. No chemicals needed.
- Seasonal Deep Clean: In spring and fall, perform the full “Brush, Vacuum, Blast” method to remove pollen and prepare the AC or heater for heavy use.
- Musty Odor: When you smell mildew, skip the simple dusting and go straight for a dedicated HVAC foaming cleaner and a cabin air filter replacement.
- Before Selling/Trading: Invest in a professional interior detail to ensure every vent is spotless, maximizing the car’s appeal and value.
Common Mistakes to Avoid
- Spraying Cleaner Directly into Vents: This is the #1 mistake. It can short out fan motors, create a mess, and damage actuators .
- Using the Wrong Tools: Using paper towels or stiff scrub brushes will scratch and scuff your vent plastic. Always use soft microfiber and soft bristles .
- Skipping the Cabin Air Filter: You can clean your vents perfectly, but if your cabin air filter is clogged with leaves and debris, it will immediately dirty them again. Replace your filter every 12,000-15,000 miles .
- Overloading on Protectant: Spraying too much shiny “dressing” on vents makes them look greasy and attracts even more dust .
- Forgetting to Vacuum: Loosening dust with a brush or air and leaving it there just means it will settle elsewhere or get blown back into the vent. Always vacuum immediately .
Safety Notes
- Electrical Parts: You have delicate electronic components in your dash. Refrain from using excess liquid that may run into buttons, knobs, or the infotainment display.
- Allergens: Using compressed air will kick up a lot of dust and allergens. You should wear a dust mask & safety glass.
- Flammability Some aerosol cleaners and compressed air cans are flammable. Keep them away from open flames and lit cigarettes.
- Heat: Avoid cleaning your vents or dashboard in sunlight. High temperatures can make cleaners evaporate too quickly and streak, and it can render some plastics more brittle and/or more susceptible to scratching.
FAQs
- Cleaning car vents using a toothbrush?
- Yes, a soft-bristled toothbrush is a great and inexpensive substitute for a detailing brush. Just be careful that it isn’t too stiff or you’ll scratch the plastic.
- “How often do I need to clean my car vents?”
- For most, a deep clean twice a year (spring and fall) is more than enough. It’s something you can do in a quick pass whenever you clean your interior.
- Why does my car smell musty when I turn on the AC?
- This is often due to moisture and bacteria accumulating on the AC evaporator core. The most effective DIY method involves using a foaming HVAC cleaner.
- Can you use a steam cleaner on vents?
- Yes, but with caution. Choose a low-pressure steam cleaner with thin nozzle Avoid saturating the vent and clean electronics without getting the tip near them. Quickly dry it with a microfiber towel.
- Where is the cabin air filter found?
- The location of the cabin air filter is usually behind the glove box, below your dashboard or located under the hood by your windshield. Your owner’s manual will specify the exact location.
- Do I have to take off the vents to clean them?
- No, it’s not required for regular cleaning. Some die-hard fans take them out for a deep clean, but they risk breaking clips. It is generally only necessary if something spills in the duct.
- Is WD-40 safe to clean car vents?
- It is highly not recommended. WD-40 will leave a greasy, sticky residue that attracts dust and can cause the plastic to weaken as time goes on.
- Will cleaning my vents make a difference for my air conditioning?
- But clearing heavy obstructions will enhance air flow, allowing your vehicle to heat up or cool down more quickly.
- What’s the white dust coming out of my AC vents?
- It can be dried coolant (indicating a leak) or, more often, it’s just mineral deposits from water that has evaporated out of the system. If it continues, take it to a mechanic and ask them to check for any AC leaks.
- My air only blows on high. Is that due to dirty vents?
- No. This is generally an indication of a failed blower motor resistor, not dirty vents. It needs mechanical repair, not cleaning.
Final Thought
Knowing how to clean your car vents is a minor skill that can have a major impact on your daily driving experience. It turns your car from a basic machine into a safe haven of clean, fresh air. With such an uncomplicated step, you are not only keeping your car’s interior and HVAC system performing well; how to clean car vents you are actually helping in enhancing the health and comfort of yourself. So, grab a brush and a towel, and starting today take your first step toward a cleaner, healthier, more enjoyable ride.


Leave a Reply