You know the feeling. You’re driving home at night, and the headlights of cars coming in the opposite direction erupt into starbursts that splatter all over your windshield. All of a sudden, the road vanishes behind a hazy, smudged curtain. You squint, you lean forward, but the glare won’t lift. You thought you had a nice clean windshield, but the setting sun or dark rainy night just showed you otherwise.
Your windshield may be dirty, streaky and impossible to see out of, but it’s not just an annoyance if your line of sight is obstructed in any way, it can become a safety hazard. It blocks your view of pedestrians, animals and other vehicles, transforming a routine drive into a gamble. The trouble with these instructions is that most people just reach for any old cleaning solution and a paper towel, unwittingly generating the very smears they’re trying to eliminate. But getting that pristine, crystal-clear finish streak-free isn’t magic. It’s a simple, repeatable science. In this comprehensive guide, we’ll take you through the expert steps, the top tools available, and the insider secrets of professionals to help you finally eradicate streaks for good. Prepare to experience your commute in a new light.
Quick Answer
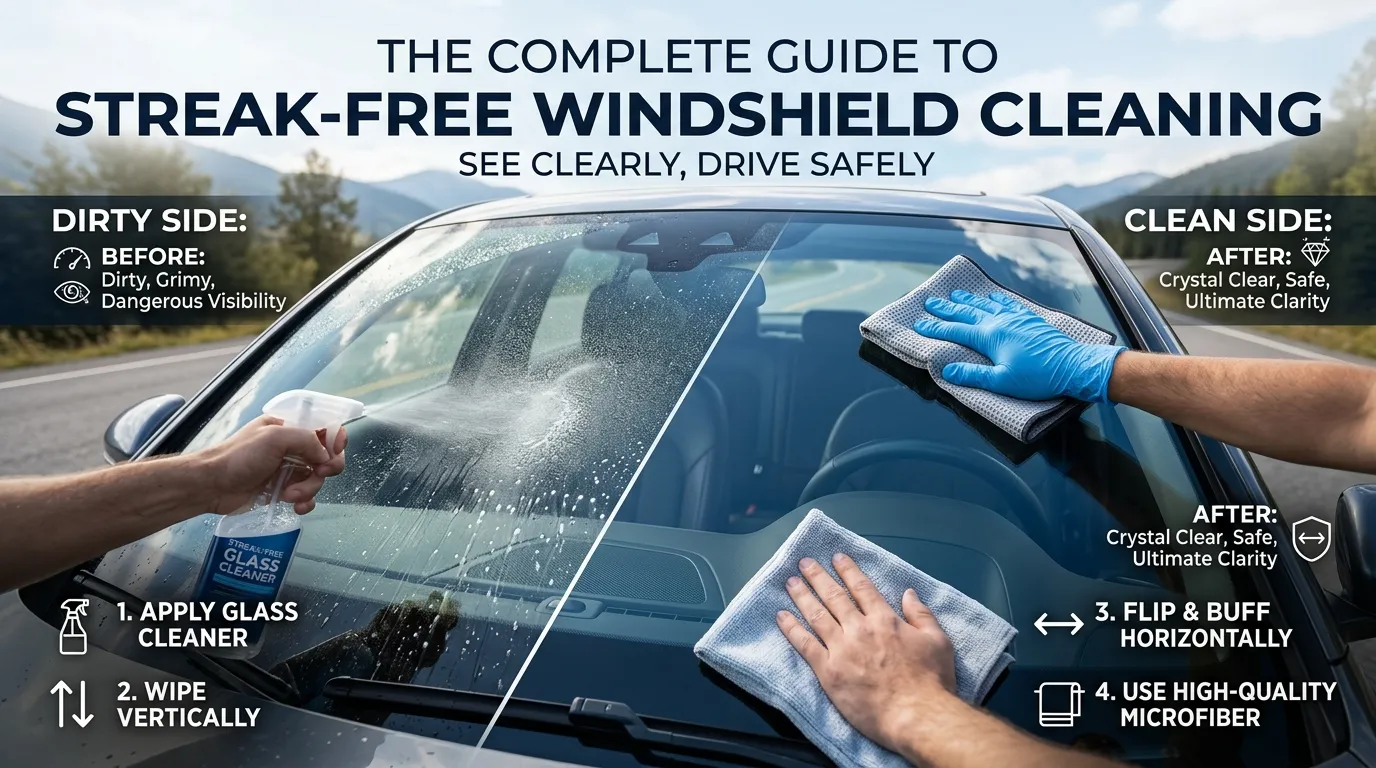
For streak-free windshield cleaning, you need high quality automotive glass cleaner and at least two clean microfiber towels. Park in the shade so the cleaner doesn’t evaporate too fast. Use vertical strokes on the outside and horizontal strokes on the inside so you can easily tell which side a streak is on. Always finish with a dry buff with second towel to pickup any residual residue.
Why It Matters (Benefits)
Cleaning your windshield isn’t just about aesthetics; it’s a critical component of vehicle safety and maintenance.
- Improved Visibility & Safety: This is top reason. A clean, streak free windshield removes dangerous glare from the sun and oncoming headlights, especially at night. It gives you a clear and unobstructed view of the road, so that you can respond more quickly to potential hazards.
- Reduces Eye Strain: Your eyes will get tired trying to focus through a dirty or smeared windshield. Making sure the glass is clean can lead to a more relaxed and comfortable drive, especially on long trips.
- • Prevents Wiper Damage: Dirt and grit on your glass are like sandpaper, wearing out your wiper blades long before their time (they’ll skip or chatter) Surface dirt in particular can shorten the lifespan of your wipers and affect their performance.
- Prolongs the Life of Your Glass: Things like bird droppings, tree sap and hard water spots can etch into your glass over time if not treated. This also removes these threats before they damage permanently.
- Enhances your car appearance: There’s no denying that a car with crystal-clear, sparkling windows just looks better. It reflects pride of ownership and gives your vehicle that “detailed” appearance.
What You’ll Need (Tools & Products)

Having the right tools is half the battle. Forget the newspaper and paper towels of the past; modern materials make the job easier and more effective.
- 1. High-Quality Automotive Glass Cleaner:
- Details: Select a cleaner that is designed for automotive glass. These are formulated to dissolve road dirt, oil and dried bug guts without leaving a residue. If you have tinted windows, skip cleaners that contain ammonia, which can eat away at tint over time. And the best available options include Invisible Glass (a hobbyists’ favorite) and Stoner Car Care products.
- 2. Microfiber Cloths (Minimum of 2, ideally 4):
- Details: This is non-negotiable. Microfiber is also superabsorbent and it traps dirt particles in between its fibers instead of just moving them around, avoiding scratches. You require one cloth for spreading the cleaner and wiping away the first layer of grime, and another — completely dry — cloth for your final buffing to a streak-free finish. Paper towels can also leave lint and scratches.
- 3. A Bucket of Clean Water (Optional but Recommended):
- The What: If your windshield is very dirty, a water rinse will remove loose dirt and grit before you wipe it with a cloth. This is an important step to avoid scratching the glass.
- 4. Invisible Glass Reach & Clean Tool (Optional but Game-Changing):
- Details: Cleaning the bottom of the inside windshield is a chore that requires back-breaking effort. The tool has a long handle and a pivoting head that holds a microfiber bonnet, enabling you to reach those tricky areas without having to contort your form. It’s a lifesaver for people with any kind of mobility issues or anyone who hates the awkward stretch.


Step-by-Step Guide (How-To)

Follow this process meticulously, and you will achieve professional-grade, streak-free results every time.
Step 1: Preparation – Set Yourself Up for Success
Keep your vehicle parked in the garage or shaded. The first reason is that direct sunlight causes the cleaning solution to evaporate far too quickly and therefore streaks. If the glass feels hot, allow it to cool. If the windshield is really dirty, rinse it quickly with water to remove loose dirt and prevent scratches.
Step 2: Clean the Exterior – Vertical Motion
Start with the outside. Spray your glass cleaner onto one of your microfiber cloths, not directly onto the glass. This prevents overspray and controls the amount of product used .
- Wipe the entire exterior surface using vertical (up-and-down) strokes .
- Use your second, dry microfiber cloth to buff the glass dry, still using vertical strokes. This ensures all the cleaner and dissolved grime is removed.
Step 3: Clean the Interior – Horizontal Motion
Now move inside. Spray the cleaner onto a fresh microfiber cloth.
- Wipe the entire interior surface using horizontal (side-to-side) strokes .
- Use another dry microfiber cloth to buff the interior glass dry, still using horizontal strokes.
Step 4: The “Cross-Hatch” Method for Stubborn Grime
If your windows are very dirty, use the “cross-hatch” technique on the first wipe. For the first, wipe in vertical strokes and immediately thereafter wipe in horizontal strokes overlapping each pass. This will also make sure you break up and lift all the dirt. Then perform final buffing in the same direction mentioned above.
Step 5: The Final Inspection
The reason they go different directions (horizontal inside, vertical outside) is genius: if you see one of the horizontal streaks, it’s on the inside. If you see a vertical streak, that’s on the outside. Use the dry side of your buffing towel and re-clean that spot.
Cost Breakdown
Achieving a streak-free shine doesn’t have to break the bank. Here’s a breakdown of potential costs.
| Item | Budget Option | Mid-Range Option | Premium Option |
|---|---|---|---|
| Glass Cleaner | DIY Vinegar/Water Solution (~$2) | Invisible Glass (Aerosol or Trigger) ($5 – $8) | Chemical Guys or premium eco-friendly brands ($8 – $12) |
| Cloths/Tools | Old, lint-free cotton cloths (Free – $2) | Pack of 6-12 high-quality microfiber towels ($10 – $20) | Invisible Glass Reach & Clean Pro Kit ($20) + premium microfiber |
| Extras | White vinegar & water ($1) | Clay bar kit for deep cleaning ($15 – $25) | Professional-grade rain repellent coating ($15 – $30) |
| Total Estimated Cost | ~$5 | $30 – $50 | $50 – $80+ |
- Explanation: The budget option relies on household items and is effective for basic cleaning. The mid-range option is the “sweet spot,” offering professional-grade chemicals and tools that make the job easier and more effective. The premium option includes specialized tools for hard-to-reach areas and protective coatings that enhance visibility in rain.
Before and After
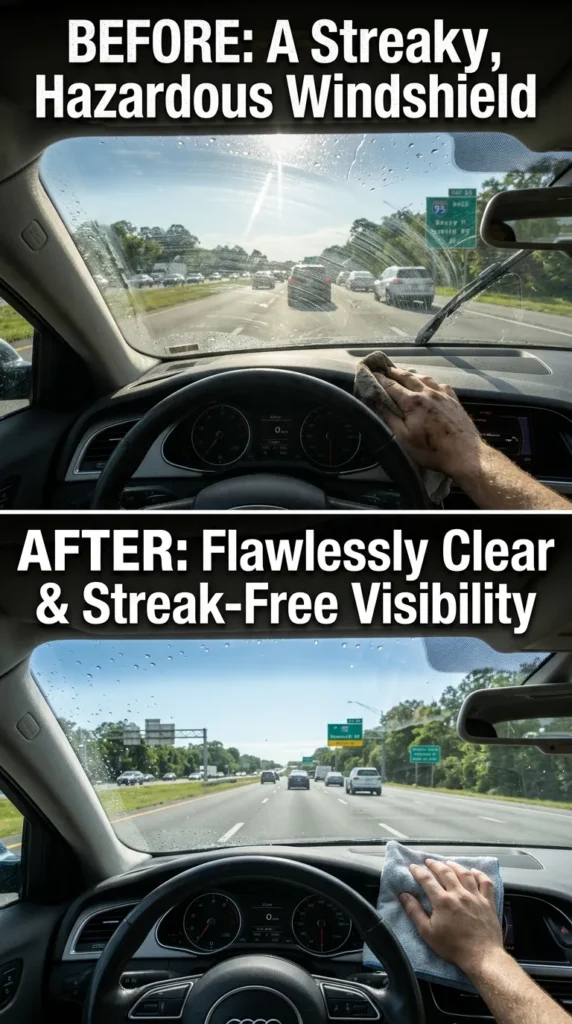
- Before: A job of cleaning the windshield that failed to remove streaks. The glass is opaque, particularly in sunlight. It’s smeared and streaked in a way that catches light and creates hazardous glare at night. Rainwater doesn’t bead off; it sheets across the glass, obscuring vision even more. The inside is cloudy with a filmy layer of off-gassing plastics and tobacco smoke.
- After: The glass is optically clear — it appears as if there were no glass at all. Sunlight filters through without forming distracting starbursts. On darkling roads, oncoming lights are sharp and precise. Water beads and rolls off easily (particularly if a sealant was applied), while the interior glass is free of the film that causes fogging. The entire vehicle seems and feels cleaner.
Product Recommendations (Premium)
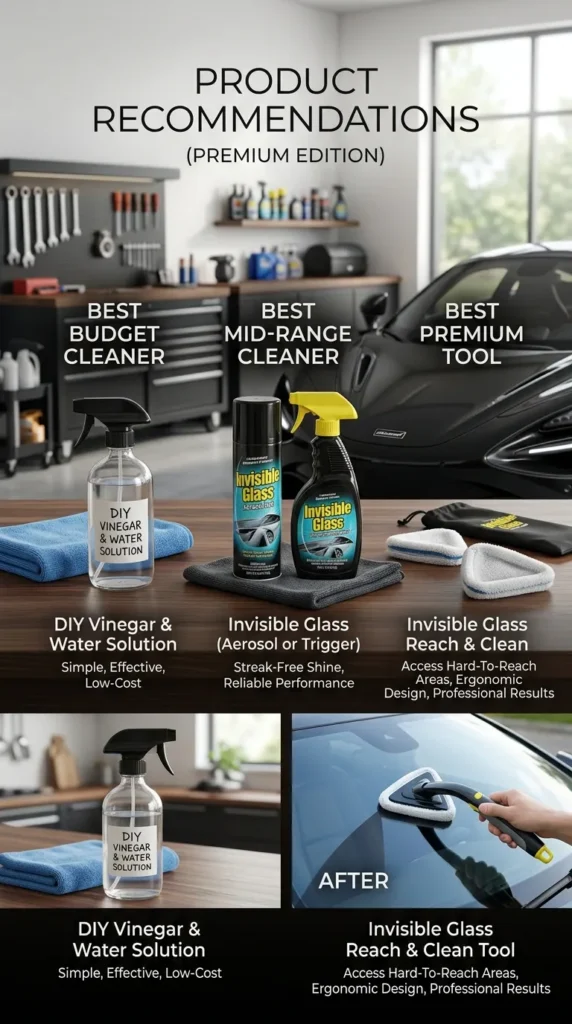
- Best Budget Cleaner: DIY Vinegar & Water Solution
- Recommendation: Mix equal parts distilled white vinegar and water in a spray bottle. It’s inexpensive, ammonia-free and effective at cutting through light grime and leaving dirt behind without streaking. The smell dissipates quickly.
- Best Mid-Range Cleaner: Invisible Glass (Aerosol or Trigger)
- Recommended: Widely regarded as the gold standard for automotive glass cleaning. It has a low-dust, low-residue formula that quickly and cleanly evaporates without leaving streaks. In independent tests it was a top performer.
- Best Premium Tool: Invisible Glass Reach & Clean Tool
- Recommendation: If you have trouble cleaning the inside of your windshield, this tool is worth every penny of its $20 price tag. It has a long, ergonomic handle and a pivoting head that can be outfitted with reusable microfiber bonnets. It makes cleaning your entire interior windshield easy, and keeps you from smearing grime onto your dashboard.


Comparison Section: Sprayway Glass Cleaner vs. Invisible Glass
Two heavyweights in the cleaning world often go head-to-head .
- Option A: Sprayway Glass Cleaner
- Pros: This aerosol foam is super popular and well-endorsed for its stain-clearing prowess. It adheres well to vertical surfaces without dripping. Its classic, strong “clean” scent has won many fans.
- Cons: The scent can be overpowering for those with sensitive noses . It’s a great cleaner, but some users find the strong smell a drawback for interior use.
- Option B: Invisible Glass Cleaner
- Pros: Invisible Glass is a product designed specifically for cars. It also has a lighter, less-caulky odor that’s much more tolerable when cleaning the interior. It’s known for its fast evaporation and wipe-on, zero-residue formula left crystal clear glass with little buffing required.
- Cons: The trigger spray type can be a little drippy if you overspray. Aerosol version is better but Sprayway is in the aisle and usually cheaper.
- Verdict: Both are excellent. Go for Sprayway if you value raw cleaning power and can deal with the scent. Grab some Invisible Glass, a more specialized, auto-specific formula that doesn’t stink up your nose box as much and leaves an optically clear finish.
Troubleshooting (Problem )
| Problem | Likely Cause | The Fix |
|---|---|---|
| Streaks after cleaning | Cleaner dried before wiping; dirty cloth; too much product. | Park in shade. Always use a clean, dry microfiber for final buffing. Mist lightly. Re-clean the affected area. |
| Hazy, greasy film (inside) | Off-gassing from dashboard plastics; cigarette smoke; previous cleaner residue. | Clean with a 50/50 vinegar/water solution or a dedicated auto glass cleaner. Use a fresh microfiber. This may require two passes. |
| Stubborn water spots | Hard water minerals have etched the glass. | Try a dedicated water spot remover or a mild polishing compound. For severe etching, a clay bar can help . |
| Wiper streaking/skipping | Wiper blades are worn; or glass has oil/road film. | First, deep-clean the glass with a dedicated automotive cleaner. If streaking persists, replace the wiper blades. |
| Persistent bug guts/tree sap | Dried-on organic matter. | Soak the area with a bug remover spray or a wet microfiber cloth for a few minutes to soften. Gently wipe away. A baking soda paste can also work . |
Time Required & Difficulty Level
- Time Required: 15-30 minutes.
- Exterior only: 10 minutes.
- Full inside and out: 20-30 minutes.
- Difficulty Level: Easy. It’s a straightforward process that requires no mechanical experience. It’s the patience and attention to detail that is a challenge but this build works step-by-step so it’s foolproof.
Pro Tips (Do)
- DO use the two-towel method: one for washing, one for buffing.
- DO roll your windows down slightly to clean the very top edge of the glass.
- DON’T clean your windshield in direct sunlight .
- DON’T use dish soap. It can leave a film that’s hard to remove and can degrade wiper rubber.
- DO clean your microfiber towels separately. Wash them with mild detergent and avoid using fabric softener, which clogs the fibers and reduces their effectiveness.
- DO use a sunshade on your dashboard. It reduces heat and the rate of off-gassing that causes interior film .
Best Picks (Top 3 Summary)
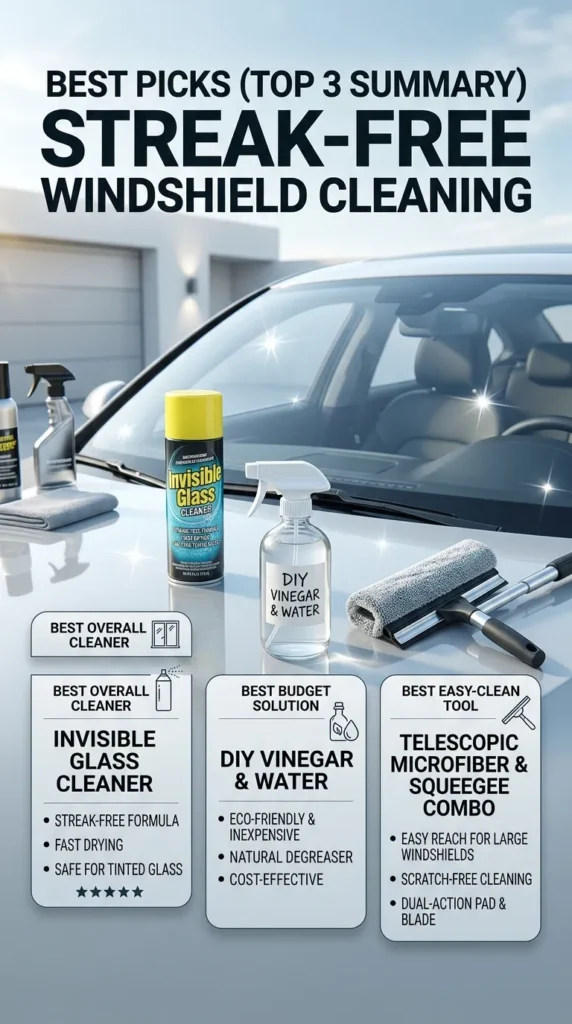
- Best Overall Cleaner: Invisible Glass Cleaner. It’s the top choice for its automotive-specific, residue-free formula that delivers a perfect finish every time .
- Best Budget Solution: DIY Vinegar & Water. It’s a surprisingly effective, eco-friendly, and incredibly cheap alternative that uses items you already have at home .
- Best Easy-Clean Tool: Invisible Glass Reach & Clean Tool. This makes the task fast, easy and effective by solving a decades-old problem of cleaning the hard-to-get-at inner windshield.
Use Cases (When to Choose What)
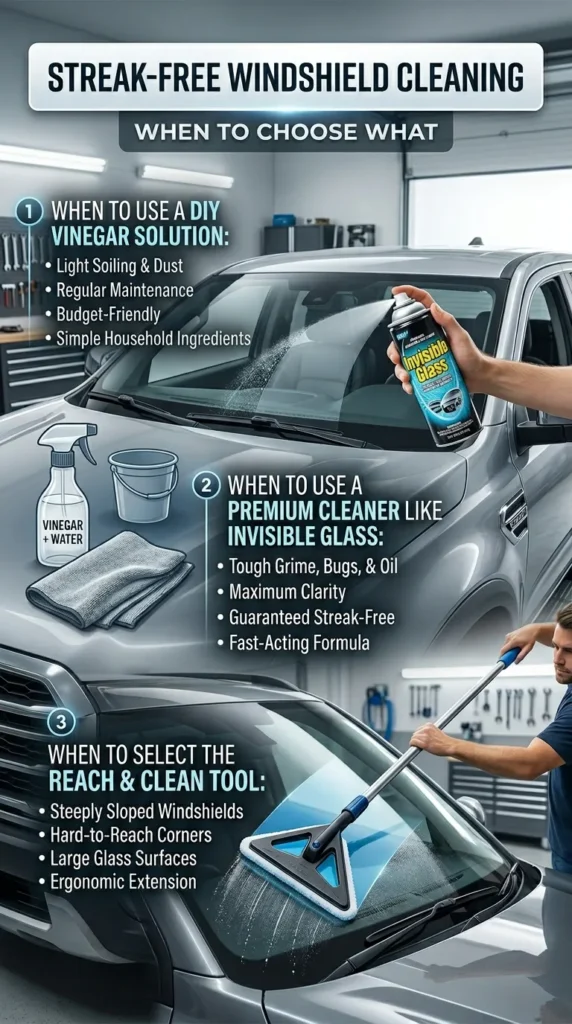
- When to Use a DIY Vinegar Solution: Go this route for a quick, eco-friendly and downright inexpensive clean of unstinted windows. It’s ideal for a weekly maintenance wipe-down to prevent light film.
- When to Use a Premium Cleaner Like Invisible Glass: Use this for a complete professional detail. It’s the best option if you’re facing heavy grime, prepping your ride for a road trip or readying your car for sale. It’s also the safest choice for tinted windows.
- When to Select the Reach & Clean Tool: Select this whenever you clean up the inside of your windshield. If you have back or shoulder issues, or simply detest that awkward stretch, this device is a permanent solution to the issue.
Common Mistakes to Avoid
- Cleaning in the Sun: The number one cause of streaks. The solution evaporates before you can buff it properly .
- Using Paper Towels or Old Rags: These leave lint and can scratch the glass .
- Using Too Much Cleaner: Excess product is hard to remove and leaves a residue. A light mist is all you need .
- Using a Dirty Microfiber Towel: A towel used for one window is now full of dirt. Flipping to a clean side or using a completely new one for the buffing step is essential.
- Forgetting the Interior: The inside gets just as dirty as the outside from dust, off-gassing, and fingerprints. A truly streak-free job requires cleaning both sides .
- Using Household Glass Cleaner with Ammonia: This can permanently damage aftermarket window tints and discolor them .
Safety Notes
- Ammonia and Tinted Windows: Never use a glass cleaner that contains ammonia on tinted windows. Ammonia can react to the tint film, changing its coloration (to a purple hue), bubbling or even delaminating & leaves the glass over time. Always read the label and go for an ammonia-free formula with tinted windows.
- Watch for Electrical Components: As you clean the inside windshield, be careful not to overspray cleaner onto the dashboard near electrical components and features such as rain-sensing wipers, automatic headlights or infotainment screens. Spraying the cloth with the cleaner first removes this risk.
- First, Make Sure You Have Proper Ventilation: Most automotive glass cleaners are low-odor (some manufacturers make them to be worked inside the car) but it’s always a good idea to do it on a well ventilated area. Use gloves to protect your skin if using strong solvents or industrial cleaners.
FAQs
- Can I use Windex on my car windows?
You can, but with caution. Classic Windex has ammonia in it, which can ruin aftermarket window tints. It works for non-tinted windows, but purpose-designed automotive glass cleaners like Invisible Glass are engineered to better tackle road film and tend to evaporate faster without as much residue. - Why does my windshield get foggy on the inside?
This is typically caused by outgassing from the plastics and vinyl in your dash when it warms up in the sun. It could also be young cigarette smoke or just the humidity in your breath mixing with dirt. - What is the best cloth to clean a windshield without streaks?
A high-quality microfiber towel is the undisputed best choice. It’s lint-free, highly absorbent, and traps dirt without scratching the glass . - Is it better to clean car windows with newspaper or microfiber?
Microfiber is better. Newspaper was the old school trick and it can work, but modern newspaper ink could occasionally smear and if the paper picked up a piece of grit it would scratch. Microfiber helps make it safer and more effective. - How do I get hard water spots off my windshield?
Water spots will often be mineral deposits, and on glass surfaces they can easily be corrected. A vinegar-and-water solution can usually break them down. On harder to remove spots, a proper water spot remover or clay bar with lube work excellent. - Why do I still have streaks after cleaning?
The three most common causes are: cleaning in direct sunlight (cleaner evaporates too quickly), using a dirty cloth (redistributing the dirt and grime onto the surface], or applying TOO much cleaner to one spot (and leaving excess residue). - How often should I clean my windshield?
To ensure optimal visibility, every car should be professionally cleaned inside and out with the right technique at least once a month. An occasional exterior wipe can also be done more frequently, as needed. - Can I use the same cloth for cleaning and drying?
No. You should always have at least two different cloths. One for applying the cleaner and working up that dirt, and a second cloth, completely dry and clean for the final buff to streak-free shine. - Does the Reach & Clean tool actually work?
Yes, reviews are overwhelmingly positive. It is incredibly helpful when cleaning up the inside of your windshield, particularly in those hard-to-reach lower corners without straining your back and shoulders. It’s got a 4.4 out of 5 on Amazon (thousands of reviews. - Is vinegar safe for car paint?
Excessive dripping and pooling of vinegar on your vehicle’s paint or wax will only make you need more car polish. Its acidity may over time, wipe away wax. If you have overspray always rinse the area thoroughly.
Final Thought
Getting a streak-free clean on your windshield isn’t about elbow grease or expensive products; it’s about technique. By mastering the basic principles — “work in the shade,” “use the right tools (microfiber and a quality cleaner)” and use of the directional wiping technique — you can ensure an immaculate finish every single time.
The returns on this tiny bit of investment in time and effort are huge: a driving experience that is safer and more pleasurable. You’ll remove dangerous glare, reduce eye fatigue and see the road with a clarity that you might not have remembered was possible. So load up the gear, find a sweet spot in the shade and give your car the crystal-clear view it — and you — deserves.
This article is best categorized into one of the following:
I believe this is the most fitting, most logical choice. However, its main focus is cleaning, so the best place for it would be “Car Cleaning” even though you could technically tuck it under Car Detailing -> Exterior Car Detailing.
Quick Affiliate Links Strategy
| Product | Best For | Commission Potential | Best Placement in Article |
|---|---|---|---|
| Invisible Glass Aerosol | Quick wins, beginners | Medium | Step-by-Step Guide + Best Picks |
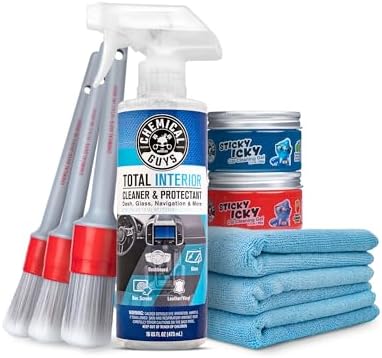
| Chemical Guys Kit | Maximum revenue | High | Product Recommendations + Comparison |
| Sprayway 6-Pack | Bulk buyers | Medium | Budget Section + FAQs |
| Jimbo’s Microfiber | Repeat purchases | Medium-High | Tools Section + Pro Tips |
| Reach & Clean Tool | Problem solvers | Medium | Troubleshooting + Interior Cleaning |


Leave a Reply